Tuesday, December 25, 2012

Door Punch Art and My Stampin'UP! Sale

Door Punch Art: Card made to look like a door using Stampin Up Punches and embossing folders
Merry Christmas!

Which ever side of a door you are on I hope you have a wonderful day.  

Inside: surrounded by warmth, good food, family and friends. . .  Or Outside: enjoying whatever nature has blessed you with (here in Wisconsin our official snow count for last week was 14.7 inches).

This cute door card was super easy to make.  I cut 2 strips of paper for the door panels (1.5" wide by 4-3/4" tall) and ran them through the Big Shot with the Woodgrain embossing folder. You could also substitute the Woodgrain background stamp if you don't have an embossing machine. Then I cut those strips into to pieces to get the 4 panels for the door. The door handle is a gold brad.

The wreath is made with 2 punched pieces, the 1-3/4" Scallop Circle and the 2-3/8" scallop circle.  Each one has a circle punched from the center.  You'll also notice the edges are sponged for greater depth. The bow is the 1/8" Taffeta Ribbon.  Gee it sure does tie nicely.  And by the way, this is a "fork bow".  Watch this video to see what I mean.

Being with family on the holidays is certainly a gift. But I have one more for you.  During the month of December you'll get double the Customer Rewards Points with every purchase.

Click here to read more about the Rewards Points
Click here to download catalogs
Click here to shop online

Happy Stamping and Happy Shopping
--Katie


Wednesday, December 19, 2012

Snowflake Confetti

Are you a fan of snowflakes?  People often ask me what basic stamp sets should a new stamper get.  Here is my short list:
   #1 a good versatile Sentiment set
   #2 a nice flower set
and I think a good winter set - something with snowflakes.

Well, here in Wisconsin we are bracing for lots of the real stuff - they tell us a blizzard is on the way for tomorrow.  So with that as a little inspiration here is a snowflake card.

The main image on this card is from a set called Snowflake Soiree, which is in the Holiday Mini Catalog. I stamped it in Versamark on Night of Navy cardstock and heat embossed it with Silver Embossing Powder. It was punched out using the 2-3/8" Scallop Circle Punch.

The background snowflakes are from a very versatile set called Confetti. There are 6 images in this set that really cover a wide range of background needs.  I used the same snowflakes as the background on this card

Maybe I should add Confetti to my short list of basic sets.  Remember, you may be buying a set during one season, but its nice if it can be versatile enough to cover more than one season. And this set certainly can. See the little hearts in the set? I'm looking forward to using it for valentines too.


The Sentiment is from a set called Friendly Phrases. I created this card to use for thank-you notes after Christmas.

This phrase seemed to be very fitting for a thank-you note.  But it does make me giggle a little using it with the snowflakes.  Does it mean this big snowflake in the middle is the best?  Isn't every snowflake supposed to be different?  And how could you tell anyway, they're all so pretty.

Either way, I'm looking forward to seeing lots of pretty stuff tomorrow...snowflakes coming down like confetti.

If you need a good snowflake set then consider this one, Snowflake Soiree.  And by the way: all orders placed online during December will earn Double Rewards Points. Maybe its time to give yourself a Christmas present.

Happy Stamping
--Katie


Tuesday, December 18, 2012

3D Christmas Tree from the Pennant Punch

Card with a 3D element, a Christmas tree made with Stampin'UP!'s Pennant PunchIts always fun to add some dimension to a card. I love doing this trick with punched images because it folds flat into an envelope but it sure gives a surprise to the person who opens the envelope.

This card was made with the pennant punch. Don't you think this pennant makes a cute Christmas tree? I just used plain green card stock but you could dress it up a bit by using Designer Papers.

The pictures below will explain how its made.  You end up with a 3D element that can fold flat

Try this 3D trick with the heart or the ornament punch. About a week ago I posted  one done with the ornament punch. I've also used it with ovals to make a pumpkin.  Just cut the bottoms off the ovals to give them a more pumpkin-like shape.


Step 1: How to make a 3D Christmas tree with Stampin'UP!'s Pennant Punch
Punch 4 pieces. One will be the base (red in this photo). Fold each of the other 3 pieces vertically
Step 2: How to make a 3D Christmas tree with Stampin'UP!'s Pennant Punch
Glue one folded piece (orange in this photo) to 1/2 of the base piece
Step 3: How to make a 3D Christmas tree with Stampin'UP!'s Pennant Punch
Glue a 2nd folded piece (yellow in this photo) to the other half of the base piece
Step 4: How to make a 3D Christmas tree with Stampin'UP!'s Pennant Punch


Glue the last piece (blue in these photos) to the tops of the 2 folded pieces that you already have on the base.
A 3D Christmas tree made with Stampin'UP!'s Pennant Punch
Punches are so much fun to play with. Stampin'UP!'s large selection of punches are found in the 2012-2013 main catalog on pages 182-185. You can download your own PDF version of the catalog HERE. Or contact me to get your own paper version.  I love having the paper version because I write in mine. I mark the stamps and tools I own and I fold down tabs on the samples I want to try. But I also really appreciate having the PDF version for quick references.

And if you have as much fun playing with punches as I do then be watching for the Spring Mini Catalog and the Sale-a-bration brochure.  They both ave new punches in them that I think you're gonna love.

Whoo-hoo - Sale-a-bration is only a month away!

Happy Stamping
--Katie 


Monday, December 17, 2012

Punched Banner Corners - Save Those Scraps!

Banners are a great way to highlight a sentiment. They look good AND they're a great way to use up scraps. Are you like me? I save all my scraps, so I love it when I find a way to use some of them.

How do you make a banner?  There are several ways - what's your favorite?
  1. Use our  banner framelits dies
  2. you can cut the tails free hand
  3. Or use your square punch!
For both of these cards I stamped the sentiment on a strip of paper and used a square punch to create the banner tails. Here's a 3rd card too.

Banner tail made with a square punch

Card made with Stampin'UP stamp set called: Christmas Lodge, banner tail made with a square punch
Card made with Stampin'UP stamp set called: By the Seashore, banner tail made with a square punch


Its super easy: when you look through the hole in the bottom of the punch. Put your paper strip in one corner and make sure its symmetrical.

You can control the size of the tail 2 ways:
1. depends on how far you put it in the punch
2. and depends on what size punch you use

The card above was stamped with a set called  By the Seashore.  Its kind of similar to a seashell card I posted in August. I really like the white wood look on this card - which again was a scrap strip of paper.  I got that wood look by using our Woodgrain embossing folder.

The shell card above was used to demonstrate the technique of Acrylic Block Stamping, see more samples here.  Banners are a good way to highlight a sentiment and using your acrylic blocks to create a backbround is a good way to highlight your main images.

The card to the left was also made to demonstrate a technique.  This one shows how to create a sun or moon by masking off an area and sponging around it.  We did this technique for our September Technique lessons on Moonlighting, see more samples here.

And, in case you are wondering, this card was stamped with images from a set called Christmas Lodge.

Are you local?  Join us for technique classes and stamping events.  Check the calendar for class dates and times and you can RSVP directly to the events page. I also do private classes for 5 or more people. Why not get together with a few friends and let me teach you some really fun ways to be creative. Locations are flexible, your place or mine.  

Contact me to schedule your event.  
by email or by phone (608) 220-3450 
HappyStamping
--Katie


Sunday, December 16, 2012

Double Loyalty Points in December

Are you somebody who likes to save money?  Silly question, of course.  Well, here's a few options to consider as you plan how to spend your hobby money.

  1. Shop the Clearance Rack:   
    *You'll find amazing deals. 
    *BUT - you have to order this stuff yourself, online.  Demonstrators can not accept orders from customers for clearance rack items because the stock might sell out between the time you pay me and when I submit the order. 
    *Stampin'UP! is always updating whats available there
      so check it often - see the clearance rack HERE

  2. December = Double Loyalty Points
    *My customers earn Loyalty Points.  You can read more about what kind of orders qualify for the points (basically anything that is outside of a party or club and not part of some other sale I'm running).
    *AND you get Double Points for all orders in December!
    blank line
  3. Buy the Starter Kit - its "INKredible"
    How long is your wish List?  The Starter Kit is great way to stretch your hobby dollars. AND today is the FINAL day to get 10 FREE INK PADS with your Starter Kit. (Your choice of the Brights, the Subtles or the Regals).

    The starter Kit is always a good deal and today only its even better.  I'll be watching Green Bay win (ever the optimist here) but I'll have my cell phone on to answer questions (608) 220-3450. ACT NOW if you want the FREE INK PADS.

    You pay only $99 and you get to choose $125 worth of product.  And there's NO SHIPPING on the Starter Kit. There is also NO OBLIGATION to buy anything further. Opportunities, yes! Obligation, no!  Contact me for more details. Or buy the starter kit now, choose JOIN NOW on the left.


blank line
and another blank line

blank line

Happy Stamping
--Katie

Saturday, December 15, 2012

Winter Card with Sponged Snowdrifts

Winter card made with Stampin Up stamp set: Confetti
Sponging is such a great technique, and its so easy.  All you need is your ink pads, some scrap paper and some sponges.  Its a perfect way to make mountains, hills and snowdrifts.

Here's how to do the sponging
  • Tear the scrap paper to get  a rough edge.  
  • Then lay the scrap paper where you want the snow drift to be.  
  • Ink up the sponge and brush it along the edge of the scrap paper - instant snowdrift.
  • Be sure to scroll to the bottom to see how you can get a set of free ink pads!
stampin'UP stamp set: ConfettiHow do you like the "window" effect on this card? The window opening was cut with the Labels Collection Framelits.    Of course if you don't own a Big Shot (or other die cut machine) you can always hand cut a window.

Those cute tiny little snowflakes are from a stamp set called Confetti.  They're just the right size for this "window". What I did here was emboss the snowflakes in white before I sponged on the sky.

There is sponging on that gorgeous tree too. The tree was embossed with the Fancy Fan embossing folder.  I really like the way it looks like the branches of a Christmas Tree.  I used Lucky Limeade, which is a pretty bright green and then sponged some more green over the texture embossing to make the texture stand out. And of course you can't forget the star on top.  That was punched out of Champagne Glimmer paper.

card made with Stampin Up stamp set: Winter MemoriesThe sentiment just seemed to fit the card.  Yes I mean the size space that was left for it.  But also the idea - cold outside, warm feeling inside.  The words "Warm Winter Wishes" are part of a stamp set called Winter Memories.  

I've used the Winter Memories Set a lot too. Its especially great if you are someone who likes to color.  Check out this card with the sled.

And even if you don't like to color you can make some great looking projects with a minimal amount of color, like on this card with the ice skates.

Speaking of color, we're down to the final 2 days of the INK-redible ink pad offer. When you buy the Starter Kit, along with all the other great things you'll get (like a 20% discount on future purchases and access to exclusive websites) you'll also get your choice of a FULL SET of ink pads for FREE (your choice of either the Brights, the Regals or the Subtles).  You can read more about this offer HERE, - or contact me by email (or phone 608-220-3450) for more details.  But you really can't wait on this because the offer is only good through tomorrow.

Happy Stamping
--Katie

FINAL 2 DAYS   - -  GET YOUR FREE INK PADS NOW!


Friday, December 14, 2012

Reindeer Punch Art

Card with a punch art reindeer
Do you enjoy making punch art? I love playing around with punched pieces and seeing what new combinations I can create.  I always feel like I got more than what  I paid for when I can make my punches do more than the obvious. 

This Punch Art Reindeer is made from 4 different punches: the Pennant Punch, the Bird Builder Punch, a small circle punch and a square punch.  Although, the square punch is just to make the stable window and you could cut that with the blade on your paper trimmer.

Do you own these punches? If you DO already own these punches then its pretty easy for you to figure out how to make him. If you DON'T own the punches then this photo recipe card will help you see how he's made.

And don't you just love the self-stick googlie eyes.  I could have done the eyes with punches too but I just love using the little wiggly eyes.

There are a few other differences between the card above and the set of instructions.  

Instructions for making a punch art reindeer
(1) The Nose:  For the instruction sheet I punched his nose from red glimmer paper.  For the card the nose is a colored pearl. Yes - you can color our pearls.  You have to use a Sharpie but it works. Check out this other post with colored pearls - on this card the pearls become red berries

(2) The Face: card I used DSP (Designer paper) and on the instruction sheet I used plain paper. The DSP might be a little much? What do you think?

(3) The Ears: on the card I used just 1 color but on the instruction sheet I used 2 colors.  I think I like the 2 colors better.

Here is another punch art reindeer - this one is used as a bag topper for some candy treats.

Did you find this interesting and useful?   
Share this information with others.  Tell all your crafty friends about this website. 

Happy Stamping
--Katie


ONLY 2 DAYS LEFT TO GET YOUR FREE INK PADS!


Thursday, December 13, 2012

Coloring with DSP!

Card made with Stampin'UP! stamp set Snow Much Fun and colored with (DSP) Designer papers
Have you tried this impressive little coloring trick?  Color your images with DSP (Designer Series Paper). Its a great way to get both color AND a pattern onto your images.

Parts of this image were colored with markers: the boots, the band on his hat and the buttons and birds. The rest, his hat and scarf, were colored with DSP.

Coloring with DSP is a super easy technique!  
1. Stamp the image on your project
2. Stamp the image AGAIN on a piece of DSP
    hint: smaller patterns work better
3. Cut out the parts you plan to use from the DSP
    and attach to the project

VOILA!

The snowflake embellishment in the bottom corner was created with the new Snow Flurry Die from the Holiday Mini Catalog. I cut the smaller snowflake from Silver Glimmer paper and embellished the center with a self-stick pearl
Card made with Stampin'UP! stamp set Snow Much Fun and colored with (DSP) Designer papers Stampin'UP! Snow Flurry snowflake die.

Stampin'UP! stamp set Snow Much FunThe snowman is from a stamp set called: Snow Much Fun found in the main catalog. These 2 little guys are so cute and the variety of images in the set really lets you do a lot with them.
  • The 2 snowmen are facing the right direction to show them interacting with each other (can you see a snowball fight?)
  • The images can be inked with a marker (instead of an ink pad) so you can stamp just the bird, or just the snowball, or the snowman without the birds. Here is the tall snowman without one of the birds
 The possibilities are endless.  What kind of scenes would you create from these images?

Coloring with Designer Papers is a really fun technique. And Stampin'UP! has so many papers to choose from.  My hints for trying this are (1) to choose images that are easy to cut out (you'll notice I did not cut the fringe on his scarf) and (2) to choose a paper with a smaller print design.  Other than that its super easy and fun.

Stampin'UP! INK-redible Ink Pad OfferWhen coloring the traditional way - with ink pads and markers - its nice to have a large selection of colors to choose from.  If you're looking for a way to get lots of colors fast then consider buying the Starter Kit.  You still have 3 more days to get in on the INK-redible FREE INK PAD offer.

When you buy the starter kit you get to choose $125 worth of product - any product - and pay only $99.  And for the next 3 days you'll also get a free set of ink pads (either the brights, the subtles or the regals) along with everything else you order.  You can read more about the details here or email or phone me for more details (608)220-3450. But there are only 3 more days left to get in on this special deal. This offer ends Dec 16th.

Happy Stamping and Happy Coloring
--Katie


QUICK LINKS


Wednesday, December 12, 2012

Sponged Winter Landscape for a Christmas Deer

Sponged Snowdrifts and Christmas Deer.We finally got a little snow so at least our landscape now looks like what I remember for a Wisconsin winter.  Although we have just a dusting, not nearly the drifts you see on this card.

This handsome fellow is from a new set called Christmas Deer.  The set is in the Main Catalog and includes lots of little things that could be used to decorate his antlers.  


I designed this card  for a technique class on sponged landscapes.  As a bonus technique, the card also uses an emboss resist technique.  
    StampinUP! stamp set: Christmas Deer
  • The snowflakes and the deer are both embossed.  The Deer was stamped with black craft ink and the snowflakes were stamped with white craft ink.  Both were embossed with clear embossing powder.
  • Tear or cut a curve shape from scratch paper to use as a mask for the snowline.  
  • Sponge color above the mask for the sky.  I used Pool Party and Wisteria Wonder.
  • Move the mask down a little to get a second snowdrift
StampinUP! stamp set: Snowflake SoireeThe sentiment for this card had to be small.  The scene was so gorgeous that I didn't want to compete with the landscape by using anything too big.  This little sentiment from Teeny Tiny Wishes is just perfect for the corner.  

The snowflakes are from a set called Snowflake Soiree. The final touch is a tiny pearl in the center of each snowflake. The snowflake set is in the Holiday Mini Catalog. People often ask me what basic kinds of stamps they should have.  Living in an area where we get snow I always say a good snowflake set should be one of your sets.

December is the last month to get things from the Holiday Mini so if there's something in there that you've been hesitating over, now is the time to get it.

Happy Stamping
--Katie

ONLY 4 DAYS LEFT TO GET YOUR FREE INK PADS!


Tuesday, December 11, 2012

Are You Counting the Days?

Stampin'UP!'s INK-redible Ink DealThis is the season when people often count the days
  *how many days to Christmas
    (the answer is 14 days left! - is your shopping done?)
  *how many days to the New Year
    (the answer is 24 - got your party plans set?)
  *the days of Hanukkah
    (the answer is 8 - and Hanukkah is NOW - Dec 8-16 this year)
  *how many days to Sale-a-Bration
    (the answer is 42 - Sale-a-Bration starts Jan 22)
  *days left of the INK-redible ink pad offer
    (the answer is 5 - this offer ends Dec 16th)


Old Felt Ink PadWhat do your ink pads look like?

When felt base ink pads get old

1. The surface becomes uneven
    . . . which makes it harder to ink the stamps

2. They start to fray and get loose threads
    and the layers begin to separate
    . . . both of which makes them dry out faster
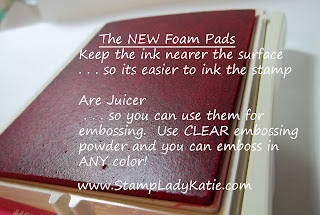

Stampin'UP!'s INK-redible new foam padThe New Foam Pads

1.  Keep the ink nearer the surface
     . . . so it inks the stamp more effectively

2.  They are juicer      . . . which means you can
      use them for embossing (like Versamark).
     Use CLEAR embossing powder
     and you can now emboss in ANY color!

Are your ink pads getting old?

Would you like more ink pads in different colors?


Yeah, maybe, so what is this INK-redible Ink Pad thing?
You get 10 FREE ink pads (either the Brights, the Regals or the Subtles) when you Join Stampin'UP!

Hmm . . . What does that mean? "Join Stampin'UP!"
It means you Buy the Starter Kit.  You can use it to start a business as a demonstrator -OR- you can use it to start (or enhance) your hobby of stamping. Yep, buy the starter kit with NO OBLIGATION to buy anything else.  Opportunities yes, obligation no.

OK, I'm listening.  What do I get?
This is the cool part. You pay only $99 (oh, and by the way, there is also NO SHIPPING charged on the Starter Kit).  Ok, so you pay only $99 (plus tax of course) BUT you get to choose up to $125 worth of product - ANY product you want from either the Main Catalog, or the Spanish Catalog or the Holiday Mini Catalog. AND through Dec 16th you'll also get the FREE ink pads which is another $49.95 value.  Really,  $175 worth of stuff for only $99!  This is the Holiday Gift I'd like to give to myself!

And it gets even better:  Because we are so close to the change over of the catalog, you could also use your $125 to buy things from the new Spring Catalog. I've mailed this new catalog out to my regular customers. If you don't have one yet just let me know and I'll get you a copy so you can see if there are things you'd like to choose from it.

Keep talking - do I get anything besides the stuff I buy? . . . Of Course!
  • Discounts on Purchases: For the next 6 months you'll get 20% off of any future purchases.  And if you buy $150 worth of product within  the first 45 days after you buy the kit you'll get 30% off of that one purchase.
  • Access to exclusive websites with ideas and how-to information. Stampin'UP! has one site and I maintain a second website for people on my Team.
  • Networking Opportunities: The opportunity to trade and network with other demonstrators to get project ideas and to increase your knowledge of stamping skills and techniques
Let me get this straight
  • I pay $99 (plus tax), and get $175 worth of product
  • no shipping charges
  • and for 6 months I get a 20% discount, but I don't HAVE to buy anything
  • if my first order is over $150 within 45 days I actually get 30% discount (but I don't have to do this)
  • I get access to the demo only ideas websites - even if I never make any other purchases
Yes indeed - that's it,  plain and simple. 
Do you have $125 worth of product on your wish list?

OK - I'm gonna do it.  How do I start? - - (and YES, I'll  do this before the 16th)
GO TO THIS SITE and click JOIN THE FUN on the left side of the page.
You can download a set of step-by-step instructions here.

I think you'll be glad you Joined Stampin'UP!  And I know you'll love the new Ink Pads

Happy Stamping
--Katie

Monday, December 10, 2012

Sponged Silhouette

Here is an easy way to do a silhouette.  The birds are punched from black paper using the Bird Builder Punch. They are adhered directly to the card. This is a regular size card (5.5" x 4.25") and there really is not room for 3 full size birds so the one on the left is only a partial bird.

The background was sponged on: Old Olive on the bottom, So Saffron, Calypso and Tangerine on top. I really like the look of the green on this card, it reminds me of low growing bushes. I love the birds silhouetted against this sponged landscape.

The sentiment fits so nicely in the narrow empty space at the bottom of the card. That sentiment is from a set called Curly Cute.

Sponges are a great way to apply color. And they're inexpensive too. You get 3 to a pack and I always cut my sponges into 6 wedges.  So I'm really getting 18 per pack. Plus I save them.  I staple a piece of the matching color paper to each sponge so I know what color its been used with. I have sponges that I've been using for 5 years now and they still work great!

This card was part of a group of cards we did for this month's technique: Sponged Landscapes.  Check back over the next several days to see other cards with sponged landscape backgrounds.  A few have green foliage like this one. Others have a snow drift base. And hey, we just got some snow. Finally. Southern Wisconsin is supposed to have snow in December!

Get your sponges and all your Stampin'UP! supplies at my on-line store.

Happy Stamping
--Katie

ONLY 6 DAYS LEFT TO GET YOUR FREE INK PADS!


Saturday, December 8, 2012

Big Wishes for Some Snow Fun

Card made with Stampin'UP!'s stamp set: Snow Much Fun.
Around here we are wishing big for some snow.  Last year southern Wisconsin got hardly any, very unusual. We're ready for some white stuff so we can do a little cross country skiing. Its "Snow Much Fun"!

For this card I inked the stamp with a marker because I wanted to play around with some creative inking. The birds gradually disappear and so does his smile. I wanted him to look a little worried. Each panel is 4" by 1-5/8" and by panel #3 I wanted his face to show that he's not having snow much fun.


 Stampin'UP! Stamp Set: Snow Much FunIn fact, that is the name of this stamp set. . . Snow Much Fun.  I've seen other cards with this design and thought it was so cute, the snow building up to bury the snowman. The tall snowman in this set was just the right size to be buried by snow.
 
Since we're wishing for snow the perfect sentiment was: Wish Big, from a stamp set called Word Play.

Stampin'UP! Stamp Set: Word Play          Card made with Stampin'UP! Stamp Set: Snow Much Fun

Stampin'UP! sells single stamps
Did you know you can now buy single stamps from selected sentiment sets? 
The stamps in this set can all be purchased individually. 
See the selection of single stamp options HERE.

Well, 4" of the white fluffy stuff is supposed to be coming on Sunday.  So hopefully I'll be able to have a little fun in the snow. And then come in for a little fun stamping.

You can shop for your Snow Much Fun stamp set, single stamps and all your Stampin'UP! product HERE.

Happy Stamping
--Katie


Friday, December 7, 2012

Winter Memories - Simple Pleasures

Card made with Stampin'UP! stamp set: Winter Memories and the woodgrain texture embossing folder.
This card really does bring back memories!  The skate image and sentiment are from a stamp set called: Winter Memories. When I was a kid we lived in a semi-rural area.  There was an abandoned farm on the corner with a big pond and we used to take our ice skates down there on Saturday afternoons.

Life was so simple back then. We were easy to please: a little snow, a little ice, sharp skates and hot chocolate waiting when we came home.

Well, I'm sill easy to please, a few stamps, some ink and paper, and of course that hot chocolate.  

This card is pretty easy too. Stamp in black ink and add a little color for the holly.  It would have looked good with a plain white background. For this one I did add a texture embossed background using the Woodgrain embossing folder.

I think this card looks good with minimal color.  Other projects need lots of color. And speaking of color:  How would you like to get 10 ink pads for free?

Would you like to replace your old felt pads with the new foam pads?  Or maybe you are just starting out in this hobby and looking for an economical way to get lots of colors right away. If so, then pay attention.

The Starter Kit is on sale from now through Dec 16th.  Thats only 9 more days!   
You can buy the Starter Kit even if you don't want to be a demonstrator.  Yes, you heard that right. And here's why you should consider it.
  1. You Save Money! Big Time! 
    You are going to pay $99 (plus your state sales tax) for the kit. 
            You are going to get $125 worth of product
    PLUS (until Dec 16th) a FREE SET OF INK PADS.  That's an additional $50 value. 
    AND there is NO SHIPPING charge on the Starter Kit - that's another $10+ of savings!
    so for $99+tax you get $175 worth of product
  2. The Kit is totally customizable - there are no mandatory purchases, you totally pick and choose what ever you want.
  3. There is No Obligation to do anything else. - but if you do decide to place additional orders you will get the demonstrator discount. You'll get 20% off all future purchases as long as you maintain the minimums. But you don't have to place any additional orders. Its totally optional.
  4. AND, I have an exclusive website for people who buy the Starter Kit from me. It has project photos and ideas for holding money making workshops and classes of your own if you want to do that. I know that most people buying the Starter Kit are just starting out and  I want to help you as much as I can.
The Starter Kit is a great deal financially.  The regular price itself is a great deal but right now its an amazing deal.  Investing $99 in your hobby right now really makes sense.  Whats on Your Stamping Wish List?

So how can you get in on this?  Click HERE to go to my business Website
-or- Download a pdf HERE → with the step-by step directions for ordering your Starter Kit.

And feel free to call me (608-220-3450) if this didn't answer all your questions. I'm happy to answer your questions about the kit and I'm happy to talk you through the on-line part of buying it.

Remember, this offer ends Dec 16th.  The sooner you order your kit the sooner you get your new supplies.

Happy Stamping
--Katie

Wednesday, December 5, 2012

3 Dimensional Ornament Elements

3D Card made with the Ornament Punch and Tags Til Christmas Stamp Set
Add a little "WOW" to your projects with a 3D ornament. This card has a 3D element that was made with the Ornament Punch and a matching stamp set.

By the way, I really like the fact that Stampin'UP! has so many sets of matching stamps and punches, and matching stamps and dies.  I think it really adds a professional look to a project when its punched or die cut.  The ornament image on this card came from a set called Tags Til Christmas.

The 3D effect was really easy to create:  The photos below tell it all.
  • you stamp and punch 3 ornaments and then punch one plain one. The plain one is the base. 
  • Fold the 3 stamped ornaments in half
  • glue one folded ornament to each side of the base and glue the 3rd one flat on top the other two.
Hot-to photos showing how to make the 3D element with the ornament punch

How to tie the twine to suspend the 3D ornament element
Then you get the fun of making the rest of the card.  For this one I added a pearl in the center of the ornament. and stamped the sentiment.  

At that point it still looked a little bare. So I made it look like the ornament was hanging from a little string.  Stampin'UP!'s Baker's Twine was perfect for this card. I threaded the twine through the hole and tied a bow on the card. Then adhered the parts.

Stampin'UP!'s Ornament Kit
Have you noticed the gorgeous 3D ornament on the front of the Holiday Catalog?  Guess what! Its now available as a KIT!  You get all the pre-stamped, diecut images ready to assemble.

The kit is item #1332832 
and sells for $14.95
Available while supplies last.

The assembly on these ornaments is similar in concept to the card I just showed above.  You can download this PDF set of directions for making these gorgeous ornaments.  Where would you use them? Would it hang from your tree?  Or go on top a special gift?  Or maybe the center of a wreath or as part of a door decoration?  The possibilities are endless.