Showing posts with label Technique - Acrylic Block Stamping. Show all posts

Tuesday, December 24, 2013

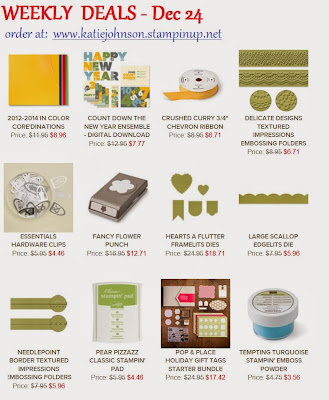
New Weekly Deals includes the Delicate Designs Embossing Folders

Stampin'UP!'s Weekly deals for Dec 24 2013
Its Tuesday and Stampin'UP! has just released its new set of weekly deals. This week we have a bonus! 12 items instead of the usual 8.

And what a list this week! Ribbon, embossing folders, framelists, a punch, an ink pad, embossing powder. WOW.  

I'm super excited to see the Delicate Designs embossing folders on sale. If you're not familiar with the Delicate Designs just take a look at these 3 cards.
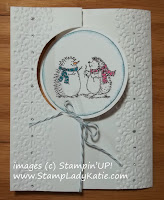
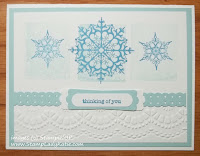
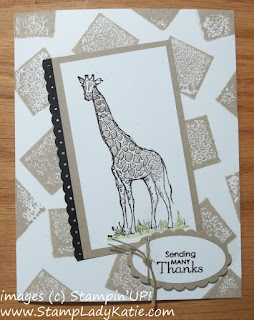
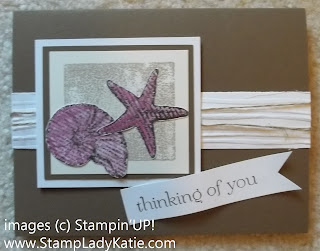
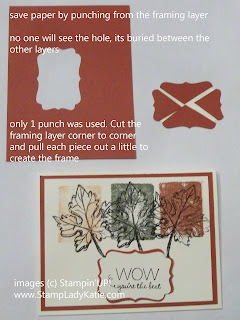
Winter Card made with Stampin'UP!'s Delicate Designs embossing folders.
Winter Card made with Stampin'UP!'s Delicate Designs embossing folders.Winter Card made with Stampin'UP!'s Delicate Designs embossing folders.

The Delicate Designs folders come as a set - you get BOTH designs in the package. Its such a quick way to really dress up a card. People are so impressed when I give them a card with texture embossing. 

Order Here: If you'd like to add the Delicate Designs embossing folders to your collection you can order them here.
 

Minimum Shipping Charge: Stampin'UP! has a minimum $6.95 shipping charge. You can get your money's worth on the shipping by increasing the amount your order..

Or if you're local (Dane County WI area) just contact me and I'll add them to my next order for you at just 10% shipping.

Shopping on-line in December? use this Hostess Code 
and receive a Thank-you card in the mail from me **
along with a free sheet of Dimensionals (100 Dimensionals on a sheet)
KHGRCTMW
 **Be sure you leave the box checked that allows demonstrator contact. 
If you un-check it then I will not see a name or address 
and will not be able to send your thank-you and Free Dimensionals.


Thanks for stopping by
Thanks for stopping by, I hope you've been inspired


Tuesday, December 10, 2013

Snowflakes with Acrylic Block Print Background

Winter card with the snowflake and sentiment from Stampin'UP!'s Best of Snow CollectionAre you a wood mount stamper or a clear mount stamper?  If you have any clear blocks you can use them to make a really interesting background. Did you know you can ink the block just as if it were a stamp and transfer the ink from the pad to the paper with the block.  

TIP: Use your clear blocks like a stamp.

Can you see the light square of ink behind each snowflake on this card? That square was made with Stampin'UP!'s "C" block.  To see other cards I've uploaded using this technique click here: Acrylic Block Background technique.

Winter card with the snowflake and sentiment from Stampin'UP!'s Best of Snow CollectionI love Stampin'UP!'s Rhinestone Jewels. These self-stick rhinestones are such an easy way to add a little sparkle to a project. One for the center of each snowflake on this card, including the snowflake under the sentiment.

Given the massive amounts of snow we've had recently a card with snowflakes seemed the perfect post. This snowflake image and the sentiment are both part of the Best of Snow Collection. Other images in this collection include the cute Hedgehogs and a darling little Snowman.

Notice the punched layer with the sentiment? There's something special about that. It was made with the Bracket Label punch - which there's only 1 size of. Yikes I can hear my high school English teacher telling us not to end a sentence with the word "of". But anyway, the punched piece is in 2 layers! Cool trick, huh? Watch this little video showing how to get 2 different size layers from 1 punch.

Want more tips like this? be sure you're signed up for my email list. On Thursday I'm sending out a pdf with copies of 6 Technique cards that my downline made at our meeting this month. Consider this a Holiday Gift from me to my Newsletter subscribers.

Huge Clearance Rack Blitz Starts today. 
Some items are marked up to 80% off!

Link to Ordering Stampin'UP! product on-line

Thanks for stopping by, I hope you've been inspired


Shop here for all your stamping supplies.

Tuesday, December 3, 2013

A Soiree of Lacy Embossed Snowflakes

Winter Card: Stampin'UP!'s Snowflake Soiree stamped over acrylic block background with embossed lacy edgeReady for a sky full of dancing snowflakes?  I woke up to some this morning. Here in southern Wisconsin we are definitely beginning to feel winter.

This card has some lovely lacy snowflakes too! The snowflakes are from a set called Snowflake Soiree.  This set is not in the catalog but is still available in either wood or clear mount

"Snowflake Soiree" is one of the best sellers from last year's catalog. So even though there was no room for it in this year's catalog they're still making it available - I really appreciate a company that recognizes what their customers like.

Do you like the background color blocks? I wanted something that looked like sky without actually making the whole top of the card blue.  The squares were stamped with an acrylic block. They turned out perfect - just the look I was going for - mottled just like a winter sky.

right size to fit 3 across on this card.

The texture embossing adds to the "delicate design". . . just a little lacy texture running across the bottom edge of the card. The texture was created with the Delicate Designs embossing folder run through my Big Shot. 

I love my Big Shot for several reasons: it can handle the larger dies. The texture comes from an embossing folder, not a die. The embossing folders are smaller and work with any texture embossing machine. So whatever texture embosser you have, this folder will work in it. Want to know a little secret?  Another reason I love my Big Shot is because I can emboss 2 or 3 white pieces of white cardstock at a time.  I actually made 24 of this card and it was such a time saver to be able to emboss more than 1 of the lacy edges at a time.

Other product used on this card:  The Dotted Scallop Ribbon Border Punch, The Modern Label Punch and the Word Window Punch.  The colors are Marina Mist and Soft Sky.

You can get all the supplies to  make this card from my on-line store. Stampin'UP!'s quality in papercrafting supplies is unsurpassed and I love shopping on-line.

WHY SHOP ON-LINE??

1) There are products available for purchase that are not in the catalogs! 

2) And there are sales that you'll find only online! 


I reward my on-line customers
Every $25 you spend on-line earns you points towards free merchandise. 
Read more about my Rewards Program here.

Thanks for stopping by


Wednesday, October 23, 2013

Cut and Ready Card Bases - Pre-Scored and Ready to Use

Stampin'UP!'s Cut and Ready Card Bases

Just in time for the Holidays! Packages of 20 cards . . . pre-cut and pre-scored. 
The perfect time savers when you're in mass production mode.

Here's a  pretty fall card made on a vanilla base.  I posted this last fall with a general greeting.  But now with these pre-cut and pre-scored Cut and Ready card bases I'm thinking of switching it up with a Thanksgiving greeting to send to all my family.  

Fall Card made with Stampin'UP!'s Gently Falling Stamp Set and Acrylic Block Background Technique

The Cut and Ready cards will make it quick and easy to make a whole bunch of cards all at once. This card is made with a set called Gently Falling, which is one of the sets on sale for 25% off this week.  Download the entire list of 25 sets on sale HERE.

Hmm . . . now, for Christmas do I go with the pistachio or the red?  Or maybe the Crumb Cake?  Or do snowflakes on the blue?  What do you think?

Happy Anniversary Stampin'UP! - Celebrating 25 years on the 25th of October!
Whats the best way to celebrate?  With a sale of course.  Or how about 2 sales!

Have you seen the List of 25 stamps on sale for 25% off?
**This special goes through Oct 28th.  

**Download the list of stamp sets HERE (pdf).
Any Workshop order during October that is at least $250 will earn an Extra $25 of hostess benefits.
Do you have any friends who'd like to get together and Stamp? Why not get together this weekend and put in a group order before the end of the month?
**Book Parties count too.
**And of course, if you  place a customer order of at least $250 you will get Hostess Benefits AND the extra $25 of product. 


Double your savings and include some of the Sale Sets on your order.
  

Contact me with any questions about arranging an event for your friends. I can help you set up your own event or, if you're local, I can come and stamp with you and your friends.

Happy Stamping
and Happy Anniversary Stampin'UP!


Sunday, June 16, 2013

Acrylic Block Spotted Background

Acrylic block background stamping on a card with the giraffe from Stampin'UP!'s Zoo Review stamp set.
Isn't this the perfect background "animal print"? I love how it matches the spots on the giraffe.  It was super easy to do, I just randomly stamped a bunch of small brown squares. 

I don't own a square stamp, so I used my small acrylic block.  YES! you read right - acrylic blocks will pick-up and transfer ink. Click here to see more acrylic block stamping. Scroll past this post to see 6 more samples of Background Stamping with Acrylic Blocks.


Other details on this card:
The sentiment is from a set called Petite Pairs.  This set, by the way, is on sale right now, 25% off. Its part of the Great Greetings Promotion.  You can read more about the Greeting sale here

You can buy those greeting sets and all your Stampin'UP! supplies from my on-line store.

Thanks for stopping by
Happy Stamping
--Katie


Monday, December 17, 2012

Punched Banner Corners - Save Those Scraps!

Banners are a great way to highlight a sentiment. They look good AND they're a great way to use up scraps. Are you like me? I save all my scraps, so I love it when I find a way to use some of them.

How do you make a banner?  There are several ways - what's your favorite?
  1. Use our  banner framelits dies
  2. you can cut the tails free hand
  3. Or use your square punch!
For both of these cards I stamped the sentiment on a strip of paper and used a square punch to create the banner tails. Here's a 3rd card too.

Banner tail made with a square punch

Card made with Stampin'UP stamp set called: Christmas Lodge, banner tail made with a square punch
Card made with Stampin'UP stamp set called: By the Seashore, banner tail made with a square punch


Its super easy: when you look through the hole in the bottom of the punch. Put your paper strip in one corner and make sure its symmetrical.

You can control the size of the tail 2 ways:
1. depends on how far you put it in the punch
2. and depends on what size punch you use

The card above was stamped with a set called  By the Seashore.  Its kind of similar to a seashell card I posted in August. I really like the white wood look on this card - which again was a scrap strip of paper.  I got that wood look by using our Woodgrain embossing folder.

The shell card above was used to demonstrate the technique of Acrylic Block Stamping, see more samples here.  Banners are a good way to highlight a sentiment and using your acrylic blocks to create a backbround is a good way to highlight your main images.

The card to the left was also made to demonstrate a technique.  This one shows how to create a sun or moon by masking off an area and sponging around it.  We did this technique for our September Technique lessons on Moonlighting, see more samples here.

And, in case you are wondering, this card was stamped with images from a set called Christmas Lodge.

Are you local?  Join us for technique classes and stamping events.  Check the calendar for class dates and times and you can RSVP directly to the events page. I also do private classes for 5 or more people. Why not get together with a few friends and let me teach you some really fun ways to be creative. Locations are flexible, your place or mine.  

Contact me to schedule your event.  
by email or by phone (608) 220-3450 
HappyStamping
--Katie


Tuesday, November 13, 2012

Gently Falling Leaves with Acrylic Block Technique

Fall card made with Stampin'UP!'s Gently Falling Stamp set and the Acrylic Block Technique
Acrylic Block stamping is a favorite technique.  Its a quick easy way to add some color to a stamped image.  

The leaf stamp on this card is from a set called Gently Falling.  This is a 2-step stamp set which means it has matching pairs of line images and "filler" images.  For this project though I just used the line image. 

Stampin'UP!'s Gently Falling Stamp set Instead of using the matching "filler" image, the color was stamped with an acrylic block.  I used Stampin'UP!'s "B" block and used it just like a stamp.  I put the block right on the ink pad and then stamped the block on the paper.  

I love how the stamp does not give an even coverage, it really gives it just the distressed fall look I was looking for on this project. The colors are More Mustard, Always Artichoke and Cajun Craze.

To see 3 other cards made with the Acrylic Block Technique click HERE.  One uses the Serene Silhouettes stamp set and the other 2 both use the Everything Eleanor stamp set. This post will appear when you click the link but just scroll down.

Oh, and here is a stamping tip for saving paper.

Paper saving tip and a trick to layering with the Decorative Label Punch
The sentiment is punched using the Decorative Label punch.  To get the darker framing layer I used the same punch but cut the piece from corner to corner as shown in the photo.  AND to save paper, I punched it from the layer that frames the card.  It will be hidden between the card base and the card front, no one will know the hole is there.  Why waste paper?  Right?

We are doing this card at my November workshops.  My last hostess had a great party with over $500 in sales.  Wow!  The Hostess Benefits for a party this size means she got to choose $80 of product from the catalog for FREE. AND she also got to pick any 2 items for half price. Guess what she chose, yep, the Big Shot.  She got that $100 machine for half price.

And not only that, she also qualified for the current promotion which means she is getting 10 FREE INK pads.  That really is INK-redible.  That promotion only goes through Dec 16th, but thats definitely enough time for you to cash in on this special too.  Contact me today to squeeze in your party before Dec 16.

And if you are not local to the Madison, Wisconsin area you can still get in on this deal.  You just need a collective order of $450 and you get the free ink pads.
  1. You can find a local demonstrator to host a live party at your location.  
  2. or, You can do your own party:  invite friends over to stamp with you and show them the catalog.  You can take their orders and place the order on my website.  Contact me to find out how.
  3. actually, You don't even need to have a live event.  You can just collect orders from friends.  We call this a "Book Party".  
But do pay attention to the deadline.  To get the free ink pads the order must be placed by Dec 16th.

Happy Stamping and I hope you have a great party.
--Katie

Thursday, July 19, 2012

Serene Silhouette and the Acrylic Block Technique

Card made with Stampin'UP! set called Serene Silhouettes. Background is the Acrylic Block Technique.
Here is one more example of a card made with the Acrylic Block Technique. This one is actually my main trade card for convention. I chose this technique for my convention trade because when you are making over a hundred of the same kind of card you want them to be something quick and easy, and the Acrylic Block technique sure is easy and quick.

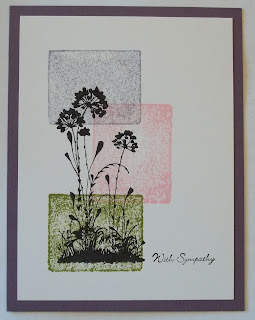
These are such pretty colors together: Wisteria Wonder, Pretty in Pink and Old Olive.  They are such soft subtle colors and contrast nicely with the black silhouette flower image.  In fact the name of the stamp set is Serene Silhouettes.  

The Acrylic Block Technique is so easy. Just ink the block on your ink pad and stamp the block to your paper.  This card used the "B" block. There is a FREE pdf tutorial going out today to everyone on my email list.  Sign up now if you aren't already on the list.

You can find all your Stampin;UP! supplies on my online store.  

Happy Stamping
--Katie


Tuesday, July 17, 2012

Everything Eleanor Baby Card

Baby Card made with Stampin'UP! stamp set called Everything Eleanor. By StampLadyKatie
Are there any baby events in your future?  We're busy planning a shower for my daughter and her husband.  I have all kinds of cute ideas for shower invites and gift cards. Problem is - they don't want to know the sex, so I don't know what colors to use.  This card compromises by using both pink and blue.

This is another example of the Acrylic Block Technique shown yesterday.  The flower is embossed in white to show up against the blue background. Then I sponged a little pink in the center of the flower and used a yellow marker in the middle of the flower


Would you like a FREE PDF tutorial explaining Acrylic Block Stamping? As I mentioned yesterday, I'll be sending out a FREE PDF tutorial on Thursday to everyone on my "on-line list" 

Just because you get emails from me does not mean you are actually on the "on-line list". People who attend events with me fill out a paper form to get emails from me - but that is NOT the "on-line list". If you don't remember signing up on-line then click HERE now to sign-up.

Feel free to contact me with any questions.
Happy Stamping
--Katie

Monday, July 16, 2012

Everything Eleanor Acrylic Block Technique

Card made with the Acrylic Block Technique and Stampin'UP! set: Everything Eleanor. By StampLadyKatie
This is a card that has everything! Super Simple, Super Gorgeous and Super Easy!  And gives you another way to use your Acrylic Blocks.

Gorgeous: The stamp set is called Everything Eleanor.  I love this beautiful realistic looking flower. And its gorgeous in this color combination: River Rock and Always Artichoke.

Simple: The card is only 1 layer.  Just stamping and a little glitter in the center of the flower.

Easy: The background, is the "B" acrylic block inked and stamped on the paper. Then stamp the flower image on top.

Some of you reading this have actually made this card with me. This was one of the 5 cards we did at the June Stamp-a-Stack and one of the 3 Senior Center Cards.  I'm also using a version of this as a trade card at convention. - - Be sure to check my Events Calendar for upcoming stamping opportunities. Next up is community stamping at Liberty Square in Sun Prairie on the 24th and Christmas Gift Tags on Wed, July 25th.

Do you get my emails? WHICH LIST are you on? On Thursday I'll be sending out a FREE PDF tutorial to everyone on my "on-line" list to show how the Acrylic Block process is done. So if you haven't signed up yet then SIGN UP NOW

And for my local stampers, just because you get emails from me does not mean you are on the "on-line" list. If you don't remember signing up on-line then you are not on the list.  sign up HERE

Check back tomorrow for another card made with the Acrylic Block technique

Tuesday, July 10, 2012

June Cards with Katie

These are the June Cards we did at the Senior Center. If you are local to the Madison area and available during the days we'd love to have you join us.  We do 3 different designs and make 2 of each card.  

We have fun, the stampers are starting to get to know each other and its becoming more social. 

Each event is also a learning experience. We talk about tools and techniques and different lay-outs. The June lesson was on the Acrylic Block Stamping technique.  And if you are a demonstrator going to convention and participating in the 80+1 trade then you'll be getting one of these cards.

Its the same event at several locations so if you can't make one you might still be able to join us at another one.  Check out the dates and times for these locations:  The Oregon Senior Center, the Monona Senior Center and the McFarland Senior Center.  I also do a senior apartment complex in Sun Prairie. You can find information on how to register for any of these locations HERE.

I hope to see YOU at one of these events.

Happy Stamping
--Katie