Tuesday, July 31, 2012

Baby Shower Invitation

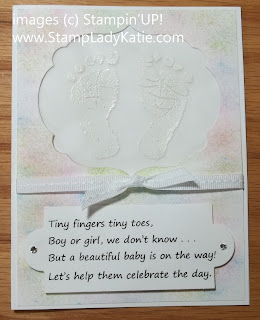
Card made with Stampin'UP! stamp set: Baby Prints. by StampLadyKatie
I just finished making 30 baby shower invitations. My daughter is due in October and we are so thrilled to be getting our first grandchild.  While its our first grandchild, my daughter's husband has 2 sisters, both of whom already have children. But that does not diminish the excitement, this baby is already being showered with tons of attention. 

When you know the baby's sex you can choose appropriate colors for the Baby Shower Invitation.  This job was a little challenging because my daughter does not want to know the sex of the baby. For this invitation I wanted soft colors. So I sponged on Bashful Blue, Pretty in Pink and Certainly Celery.

Where to find words for a baby shower invite?  The internet of course. I searched several sites and ended up combining several ideas into one of my own.

Tiny fingers, tiny toes
Boy or girl, we don't know . . . 
But a beautiful baby is on the way!
Let's help them celebrate the day.

Did you notice those precious baby feet?  They are from a stamp set called Baby Prints. I had a hard time deciding whether to use the baby hand prints or the baby footprints. Because the colors were pastels I wanted all the imagery to be soft. The feet are heat embossed in white on vellum paper and peek through a window cut in the card face. The card was finished with a white ribbon, again to keep the look soft.

The information for the invitation to the baby shower is printed on the inside.  I just made a word document and ran off 2 cards for each sheet of paper.

Thank goodness for framelits! They really made the job easier.  I used one of the Apothecary Accents Framelits to frame the little poem. and the Labels Collection Framelits to create the hole for the embossed feet.

Glad that job is done! Now I'm busy getting ready for the Craft Show at Utica Fest this weekend.  If you're local stop by. Its a good ole time in the country: music, food, baseball, horse pull and of course, the Craft Fair. Stop by my booth and say HI.

And speaking of weekend activities, have you registered yet for the August Stamp-a-Stack?  Sunday afternoon or Monday night, your choice of days.

Hope to see you at one of these events, and feel free to contact me with any questions about this baby shower invitation or any card project.

Happy Stamping
--Katie

Monday, July 30, 2012

"Spot On" or "Spotless" Background

Lets do a little survey: which background do you like better?  Just how important is the background on a card. Maybe its only the focal point that matters.  Compare these 2 cards. . .
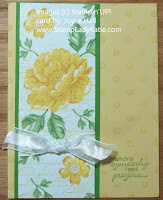
Card made with Stampin'UP! Stippled Blossoms and Distressed Dots. by StampLadyKatie Card made with Stampin'UP! Stippled Blossoms. by StampLadyKatie
The card on the left is one I got as a trade card at convention. It was made by one of the members of my group, Joyce Hall of Hudson,WI. She used the Distressed Dots background stamp. I did the one on the right to see how much of a difference the background makes.  What do you think?

The focal point on this card is from a stamp set called Stippled Blossoms.  The gorgeous coloring on this comes from the fact that this is a 2-step stamp set. A 2-step stamp set comes with pairs of images that are intended to be stamped one on top the other.

Joyce used the 2 stamps in the upper left to make the big flower.  She stamped the top image (the detailed line image) with a darker ink:  More Mustard and then she stamped the bottom image (the solid flower) using a lighter ink: So Saffron.

I can see why Joyce chose this background stamp.  The "distressed" dots image is a perfect complement to the "stippled" images of the flower.

So, now its time for your vote.  What do YOU think?  How much of a difference do you think the background makes? LEAVE A COMMENT BELOW

Happy Stamping
--Katie

REMINDERS:

Saturday, July 28, 2012

Lay-Out Template

Do you have a favorite card lay-out? People often ask how I come up with ideas for cards and the simple answer is that I often see a lay-out I like and then change the colors or change the stamp set. And I keep a file of Lay-out Templates like this one.

This is a very simple lay-out that's easy to re-use.
  • The card is divided in half
  • There is a design feature that separates the top and bottom
  • There's 1 main focal point in the middle
  • There is a small sentiment at the bottom.

This is the same lay-out used on the card from yesterday's post. Of course the colors are different and I changed up several other features.
  • The design feature separating top from bottom is a stamp today (set: Creative Elements), yesterday it was a ribbon
  • The main focal point is a Butterfly today ("fussy cut" image from a set called: Creative Elements).
    Yesterday the focal point was a floral piece made mostly from punches.
So, how would YOU make this card?  What stamp set would you use?  What would you use to separate top from bottom?  Would you score the bottom half or use DSP? or simply use a different color piece of paper?  Its time to get out the stamps and play.

Happy Stamping
--Katie
Friday, July 27, 2012

4 Ways to Add Dimension to a Project

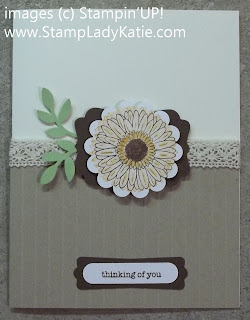
Card Made with Stampin'UP! Punches and Simply Scored tool.
Take your projects from plain to WOW by adding a little dimension. Paper projects such as cards tend to be 2-dimensioal and flat. You can add a "wow" factor by doing something that gives a little dimension, a little 3D effect. Something that influences the way light reflects off the card. This card showcases 4 different ways you can add dimension.
  1. The first way to add dimension is very simple, use layers!
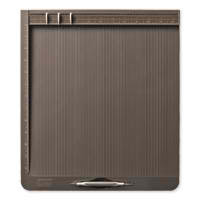
    Stampin'UP! Simply Scored Scoring ToolThe card base is Very Vanilla, but the bottom is covered with a light brown layer (Stampin'UP! color = Crumb Cake).
    *The sentiment is layered with punched pieces using the Word Window Punch and the Modern Label Punch.
    *The flower focal point consists of layers made using the Decorative Label Punch, the Scallop circle Punch and leaves from the Bird Builder Punch.

  2. The second way to add dimension is to distress the paper
    Did you notice the vertical scoring on the Crumb Cake layer.  Its very subtle but certainly contributes to the dimensional effect when light reflects from the project.


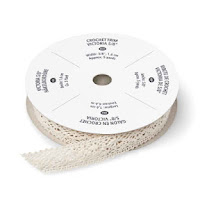
    Stampin'UP! Crochet Trim: Victoria
  3. The third way to add dimension is to add an element that has texture
    On this project that is the ribbon.  This lovely crocheted trim matches the Vanilla cardstock for this project.  It can also be dyed with ink re-fillers to match any of our other gorgeous colors.


  4. The fourth way to add dimension is to use Dimensionals!
    These are little foam adhesive pieces that are sticky on both sides. You use them to physically raise up a part of the project.Card Made with Stampin'UP! Punches and Simply Scored tool.


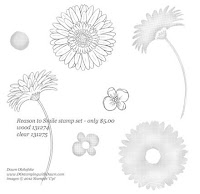
By the Way: the flower on this card is from the July Promotional set:  Reason to Smile.  This is an exclusive set available only for the month of July. And with a qualifying purchase you can get this lovely 2-step stamp set for only $5.

Shop HERE shop online to add a little dimension to your projects and when your order reaches $50 (before shipping and tax) you qualify for the Reason to Smile Stamp Set (Wood Mount #131274 or Clear Mount #131275)

Feel free to contact me: StampLadyKatie@aol.com with any questions about the product used to create the dimension or about the details of the Promotional set.  I'm happy to answer your questions

Happy Stamping
--Katie

Thursday, July 26, 2012

A CAS CASE (love those ACRONYMS)

Card uses 3 Punches: Elegant Butterfly, BoHo Blossoms and the Bird Builder Punch
Does this card look familiar?  Yes, its yesterday's card, minus the scoring. Just wanted to show the difference scoring can make.  Its pretty without the scoring too.

This card is what we call CAS. CAS is an acronym for: Clean And Simple.  If you spend any time on SplitCoastStampers then you've probably noticed all the acronyms that people use.   

I fact, since its a version of yesterday's card its also a "CASE"  - another ACRONYM. Because that's how we get ideas . . . we Copy And Share Everything.  We take someone else's idea and re-make it.  

Sometimes its an exact copy and sometimes we change it up to make it our own.
  • We change the colors
  • We use a different stamp set
  • We use a strip of ribbon instead of a strip of paper
  • We rotate it vertical/horizontal 
What changes would you make?  How could you make this card "your own"?  Leave me a comment below, which card do you like better and why?

Happy Stamping
--Katie

Don't Miss out - Only 6 days left for the July Special

This month only you get the Reason to Smile Stamp set for only $5 with a $50 purchase. see promotion details

This set is EXCLUSIVE to this promotion and is not in the catalog and will not be in the catalog. 

This is your only chance to get this lovely 2-step stamp set. 

Want to see some cards made with this set? Check out
the Split Coast Gallery for the Reason to Smile set.

Wednesday, July 25, 2012

Diagonally Scored Swap Card

Diagonally Scored Card made with Stampin'UP!'s Elegant Butterfly Punch
This was one of my convention swaps.  I only made a few of these because my arm would have gotten tired scoring all the diagonal lines if I'd tried to do a hundred of these.  But it sure turned out pretty. And I love the strong contrasting colors: Black and White with Calypso Coral and Old Olive.  


Swap cards are great! Demos love swapping cards at Convention - its a great way to get lots of samples without having to come up with all the designs.


Stampin'UP! Convention 2012
Usually my swap cards are simpler than this. But this was a special swap. I made these for the ladies in my group who attended convention. Here we are in front of the main stage display.

Being part of this group is so fun and so motivating. There are many reasons to join Stampin'UP! and certainly friendships rank high on the list.  Higher than making money??? hummm... have to think about that. Money is a good thing too.


My business has grown to the point that 
  1. its been years since I've had to pay for any stamping supplies
    - - - the business sustains itself
  2. I earn a little extra each month
    - - - which is nice because I'm totally addicted to garage sales
  3. I have people in my downline now
    - - - so I'm earning money from their sales too.
This business has so much potential! As my business continues to grow the downline overrides will also grow.  Too bad I didn't start this in my 20's!  I'd have been able to quit my career job and retire sooner.  But good things are happening now.
.
What about YOU?
  • Would you like to earn a little extra each month?
  • Would you like to have all your stamping supplies paid for?
  • Would you like to start building a business that will grow and sustain you more and more each year?
Anyone at any age can build a successful stamping business.  Of course, the younger you are the more potential you have over time to build up monumental income from building a large downline. You do have to be at least 18 years old to buy the Starter Kit. Check out the Career Plan information on the Stampin'UP! Website  . . . and then contact me with your questions about how this can work for you.

There's lots of support for new demonstrators: Its not like you have to figure things out on your own.  Stampin'UP! has all kinds of resources: on-line training, demonstrator forums, monthly magazine, conventions . . .    AND, I have a private website where I support my downline with business files and project ideas.

Joining Stampin'UP! is easy, just click JOIN NOW

Happy Stamping
--Katie


Tuesday, July 24, 2012

Convention Highlights

Salt Lake City Convention Center - Site of the Stampin'UP! Convention 2012I Am . . .
*so EXCITED to share what I saw and learned at convention
*so GRATEFUL to be part of this company
*so PLEASED by the business training at convention this year
*so AMAZED by all the talented trade cards that were shared

The theme for this year's Stampin'UP! Convention was I AM...
and, in short, this year's Convention was - in my opinion - the best I've attended so far.

There are lots of different activities at convention:
*We get a chance to swap cards with other demos
*We get to meet new people - demonstrators come from all over the US and Canada
*We get a chance to play with new product
*We attend business seminars
*We get to stamp and make projects
   - and learn a few new tricks!
*and of course, we have lots of fun with friends.
Stampin'UP! Convention 2012 Make & Takes

Speaking of friends - I went out there with 6 other demonstrators from the Madison area. Here we are around the Make and Take table. I'm the gray-haired old lady 2nd from the left. We had that Make&Take table so well organized that the projects were finished in no time. We amazed ourselves.

We did learn a trick at this session:
Stampin'UP! sells these little craft boxes. They come folded flat and you open them to make the box. The idea is that you can decorate them - with all Stampin'UP! product.
*We stamped them with a simple circle using Versamark Ink
*wrapped them with ribbon
*and made the bow with designer paper decorated with a clear button

Make&Take Box Project from Stampin'UP! Convention 2012 Make&Take Box Project from Stampin'UP! Convention 2012 Ribbon Trick

Now The Trick!  In the picture on the left it looks like the ribbon is wrapped around the box. Not so! The photo on the right shows the trick.  Attaching the ribbon this way means the bow is attached to the top of the box and does not have to be removed. The box stays looking pretty and can even be re-used over and over again!
Check back tomorrow for more from convention.

*Shop for all your Stampin'UP! product HERE
*Be sure to check my Customer Rewards Program


Happy Stamping
--Katie

Monday, July 23, 2012

Emboss Resist is a Reason to Smile

Card made with Emboss Resist and Stampin'UP!'s Reason to Smile Stamp Set
Learning new techniques is every stamper's "Reason to Smile".  This card uses a technique called Emboss Resist and the stamp set is the July Special called "Reason to Smile".

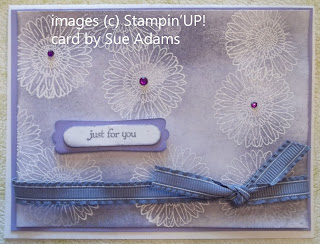
This is another of the cards shared by my downline Sue Adams.  I love the purple and white combination. Sue made the white really "pop" on this card by white embossing it. Then she sponged the purple color on top the whole card. The areas that were white embossed "resisted" the ink. The purple color is Wisteria Wonder.

The sentiment is from a stamp set called Teeny Tiny Wishes.  This set contains 24 different small wishes that all fit inside the Word Window Punch. Sue layered it on top a purple piece punched using the Modern Label Punch.

The flower image is from a set called Reason to Smile. This set is available only during the month of July and only to customers who place a $50+ order during July.  But the cool thing is, this set is only $5!  Its the Stampin'UP! way of saying "thanks for being a customer".  Click HERE and SCROLL DOWN to see some other samples made with this set.

Card made with Emboss Resist and Stampin'UP!'s Reason to Smile Stamp Set

Check out the sparkly purple rhinestones.  "Wait a minute", you say.  "Stampin'UP! doesn't sell purple rhinestones!" - - Yep, you're right.  But did you know you can color our clear rhinestones with a sharpie marker?  Super tip because with the right Sharpie you can make rhinestones of any color.  HERE is another example

This is a really beautiful card.  Without the rhinestones the card is very pretty. With the rhinestones its just "over the top".  Nice job Sue!

Take some time to browse our catalog and see all the great stamp sets, matching punches and ribbons and, of course, the clear rhinestones. You can see the catalog on-line here. Or contact me (608-220-3450)to get your own paper copy. You can SHOP HERE at the on-line store or by contacting me.

Oh, by the way: be sure to check out the Clearance Rack where there more product that isn't in the catalog.

Happy Stamping
--Katie

Saturday, July 21, 2012

Convention Updates

I am at convention in Salt Lake City.  Its beautiful here, so energizing to be with so many talented people.  I get so many ideas, both for how to run my business as well as creative ideas for projects.  And ideas for new and different ways to use the product I already have.  Can't wait to share with you.  But you'll have to wait until I get home to start seeing some of it.  Check back soon to see photos from the convention.

Thursday, July 19, 2012

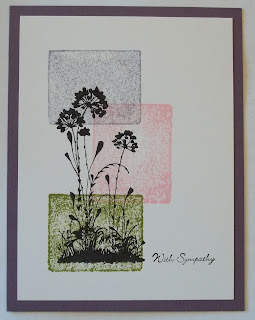
Serene Silhouette and the Acrylic Block Technique

Card made with Stampin'UP! set called Serene Silhouettes. Background is the Acrylic Block Technique.
Here is one more example of a card made with the Acrylic Block Technique. This one is actually my main trade card for convention. I chose this technique for my convention trade because when you are making over a hundred of the same kind of card you want them to be something quick and easy, and the Acrylic Block technique sure is easy and quick.

These are such pretty colors together: Wisteria Wonder, Pretty in Pink and Old Olive.  They are such soft subtle colors and contrast nicely with the black silhouette flower image.  In fact the name of the stamp set is Serene Silhouettes.  

The Acrylic Block Technique is so easy. Just ink the block on your ink pad and stamp the block to your paper.  This card used the "B" block. There is a FREE pdf tutorial going out today to everyone on my email list.  Sign up now if you aren't already on the list.

You can find all your Stampin;UP! supplies on my online store.  

Happy Stamping
--Katie


Wednesday, July 18, 2012

I Know This Great Little Tea Shoppe . . .

Embossed Tea Cup from Stampin'UP!'s Tea Shoppe stamp set.I know this great little Tea Shoppe . . . Actually I know a cute stamp set called Tea Shoppe. Just look at the detail in the image of the cup.  My grandmother collected tea cups and saucers and this reminds me of her china cupboard in her dining room.

For this project I wanted the tea cup to really look like china - so we embossed it.  Now if you are wondering how many different embossing powders Stampin'UP! carries, its not that many. But the NEW FOAM INK pads are much juicier than the old felt pads so now you can emboss in any color! I stamped this image in Summer Starfruit and used clear embossing powder.

Tea Cup card made with Stampin'UP!'s Tea Shoppe stamp set.The cup looked great when done in just the Starfruit color - but it looks even more amazing when done in the 3 colors.  I got that 3 color look by doing an emboss resist.  Once the embossing powder is heat set ink will not stick to it, but it does stick to the parts of the image that did not get embossed. I used a sponge dauber with red and green inks and sponged them over the lines for the flowers and stems.
We are using this tea cup on one of the projects for the July "Cards with Katie" at the community centers. We cut out the cup and attached it to the card with Dimensionals to raise it up and create the pocket for the package of tea. What a cute way to give someone a special card with a little package of tea.

WHERE to get it?
**the Tea package?  any grocery store
**the idea for cards like this?  Stick with me and you'll see lots of great ideas. Or better yet, join Stampin'UP! and you can go to convention and get hundreds of amazing ideas.
**The supplies to make this card?  You can get everything for this card from my on-line store. In fact, I have a PDF file showing step-by-step photos how to make this card and I'd be happy to send it to you.  Just send me an email requesting it.  Please give me a week to respond as I am actually in Salt Lake for the convention right now, but when I get home I'll be happy to send you the file.

Happy Stamping
--Katie
Tuesday, July 17, 2012

Everything Eleanor Baby Card

Baby Card made with Stampin'UP! stamp set called Everything Eleanor. By StampLadyKatie
Are there any baby events in your future?  We're busy planning a shower for my daughter and her husband.  I have all kinds of cute ideas for shower invites and gift cards. Problem is - they don't want to know the sex, so I don't know what colors to use.  This card compromises by using both pink and blue.

This is another example of the Acrylic Block Technique shown yesterday.  The flower is embossed in white to show up against the blue background. Then I sponged a little pink in the center of the flower and used a yellow marker in the middle of the flower


Would you like a FREE PDF tutorial explaining Acrylic Block Stamping? As I mentioned yesterday, I'll be sending out a FREE PDF tutorial on Thursday to everyone on my "on-line list" 

Just because you get emails from me does not mean you are actually on the "on-line list". People who attend events with me fill out a paper form to get emails from me - but that is NOT the "on-line list". If you don't remember signing up on-line then click HERE now to sign-up.

Feel free to contact me with any questions.
Happy Stamping
--Katie

Monday, July 16, 2012

Everything Eleanor Acrylic Block Technique

Card made with the Acrylic Block Technique and Stampin'UP! set: Everything Eleanor. By StampLadyKatie
This is a card that has everything! Super Simple, Super Gorgeous and Super Easy!  And gives you another way to use your Acrylic Blocks.

Gorgeous: The stamp set is called Everything Eleanor.  I love this beautiful realistic looking flower. And its gorgeous in this color combination: River Rock and Always Artichoke.

Simple: The card is only 1 layer.  Just stamping and a little glitter in the center of the flower.

Easy: The background, is the "B" acrylic block inked and stamped on the paper. Then stamp the flower image on top.

Some of you reading this have actually made this card with me. This was one of the 5 cards we did at the June Stamp-a-Stack and one of the 3 Senior Center Cards.  I'm also using a version of this as a trade card at convention. - - Be sure to check my Events Calendar for upcoming stamping opportunities. Next up is community stamping at Liberty Square in Sun Prairie on the 24th and Christmas Gift Tags on Wed, July 25th.

Do you get my emails? WHICH LIST are you on? On Thursday I'll be sending out a FREE PDF tutorial to everyone on my "on-line" list to show how the Acrylic Block process is done. So if you haven't signed up yet then SIGN UP NOW

And for my local stampers, just because you get emails from me does not mean you are on the "on-line" list. If you don't remember signing up on-line then you are not on the list.  sign up HERE

Check back tomorrow for another card made with the Acrylic Block technique

Sunday, July 15, 2012

Punch Art Mileage Book

Punch art car Cover of a Mileage Notebook for recording business miles. This Punch Art Mileage Book is a little present I made for the gals in my group attending Convention.  I wanted to give them something they could use with their business as well as to show off as a sample project.

These are the little composition books sold at Office Supply stores like Staples.
  1. I covered the front with the Bashful Blue and Certainly Celery paper.  
  2. The clouds were punched with the Cupcake Punch
  3. The car was made with Oval Punches &Circle punches.  the bumper is the Word Window Punch and the tires are the Modern Label punch.
  4. I hand wrote the "License Plate" for each person.
The books look shiny because I covered them with Crystal Effects.  I was afraid that if people kept them in their purse or glove compartment of the car that the punch art might catch on something and get torn loose. The Crystal Effects was a way to make it last longer.

One of the perks of being a Demonstrator is the things you get to write off as tax deductions. Mileage is one of them.  Today I'm in an airplane flying from Wisconsin to Salt Lake City for the Stampin'UP! convention.  Sure wish I could declare all those miles - but of course its only miles you drive in your car.

Another perk of being a demonstrator is going to convention.  This next week will be so exciting, inspiring, and totally fun. I can't wait to share my experience with you. 

Stampin'UP! Starter Kit Button
Actually there are many great reasons to be a demonstrator. Including the fact that for the Starter Kit you get to choose $125 worth of product and pay only $99. Check my explanation page or the Stampin'UP! site for more info.  Its super easy to get that Starter Kit - you can even order it on-line!

When you join MY Stampin'UP! team I am there to answer all your questions.  Be sure to Contact me(608-220-3450) if you want more information or if you have questions now before you join. 

Happy Stamping
--Katie

Saturday, July 14, 2012

Mouthwatering Embossed Popsicle

Card made with Stampin'UP! stamp set called: Mouthwatering. By StampLadyKatie
Isn't this just mouthwatering?  The Popsicle looks so shiny and just "ready to eat".  Especially with this heat wave we've been having here in Madison. This part of Wisconsin is suffering so much, it hasn't rained here since May!  Its so sad. The grass is just crunchy and we've already lost one big tree.   

There's a couple of really cool things on this card (OK that was not intended as a pun - the "cool" part - but after re-reading this it seems appropriate).  Anyway, I wanted to point out a few things: the popsicle stick, the scoring, the lay-out and the shiny finish.

First: the popsicle stick.  The stick was punched from the Word Window Punch (#119857). You may notice it seems to have some "wood graining". I made it streaky by just lightly dragging it across a brown ink pad.  Super easy and its a very effective look.

Notice the scoring and the lay-out in general. The scoring below and above the sentiment is a way to highlight the sentiment without using an additional strip of paper. 

And if you think this lay-out looks familiar its because this is essentially the SAME CARD as one posted earlier this month.  They both have the same scoring and the same sentiment.  Just different "tall" images in the upper part of the card. 

What tall images do you have that would fit this lay-out?  Maybe a tree, or a giraffe?  Leave a comment below and tell me what image you'd use on this lay-out.

Now, that shiny popsicle! The popsicle image on this card is from a stamp set called "Mouthwatering".   It looks shiny because it is clear embossed.  Stampin'UP!'s new foam ink pads are "juicier" and make it super easy to emboss in any color.  By the way, isn't this color "mouthwatering"?  Its one of the new In Colors called Primose Petals.
The mouthwatering popsicle's shiny look is achieved by clear embossing. 

Did you know Stampin'UP! also sells Scented embossing powder? This popsicle looks good enough to eat.  What if if smelled good too?? The scented embossing powders are so easy to use and really add a "wow" factor to a project.  They come in 3 scents: vanilla, melon and cherry. Hmmm? Primrose Petals. I wonder what flavor that should smell like?

And Stampin'UP! makes shopping so easy. No need to get dressed, use gasoline, fight for parking or carry packages. Shop from the convenience of your own home with a cup (or glass) of your favorite beverage, and have your order delivered to your door.
And all On-Line orders qualify for my Customer Loyalty PointsClick HERE and scroll down to read about Customer Loyalty Points.  Then start shopping now!

Friday, July 13, 2012

Open Sea and a Water Colored Earth

Here is a really "down to earth" card. The stamp set is called Open Sea and it just seemed so appropriate to use water color to make this card.

I love using the AquaPainter for watercoloring.  Its perfect for a project like this. And of course, using Water Color Paper really helps complete the look too. 


The colors on this card were my attempt at being realistic and "earthy".  I did the land masses in Summer Starfruit and I added a little Always Artichoke (dark green) over the Starfruit to create some forested areas. The water color is Bashful Blue with Marina Mist for the blue scalloped layer behind the  main piece.  

What do you think of that blue scallop layer?  The scallops on it remind me of ocean waves.  Anyway, it was made with the Dotted Scallop Ribbon Border Punch.  Check out the video below (2:49) to see how EASY it is to make a medallion like this.


 You can get the tools to make this project at my Stampin'UP! On-Line Store.  While you're there be sure to check out the Clearance Rack.  There are always good deals there.  

Other Things to remember:
  • A $5 stamp set is a Reason to Smile - and its the July Promotion
    Check out the details here and see some of my samples here
  • We Love Our Hostesses - in fact for the rest of July we're giving away an extra $50 in Hostess Benefits for all orders over $450.  Call me today (608-220-3450) to see if we can fit your party into July. Or better yet, grab your catalog and gather orders from your friends and family. You can put the order in yourself on-line and earn yourself a grand total of $115 of FREE merchandise.  
  • You can see the catalog on-line HERE.  Call me if you'd like a paper version of the catalog.

Wednesday, July 11, 2012

Score a Reason to Smile

Stampin'UP! Scoring ToolThe July Stamp-a-Stack card set was focused on the Simply Scored tool.  To score a card means to impress a line in the cardstock. The Simply Scored tool is a plate with tracks running down it every 1/8". The bed is 12x12 to handle scrapbook pages. You run a stylus down the track to make the lines. You would score a line for several reasons:
  1. You score as a folding guide: Scoring breaks the fibers in the paper and makes the paper easier to fold.
  2. You score to add visual interest. Scoring raises (embosses) the paper on one side and depresses (debosses) the paper on the other side
This is the first of the 5 cards we did. The embossed lines on this card might replace a strip of paper.  Can you see this card done with the sentiment instead on a strip of white paper on top a strip of green paper?  The scored lines give that same visual interest without making the card "color heavy" on the bottom.

The sentiment is from a Stamp Set called: A Word for You.
The flower is from a Stamp Set called: Reason to Smile - notice the colors on the flower: this set is a 2-Step Stamp Set.

BTW: the Reason to Smile stamp set is the July Special.  If you make a purchase of $50 during July then as a thank-you from Stampin'UP! you can buy this stamp set for only $5.  Check out some other images of cards made with this set.  Click HERE and SCROLL DOWN.

Happy Stamping
--Katie
Tuesday, July 10, 2012

June Cards with Katie

These are the June Cards we did at the Senior Center. If you are local to the Madison area and available during the days we'd love to have you join us.  We do 3 different designs and make 2 of each card.  

We have fun, the stampers are starting to get to know each other and its becoming more social. 

Each event is also a learning experience. We talk about tools and techniques and different lay-outs. The June lesson was on the Acrylic Block Stamping technique.  And if you are a demonstrator going to convention and participating in the 80+1 trade then you'll be getting one of these cards.

Its the same event at several locations so if you can't make one you might still be able to join us at another one.  Check out the dates and times for these locations:  The Oregon Senior Center, the Monona Senior Center and the McFarland Senior Center.  I also do a senior apartment complex in Sun Prairie. You can find information on how to register for any of these locations HERE.

I hope to see YOU at one of these events.

Happy Stamping
--Katie

Monday, July 9, 2012

No Waste Here - Use Every Scrap

Lets face it - ours is a craft that generates waste. Being responsible citizens of the earth means trying to minimize that waste.  So here's a clever idea:

The idea comes from one of my downline - Sue Adams.  She used the Labels Framelits to cut out a shape and ended up with these two cards.  When you look at the cards you'll see what she did.

Now the question is, what did she start out making?  Did she plan to use the cut out shape and then decide to use the leftover piece with the hole?  Or did she want the hole and then decide to use the piece she'd cut out?  Either way its a clever way to minimize waste. And both cards are pretty, so its all good!
 

Is this an idea you might use?  The reason you are looking at this website now is to get ideas.  Another way to get ideas is to be part of an active demo group.  If you are a demonstrator you know what I mean. If you are not a demonstrator you should consider joining.  

There are many perks to buying that Starter Kit and becoming a demonstrator:
** the ideas and energy you get from the people in your group. 
**There's also the financial aspect of (1) the discount on purchases and (2) the income from sales. 
**And you have the flexibility to do things YOUR WAY.  You can be a hobby demo, which means you enjoy the discount for your personal purchases or you can be a business demo and do workshops for added income.
Does this sound intriguing?  Does it raise questions?  Call me 608-220-3450 or email to get your questions answered.  Or check MY PAGE or the Stampin'UP! site for more information.  And if you're just ready to do it (hey who wouldn't want to get $125 worth of stuff for $99!) then click here to join now.
The internet makes it so easy to facilitate group sharing.  My group and I would love to have you join us.

Happy Stamping
--Katie

Saturday, July 7, 2012

Another Reason to Smile! - Customer Rewards

Being appreciated is a good Reason to Smile. I appreciate you, Stampin'UP! appreciates you and I hope that we can give you some Reasons to Smile and feel appreciated too.

We appreciate our Hostesses!  From now until the end of July Stampin'UP! is offering an additional $50 of Free Hostess benefits to all qualifying parties. When your party sales reach $450 you'd ordinarily have earned $65 FREE to spend. For the rest of this month you actually be earning $115 of free catalog product.  There's a Reason to Smile.

We appreciate our Customers! For the month of July any order over $50 qualifies you to buy this cute stamp set for only $5!  Yes, you read that right . . . a $5 stamp set.  The set is called "Reason to Smile" and is available in either wood mount or clear mount.  

And here's another Reason to Smile: this is a 2-step Stamp set.  You can see sample cards made with this set on my July 6th post and July 2nd post.

You can see lots of samples of 2-step stamping here.

I appreciate YOU!  Are you aware of my Customer Loyalty Program?  If not be sure to check out all the details HERE.  You earn a point for every $25 you buy and some of you already have accumulated points to spend. 

A Final Reason to Smile:  its so convenient!

Happy Stamping
--Katie

Friday, July 6, 2012

Another Reason to Smile

Card made with Reason to Smile the July Stampin'UP! Promotional set.
I really like this image from the "Reason to Smile" stamp set.  In case you missed the announcement, this is a promotional set available only during July. The name of the stamp set describes the promotion - the set is only $5, which is certainly a "reason to smile". 

How do you get this set for the $5 price?  A purchase of $50 or more during July qualifies you to purchase this set.  What a great gesture from Stampin'UP!  A wonderful way to say thank-you to all our great customers.

Why do I like this image?  I think because of how pretty it looks with the 2-step stamping.  The dark outline of the petals is one stamp and the softer lighter solid image is a 2nd stamp that was stamped on top of the first image. See another sample with this set.  I just really like how it looks.  I guess you could say it gives me a "reason to smile"! (sorry, could not resist the bad pun).

This will be a short post as I'm busy getting ready for the Stamp-a-Stack this Sunday or Monday.  Are you local (i.e. Dane County/Madison, WI area)?  We'd love to have you join us.  You can register HERE to attend. Just click RSVP for either session 1 or session 2.

Reason to Smile Stampin'Up! July Promotional SetWe will be using the Reason to Smile stamp set at the Stamp-a-Stack although we will not be making this card. But do you notice the background on the card?  It was done with the Diagonal Plate for Stampin'UP!'s Simply Scored tool. We will be using the Simply Scored tool on 4 of the 5 cards.  And everyone who attends will get a print out from me showing more than 25 different score patterns you can make with this tool.

And here's another "Reason to Smile" - your purchase of both the Simply Scored tool and the optional Diagonal Plate qualifies you to get this beautiful stamp set for only $5.  You can shop now on-line.  After your order totals at least $50 you can enter the number for the stamp set. 
*131274 for wood mount
*131275 for clear mount
Call (608-220-3450) or email with any questions.

Remember to check the events calendar and RSVP today.

Happy Stamping
--Katie