Showing posts with label Technique - 2-Step Stamping. Show all posts

Saturday, March 26, 2016

Sale-a-bration - What I Love

Sale-a-bration Countdown - Only 6 Days Left!

This gorgeous card was made by my friend Rachel Durtschi
Rachel used the "What I Love" stamp set.


Special Inking Tips:
#1:  The gorgeous coloring is a result of the stamp set itself.  What I Love is a 2-step stamp set.  There's one stamp for the flower outline and the leaf outline and a 2nd stamp for the fill color. Actually if you check out the image in the product chart below you'll see the flower is really a 3-step stamp. That's the trick to the subtle shading on the flowers.

#2:  The layered look of the sentiment strip across the page. Rachel used Post-a-notes to mask the center strip when she stamped her flowers. That's why the edges look cut off.  When she removed the post-its there was a blank strip for the sentiment. Pretty tricky right?  In part it saves paper. It also reduces bulk for mailing. Plus its just cool - people ask you how you did it.


What I Love is a gorgeous stamp set - and what I love is sale-a-bration!  

Sale-a-bration is Stampin'UP!'s big once a year promotion - EACH $50 you buy earns you a free item from the Sale-a-bration brochures. Check out the choices by clicking on the catalog images below.  

If you love what I love (pun intended) then make sure you get everything you want before Sale-a-bration ends on March 31st. Now is the time to stock up on consumables: white paper, adhesive, ribbons, envelopes and more. You get 1 free sale-a-bration item with EACH $50 purchase.


Click the images below to see all your sale-a-bration choices.  (note the Hello set, the Airplane set and the Perfectly Artistic Paper are no longer available)


Thanks for Stopping by: Take a minute and browse previous posts. If you see anything you like I'm happy to help you get the product or just to consult and explain further how the project was made . . . its all about having fun with our hobby. There are also ordering links under my signature.


click here to see Stampin'UP!'s Deal of the Week
new each Tuesday - Weekly Deals

Click here to see whats on Stampin'UP!'s Clearance Rack
Up to 80% Savings Clearance Rack
Stampin'UP!'s Annual Catalog
2015-2016
Annual Catalog
Stampin'UP!'s Spring 2016 Occasions Catalog and Sale-a-bration Brochure
2016 Catalog       Sale-a-bration Brochure

* * * Buy it Here * * *
Order Stampin'UP! products here I'll be happy to help you place your order 
Order Stampin'UP! products here If you're ordering on-line then use this Hostess Code 
 to be registered for my Customer Rewards Program 

W2CH7QGZ (good thru - March 30th)

Subscribe:  Fun Monthly Kits
Sign-up HERE
(only $19.95/month)  www.MyPaperPumpkin.comSign-up for Stampin'UP!'s Monthly Craft Kit, the kits are called Paper Pumpkins (but they don't make pumpkins)
  • Your card is charged on the 10th of the month
  • Your kit ships around the 15th.
  • You can suspend the subscription in a busy month
  • No minimum commitment, you can quit anytime.
  • See what others have done (on Pinterest)
  • See what others have done (Facebook Group)

Saturday, January 10, 2015

Beautiful Painted Petals


These flowers almost look like they're painted petals. 
In one sense they are . . .
because that's the name of the stamp set: Painted Petals

Card made with Stampin'UP!'s Painted Petals Stamp set

Painted Petals is a 2-step stamp set 
which means there are 2 stamps used to create the image
That's how you get the green and pink colors next to each other.

Stampin'UP!'s Painted Petals Stamp set

This card was designed by my friend Norma Artman 
(Norma is a demonstrator in Deerfield)
I love how she added dimension by "fussy cutting" the one flower 
and popping it up on Dimensionals.

Card made with Stampin'UP!'s Painted Petals Stamp set
The combination of petals and leaves makes such a pretty image
and I especially appreciated that it we used it in photopolymer

Did you know that Stampin'UP! now carries clear stamps?
The photopolymer option is totally clear.  It makes it really easy to position the images for a project like this when you can actually see through the stamp itself!  All you need is a a clear block to mount them on.

The Painted Petals stamp set is available in 3 options:
*Wood Mount - #138819 for $32.95
*Clear Mount - #138822 for $24.95
*Photopolymer - #137146 for $23.95


Thanks for stopping by - I hope you've been inspired

January - March is Sale-a-bration
Each $50 purchase earns you a Free item from the Sale-a-bration Catalog

I'll be happy to help you place your order 

If you're ordering on-line then use this Hostess Code 
 to be registered for my Customer Rewards Program
XG7ACGFP  (good thru Jan 22nd)

Saturday, December 21, 2013

More Cards with the Evergreen Stamp Set

Here are a few more cards made with the Evergreen Stamp Set. 
Christmas Card made with Stampin'UP!'s Evergreen stamp set
Silver embossed on top the blue ink. 
Silver glimmer paper and texture embossed flowers 
with the Petals-a-plenty embossing folder.

Christmas Card made with Stampin'UP!'s Evergreen stamp sett
Square Lattice embossing folder 
with 1/8" Black Taffeta Ribbon
Christmas Card made with Stampin'UP!'s Evergreen stamp set
Stamped in White Craft Ink and Heat embossed with Iridescent Ice Embossing Powder


Thanks for stopping by, I hope you've been inspired


Shopping on-line in December? use this Hostess Code 
and receive a Thank-you card in the mail from me **
along with a free sheet of Dimensionals (100 Dimensionals on a sheet)
KHGRCTMW
Link to Ordering Stampin'UP! product on-line
**Be sure you leave the box checked that allows demonstrator contact. 
If you un-check it then I will not see a name or address 
and will not be able to send your thank-you and Free Dimensionals.

Friday, December 20, 2013

Gold Embossed Evergreen

Christmas Card made with Stampin'UP!'s Evergreen stamp setHere's a simple yet elegant Christmas card. The "elegant" part is the gold embossing. Anything looks classy when gold embossed.  

I actually like to stamp my images with the Gold Encore ink and then sprinkle with the gold embossing powder.  I think it adds extra richness to the embossing.  

And - whoohoo, the Gold Encore Ink pad is on sale this week. See the Weekly Deals for this week here

The "simple" part is the tree: The gold embossed evergreen on this card looks far more complicated than it really is. The simple trick is, that this is a 2-step stamp set. The green of the tree is one stamp and the gold lines are a 2nd stamp.

Stampin'UP!'s Evergreen stamp setIts so fun to give a card like this and have the person ask you how you made it. You'll definitely get a "wow" when you make this tree.

The set is actually called Evergreen. This is one of last year's winter stamp sets so its not in any of the current catalogs

However, Evergreen was so popular last year that it IS still available, but you'll find it on-line only: and it is available in either clear mount or wood mount.


Shopping on-line in December? use this Hostess Code 
and receive a Thank-you card in the mail from me **
along with a free sheet of Dimensionals (100 Dimensionals on a sheet)
KHGRCTMW

Link to Ordering Stampin'UP! product on-line
**Be sure you leave the box checked that allows demonstrator contact. If you un-check it then I will not see a name or address and will not be able to send your thank-you and Free Dimensionals.

Additional things to know if you shop on-line

Thanks for stopping by, I hope you've been inspired

Friday, October 11, 2013

Wow: a $25 purchase gets you the Demonstrator Discount

For 2 weeks a $25 purchase gets you the demonstrator discount
Buy $26.95 of product as the "Starter Kit", pay only $25.

This is a FREE TRIAL as a Demonstrator
You'll get the product you paid for, Plus:
Free Business Supplies
and the 20% discount* on all purchases for the next 3 months.
NO RISK - NO OBLIGATION
just $25 to try it and it includes your product

Interested?  Keep reading.
If not, scroll to the bottom to see ideas for 2 cards made with the Too Kind Stamp Set


Stampin'UP!'s Starter Kit Special **Does a 20% discount sound interesting?
**Have you been thinking of becoming a demonstrator?
**or thinking of having friends over for stamping
   and maybe teaching them some of what you know?

 This limited time option was made for you
NO OBLIGATION for anything.
For $25 you get to try it out - AND you get the product. 

Actually, for $25 you'll get $26.95 of product,
plus a 3 month TRIAL of Demonstrator Perks

Why would you not spend $25 to get $26.95 of product
with FREE SHIPPING
and the option for 3 months of a 20% discount???
If you've been thinking of making a $26.95 purchase anyway
then definitely buy it now as the Starter Kit,
pay only $25 and get FREE SHIPPING to boot!
Doesn't this seem like a "no brainer!"?
Offer ends Oct 21st

You may be thinking that $26.95 isn't very much . . . but just look at these 2 cards made with a set called Too Kind.  This is a beautiful 2-Step Stamp Set and its only $14.95 clear mount or $19.95 wood mount.  That still gives you left over money to get some gorgeous ribbon like this Crochet Trim or Linen Thread.

Card made with Stampin'UP! set: Too Kind, a 2-step stamp set  Card made with Stampin'UP! set: Too Kind, a 2-step stamp set

How to access the Stampin'UP! Clearance Rack You can pick your $26.95 worth of product
from 3 different places:

Contact me with any questions
But don't wait - this Demonstrator Trial Offer ends Oct 21st.


*Ahh . . . You noticed the small red asterisk and wondered. Yes, its a 20% discount on all purchases for the next three months.

But it can actually be MORE:
*you get a 30% discount on your first order
  if that order is at least $150 and placed within 45 days.
*and you can combine that 30% discount with the October Hostess Promotion
  for an additional $25 of free product.
Just a thought . . .

Friday, October 4, 2013

Too Kind 2-Step Stamping with Ruched Ribbon

Fall Card with Stampin'UP!'s "Too Kind" Stamp SetYou're almost assured to get a WOW when you use a 2-step stamp set.  Too Kind is an example.  This set has 2 flowers which are intended to be double stamped, or stamped in 2-steps. Stamp the larger flower head in a light color and the smaller flower head in a darker color.  

These flowers were stamped in So Saffron and Crushed Curry.  The combination of browns and yellows is a beautiful fall color group. 

And that little strip of Champagne Glimmer paper adds a real wow.  

Ruched Ribbon and Stampin'UP! Antique Brad on a Fall CardThere are some additional details on this card that make it really special:  the Antique Brad and the "ruched" ribbon. Actually, its Crumb Cake Seam Binding.

To get the ribbon to look like this I laid down a strip of Sticky Red Line Tape and then started at one side with my seam binding. I adhered one end of the Seam Binding, then gathered up the ribbon  into a little loop and adhered again.  I just kept gathering and gluing until I got to the end of the tape.

If you like the look of the ribbon then check out this card with faux snow and this post that explains 4 ways to use ribbons.

The Too Kind Stamp set and all of these supplies are available from my on-line store.

Thanks for Stopping by


Saturday, September 28, 2013

2-Step Stamping with Too Kind

Card made with Stampin'UP!'s Too Kind stamp set and Bitty Butterfly Punch2-Step Stamp Sets allow you to create some awesome images.  One of my favorites is a set called Too Kind. We used it in class this month to make this card.

Here's why its called 2-step stamping:
The 2 tones on the flower actually come from 2 different stamps.  The larger, lighter purple image is one stamp and the smaller, darker part of the flower is actually a 2nd stamp.

This card is actually really easy to make! 
*We stamped the stems first (because they're long and actually go under the sentiment strip. 
*Next we stamped the large, light purple part of the flower, because we wanted it situated right above the stem
*Finally we stamped the darker purple smaller part of the flower. 

Stampin'UP!'s Too Kind Stamp SetThis stamp set is nicely "forgiving" in that the placement of the flower heads does not have to be exact. It looks good pretty much where ever you stamp the 2 images.


Do you sometimes get annoying lines around your image because the ink got onto the edge of the stamp.? There ar 2 ways to avoid that.
1. Ink the stamp with markers instead of an ink pad
2. Trim your stamp to remove the edges.

Trim the edges of your stamp to avoid the ink edges on your project.
YES - I know they come die cut and ready to punch out.  But sometimes the edges are a problem anyway. 

Stampin'UP!'s Paper Snips have a wonderful sharp point and thin blade that lets me get under just the rubber and not the foam backing. 

This has really made a difference in the quality of my stamping.

Thanks for stopping by

--Katie
Only 3 days left to get your 15% Savings on the Bitty Butterfly punch and Papillon Potpourri Stamp set.

Stampin'UP!'s september promotion:  Bitty Butterfly Punch and Papillon Potpourri Stamp Set

Monday, July 30, 2012

"Spot On" or "Spotless" Background

Lets do a little survey: which background do you like better?  Just how important is the background on a card. Maybe its only the focal point that matters.  Compare these 2 cards. . .
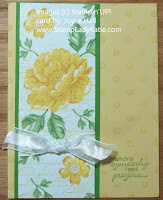
Card made with Stampin'UP! Stippled Blossoms and Distressed Dots. by StampLadyKatie Card made with Stampin'UP! Stippled Blossoms. by StampLadyKatie
The card on the left is one I got as a trade card at convention. It was made by one of the members of my group, Joyce Hall of Hudson,WI. She used the Distressed Dots background stamp. I did the one on the right to see how much of a difference the background makes.  What do you think?

The focal point on this card is from a stamp set called Stippled Blossoms.  The gorgeous coloring on this comes from the fact that this is a 2-step stamp set. A 2-step stamp set comes with pairs of images that are intended to be stamped one on top the other.

Joyce used the 2 stamps in the upper left to make the big flower.  She stamped the top image (the detailed line image) with a darker ink:  More Mustard and then she stamped the bottom image (the solid flower) using a lighter ink: So Saffron.

I can see why Joyce chose this background stamp.  The "distressed" dots image is a perfect complement to the "stippled" images of the flower.

So, now its time for your vote.  What do YOU think?  How much of a difference do you think the background makes? LEAVE A COMMENT BELOW

Happy Stamping
--Katie

REMINDERS: