Wednesday, May 30, 2012

Everything Eleanor and Everything Changes

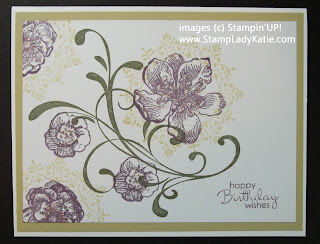
Made with Stampin'UP! stamp set: Everything Eleanor
Everything! Thats what today's post has to cover . . . everything.
1. Today is the LAST DAY you'll be able
    to order any retiring product.
2. Tomorrow is the first day you can
     order from the NEW CATALOG
3. Stamp-a-Stack this weekend
4. and this card is made with a stamp set
    called Everything Eleanor

So, #1:  Have you looked at the retiring lists?  I really feel bad when someone comes a few months after the change and wants to order a stamp set thats retired. The lists are posted on my Stampin'UP! website. Call me if you have questions, but do it TODAY!  608.220.3450

#2: Do you have your new catalog yet?  Everyone who ordered $50 or more from me during the last calendar year will get one for free. Call me or email me to make arrangements to pick up yours. If you are coming to the Stamp-a-Stack this weekend you can get yours then. And of course, they will be available on-line as of June 1st.

#3: Are you signed up for the Stamp-a-Stack yet?  Your choice of date/time.  Sunday starting at 1PM or Monday starting at 6PM.  RSVP by email if you want to attend.

#4: And finally, how do you like the card? This was made with one of the new stamp sets called Everything Eleanor. I made this card as a trade for my demonstrator group which met last night. I mention that fact because I know a few gals from the group missed the meeting and I know they check my blog, so ladies, this is for you to see what you missed.

Does this card look slightly familiar?  I hope so. The green flourish on this card reminds me of Baroque Motifs (did you know that set was retiring?). How about that round doily like element under the flower - that reminded me of the Vintage Vogue stamp set (also retiring). And I love this color combination:  Always Artichoke, River Rock and Perfect Plum
Card made with Stampin'UP!'s Vintage Vogue stamp set. 
When I designed this card I wanted to see how well the new stamp sets replaced ones that were retiring. I ended up trying to copy this card which was posted in late February.  The older card was made with Vintage Vogue and while the imagery is not exactly the same as in the Everything Eleanor set it still makes a really beautiful card. I can't wait to get in more playtime with "Eleanor".

Happy Stamping
--Katie

BTW: have you registered for the Stamp-a-Stack yet?


Tuesday, May 29, 2012

Easy Knot but Not Easy to Say Good-bye to Retiring Product

Card uses Stampin'UP!s Elizabeth stamp and the Stripes embossing folder
I love the muted elegance of this card. The combination of the colors, the imagery, the texture, the satin ribbon and the gold embossing all really give it a rich, formal feel.

The neutral colors really let you focus on the imagery. Both the filigree image and the Congratulations are gold embossed on Vanilla paper. The base is Soft Suede which was spritzed with gold Smooch to add a little sparkle.

The texture on this card adds to its richness. There are lots of things contributing to the richness of the textures: the knotted ribbon, the gold embossing, the layers for the sentiment and the dry embossed stripes. The Soft Suede base was dry embossed using the Stripes embossing folder and the Big Shot
Card uses Stampin'UP!s Elizabeth stamp and the Stripes embossing folder
By the way, this is the easiest knot ever! I just cut the ribbon long enough to wrap the ends around the card and knotted it in the middle before adhering to the card. Voila!

One of the things I really appreciate about Stampin'UP! product is how things are designed to work together. The sentiment was punched with the Large Oval Punch (#119855) and layered on a piece punched with the Scallop Oval Punch (#119856). These 2 punches fit together perfectly AND they are a perfect fit for the center of this stamp!

The Stamp used on this card is called Elizabeth. This beautifully detailed stamp is sold individually. It looks gorgeous when gold embossed or just stamped. Wouldn't it make a beautiful place card for a dinner table?

Just as an FYI: this stamp is retiring. In fact there are only 3 days left to get any retiring product.

3 DAYS and COUNTING
The current catalog ends in 3 days. You have that much time to get any retiring stamps you still want. Retiring accessories are available only while supplies last and some are already sold out. Check out the retiring product here.

The new catalog goes live in 3 days. I've already contacted my customers about reserving their new catalogs for them. Do you need a catalog? If you don't already have a demonstrator I'd love to be yours. Just shoot me an email with your phone number and we'll figure out how to get you a copy of the catalog. And, of course, it will be available on-line too, but some of us just like to snuggle with the paper copy and yellow highlight and post-a-note all our favorites.

Happy Stamping
--Katie

Monday, May 28, 2012

Magic Color Change Card

Dinosaur Birthday card is a Magic Color Change Card
The concept of a Magic Color Change Card is that when you first look at it the image is uncolored, but when you manipulate the card the image becomes colored. 

This card does not really open, instead this is a variation on a slider card. When you look at the images you'll see that as you pull out the slider the image becomes colored. 

Class participants received written instructions as well as the class experience.  Sign-up today for the next Fancy Folds Class on June 12th.
See details of the class  AND SIGN-UP here.

Dinosaur Birthday card is a Magic Color Change Card
We did 3 cards in class this week and the Magic Color Change card was definitely the most challenging of the 3, both conceptually a well as technologically. Scroll down to see the other 2 cards in yesterday's post and Saturday's post.

Aren't these dinosaurs just the cutest?  Do you have any dinosaur fans in your house?  They are sure to have tons of fun coloring these images. This is Stampin'UP!'s Dinoroar Stamp set, available in either wood mount or clear mount. I think the words are so cute: "I dig dinosaurs and I dig you", and "ROAR! (that means happy birthday in dinosaur)" Order yours today HERE.

Happy Stamping
--Katie

REMINDER - - Only 4 days left to get retiring Stamp Sets.  
Last day to buy from the current catalog is May 31st. Check the retiring lists here

Sunday, May 27, 2012

Gate Fold Card with Double Punched Gates

Double Punched Gate Fold card made by StampLadyKatieHere is a Gate Fold card with something extra - a double punched image in the gates! The concept of a gate fold card is really simple. Instead of opening from a fold along one edge it opens in the middle with 2 sides acting like a pair of swinging gates.

To make this Gate Fold Card I started with a piece of card stock that was 4" by 12". The gate fold element on this card ends up being a 4" square. I just mounted it on a 4-1/4" by 5-1/2" piece of card stock so that it would end up being the same size as a regular card. 

Double Punched Gate Fold card made by StampLadyKatie
The feature of this gate fold card that makes it unique is the matched punched image in the gates. This card that we did at the class uses Stampin'UP!'s Blossom Punch (#125603).   Click this link if you want to see a gate fold card made without the punched images .

Here's two more examples of the gate fold with the matched double punched image. This one is a baby card.The punched image on this one was the Scallop Circle Punch.  It really doesn't matter what punch shape you use. What punches do you have that would work for this technique?

Double Punched Gate Fold card made by StampLadyKatie Double Punched Gate Fold card made by StampLadyKatie

This was the 2nd of 3 cards we did at the Fancy Folds class. Be sure to check yesterday's post for the 1st card and come back tomorrow to see the last card: a Magic Color Change Card.

The Next Fancy Folds class is Tuesday, June 12th. You can RSVP now here. And be sure to check the full calendar for other events that might be of interest to you.

Happy Stamping
--Katie

Saturday, May 26, 2012

Diorama Card

We made this Diorama Card at the Fancy folds class this week.  The main features of a Diorama card are: 
*it stands up by itself
*it has a window you can see through
*and what you see when looking through the window has a 3D effect.

This diorama card was actually really easy to make. The finished card is regular size: 4-1/4 x 5-1/2". It is made of 2 separate pieces of card stock, scored at 1/2" and 1" from each end. 
*Punch a hole for the window
*decorate
*fold the score lines to make a box
*adhere the 1/2" strips on each end
Viola!


The decorating on this card was pretty simple. The butterfly was punched with the retiring Butterfly Punch (#119848). I used my favorite punch - the Dotted Scallop Ribbon Border punch (#119275) to make the white strip. In case you missed it I made a video showing how to make a medallion with this punch

The grass is from the stamp set Inspired by Nature (#111656). Sadly this stamp set is retiring!  If you want this stamp set you'd better order it NOW because once the catalog retires May 31st its gone.


Come back tomorrow to see another one of the Fancy Folds we made on Tuesday
Happy Stamping
--Katie

Monday, May 21, 2012

Blossom Builder Punch and the Flower Girl


Flower Petals for the flower girl made with Stampin'UP!'s Blossom Builder Punch
My daughter's wedding was this weekend and we made the petals for the flower girl to carry. The Blossom Builder Punch was the perfect tool. My helpers did get a little nervous when I said we were going to punch all the petals - but the punch makes 4 at a time so it made the job go very quickly.

It was really quick and easy to fill the basket - and a great way to use up scraps of cardstock and old Designer Papers! Plus, we swept them all up afterwards and they'll get used by an after-school program for a kids art project


Isn't she charming! This is the groom's niece. The grooms men all wore Hawaiian shirts and her dress was made by an aunt to match the mens' shirts. She took her responsibilities very seriously and really did a great job.

By the way: are you looking for a photographer?  I did take this photo because I wanted to show off the petals however I'm NOT volunteering for your needs. But I am strongly endorsing the photographer we used. The groom's sister and her husband have a photography business and I can highly recommend their work. You can check out their work at: Portrait-Independence.com. No doubt some of the photos from Sara's wedding will be on their slide show soon.

Do you have a "do-it-yourself-wedding coming up in the near future?  I have all kids of suggestions. Feel free to contact me for ideas about invitations, decorations, favors, wedding programs, and, of course, flower petals for the flower girl.

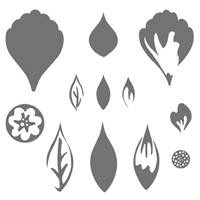
The Blossom Builder punch was perfect for several reasons. It has a variety of sizes and and a variety of shapes and punches 4 at a time. I can personally recommend this punch for this job so for anyone with a wedding coming up, you really need this punch! (item #121808) Plus, its great for punch art projects and it has a matching stamp set.  

Thanks for all your good wishes for the wedding. It was a wonderful event, everything came together beautifully. After a 1 week break I'm back to blogging and stamping. If you don't already have a demonstrator I'd love to be yours. You can get this punch and all your Stampin'UP! product at my on-line store.  Feel free to contact me with any questions.

Happy Stamping
--Katie

Monday, May 14, 2012

Owl Punch Graduation Card

Doesn't this owl make a cut graduation card? Today's post shows one of the cards we're doing at the community centers this month. I always try to give people a choice of sentiments and since we're close to the end of the school year there are lots of graduations coming up. This wise old owl is perfect for a graduation card. And he's so easy to make with the owl punch.

The first card uses one of the sentiments from Curvy Verses. This is one of the stamp sets that is retiring this month. In case you've somehow missed the notification, the current Stampin'UP! catalog expires the end of May. 

If you haven't done so yet be sure to check out the retiring stamps and accessories. You can see the lists and images of all current product HERE. Retiring Stamps are available through the end of the month but retiring accessories are only available while supplies last.

Accessories include anything that isn't a stamp. That includes cardstock, ink, markers, ribbon, brads, designer paper, the Big Shot . . . and of course, punches. 

I used lots of accessories on this card.
  • the texture on the house is from the Stripes embossing folder
  • the texture on the roof is from the houndstooth embossing folder 
  • the owl was made with the Owl builder punch
  • his wings were made with the scallop oval punch which I cut into 4 sections. One oval makes 2 owls
  • The black 1/8" taffeta ribbon on the hat is just folded in half and stuck between the legs of a gold brad
  • The hat I cut free hand, I'm still waiting for a diamond punch
The Congratulations sentiment on the 2nd card is from Curly Cute. Of course graduations are not the only thing we congratulate people for: there's promotions, retirements, weddings and babies, to name a few. 

And I have one of those events coming up. No, I don't mean the retiring stamps. My daughter Sara is getting married on Saturday. If you follow this blog then I'm announcing a 1 week hiatus . . . I won't be posting again until after the wedding. However, I will be checking email regularly. So feel free to contact me with any questions, especially questions related to retiring product.

Happy stamping
--Katie


Friday, May 11, 2012

Winter Scrapbook Page

Here is an idea for a winter scrapbook double page lay-out. I know its not winter, but there are several reasons to share it now. 

 First: May is National Scrapbook Month. So even though its not winter, this is a very appropriate time to share a winter scrapbook page. 

 Second: May is also the month to say a final farewell to retiring product and this page, even though its a winter page, uses 3 retiring products. These products are all retiring and only available while supplies last. You can check availability by browsing my Stampin'UP! store.
  • Serif Essentials Alphabet Dies - - - 113464, $149.95
  • Large Snowflake #2 Die - - - 113460, $15.95
  • Snowflake Punch item - - - #119852, $16.95
Points to remember when creating scrapbook pages:  be sure to include a headline and, where appropriate, include journaling. This will be a help to you and others later to more fully enjoy the pictures and the memories they hold. So, what pictures do you have that would fit these pages?

Happy Stamping AND Happy Scrapping
--Katie

Thursday, May 10, 2012

Good-bye Greenhouse Garden

The Greenhouse Garden stamp set is retiring. This is a 2-step stamp set which makes incredible images when you stamp the matching  flowers in coordinating colors. It doesn't matter what color you choose, this set makes gorgeous cards. Even if you stamp in black! 

If you like the look you get with the Greenhouse Garden set, then check out these other posts that use this amazing 2-Step stamp set:  Card #1 and Card #2


Card made with Stampin'UP!'s Greenhouse Garden Stamp Set. Made by StampLadyKatie Card made with Stampin'UP!'s Greenhouse Garden Stamp Set. Made by StampLadyKatie Card made with Stampin'UP!'s Greenhouse Garden Stamp Set. Made by StampLadyKatie
click on any of these images to see them larger (and the glitter on the flowers)
That first card actually was stamped in black! I "stamped off" the solid image and  stamped the veins full strength.  If "stamping off" is not a familiar technique then check this post where I explained it using another example. The concept is really easy, you use it when you want the color, just less intense. I inked the solid flower stamp and lightly stamped on scratch paper to remove some of the ink, then stamped my card piece. The resulting image is light gray. Its so fast and easy and can make some impressive projects.

Greenhouse Garden is retiring along with a long list of others as we transition into the new catalog. Retiring stamp sets will be available through the end of May 2012. The new catalog goes live June 1. Check the lists of retiring stamp sets HERE. If you browse the "store" on my website you will see the images of each retiring set.

Retiring Accessories are now available only while supplies last! Again, browse the store. Some items (like some of the papers) are reduced in price. And some items won't appear because they are already sold out!  If there's something you want then don't delay. Order what you want while its still available.

contact me with any questions
Happy Stamping
--Katie

Wednesday, May 9, 2012

Upgrade to My Digital Studio 2

Stampin'UP! has just announced an upgrade to our Digital Scrapbooking Product: My Digital Studio. There are many wonderful new features to My Digital Studio 2. Sara Douglas, daughter of Stampin'UP! founder Shelli Gardner shares some of the new features in this video.


Stampin'UP! My Digital Studio 2
When should you get the upgrade? The upgrade is coming soon. If you already have My Digital Studio, you'll be able to upgrade for only $20. If you don't have this software yet, don't wait. Get the product now and start playing with it. If you buy the product now you'll be able to upgrade for FREE when it comes available.

My Digital Studio is a wonderful software package that lets you re-size your digital images and combine them in creative ways with Stampin'UP!'s exclusive punch and stamp imagery.

And once you purchase a set of Digital Designer Papers or Digital Stamp set you have it forever!
Your digital file never retires
.
Happy Stamping AND Happy Scrapping
Feel free to contact me with any questions
--Katie

Tuesday, May 8, 2012

Charming Emboss Resist

The concept of a resist is quite simple - continued. At the May Stamp-a-Stack we made 2 cards with this technique - yesterday's post showed one of them. The technique really is very simple, you put something on the card that "resists" the ink - i.e. makes it so the paper won't hold the ink. For both of the May cards we heat embossed an image and then sponged ink over the embossing. The ink sticks to the paper but not to the embossed image.

The embossed image on this card is from a stamp set called: Charming. This is one of the retiring sets. The images are all small and intended to go with the Simply Adorned Jewelry line which is also retiring. 

Simply Adorned was a really fun concept in Jewelry. You can buy chains for necklaces or bracelets and add window charms which could be decorated with designer papers or stamped art. You can customize your jewelry to match your clothes or to celebrate an event. These accessories are now available "while supplies last". Availability changes daily so check the store listings for desired items. Type the word "adorned" into the search box.

What do you think of the decorative punched holes on this card? They were made with a tool called the Mat Pack.

Products Used On This Card:
118533 . . . Wonderfully Worn Background Stamp (retiring)
115060 . . . Sentiment Stamps: Short and Sweet (retiring)
105826 . . . Mat Pack (retiring)
109132 . . . White Embossing Powder
100005 . . . Heat Embossing Tool
 119859 . . . Extra Large Oval Punch
101610 . . . Stamping Sponges
104336 . . . Silver Brads
122973 . . . Wisteria Wonder Ruffled Ribbon
122922 . . . Wisteria Wonder Paper
122936 . . . Wisteria Wonder Ink

Feel free to contact me with any stamping questions
Happy Stamping
--Katie

Monday, May 7, 2012

Upsy Daisy Emboss Resist

 The concept of a resist is quite simple. You put something on the card that "resists" the ink - i.e. makes it so the paper won't hold the ink. We actually made 2 cards with this technique and for both cards we heat embossed an image and then sponged ink over the embossing. The ink sticks to the paper but not to the embossed image.

The stamp set used on today's card is UpsyDaisy. It was stamped in Black Craft Ink and heat embossed with clear embossing powder onto So Saffron paper.

We used a post-a-note punched with a 1-3/4" circle punch to mask off an area for the "moon". We sponged Peach Parfait ink over the embossed image. The ink stayed on the paper but not on the embossed image.

Other items used on this card - ALL available from my Stampin'UP! store:
   ** 1/8" Black Taffeta Ribbon
   ** Large Oval Punch
   ** Scallop Oval Punch
   ** Oval All Stamp Set (sentiment)
   ** Peach Parfait Marker
   ** Self-Stick Rhinestones
   ** Star Burst Embossing Folder

Emboss Resist is a really easy technique that can make some very impressive looking projects. Give it a try, I think you'll be really pleased with the results.

Have you checked the Lists of Retiring Product?  see the Lists Here. Retiring Stamps will disappear at the end of the month and retiring accessories are only here "while supplies lastIf there is anything on the list you want be sure to get it before its gone!

Happy Stamping
--Katie

Sunday, May 6, 2012

Make a Paper Medallion with a Border Punch

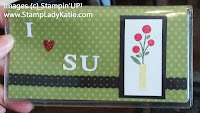
Border Punches can be used in a variety of ways. First: The obvious use is to make a border. The black border on this check book cover was made with Stampin'UP!'s Dotted Scallop Ribbon Border Punch.
Stampin'UP! Dotted Scallop Ribbon Border Punch 


Stampin'UP! Dotted Scallop Ribbon Border Punch
You can switch it up a bit by exposing only half the border. On this card I tucked the punched paper ribbon behind the floral element and just let a little peek out from one edge.

Using the punched ribbon this way gives extra decorative emphasis to the frame for a focal point. I love using this particular punch this way because the holes on the punched strip really add to the visual impact of the project.

One of my favorite uses for border punches is to make a "medallion". Just cut a square of paper and punch once in the middle of each side to make a medallion as a layer on the card like these.
Stampin'UP! Dotted Scallop Ribbon Border Punch square medallion Stampin'UP! Dotted Scallop Ribbon Border Punch square medallion

These Square Medallions are really easy to make. For this punch try a 3" square or a 3.25" square.  Watch the video to see how easy this is. (2:49)


I hope you found this helpful. Feel free to contact me with any questions.

To get your Dotted Scallop Ribbon Border punch visit my on-line store. It is item #119275 
And while you are there be sure to check the retiring products lists and be sure to check the Clearance Rack.

Happy Stamping
--Katie

Tuesday, May 1, 2012

Join Stampin'UP! - New Starter Kit available Today

Stampin'UP! has just made it easier than ever to get started. The Starter Kit has been re-designed to be completely customizable.  

YOU get 
what YOU need 
to do business YOUR way.


Joining Stampin'UP! could benefit you both financially and artistically. 

FINANCIALLY - How would you like to get all your stamps for FREE and never have to pay for any more paper, markers, brads or any supplies? Sounds too good to be true, right? Well I can't remember the last time I had to use any of my own money to buy stamping supplies. My business pays for all my supplies and then some. Does this sound intriguing? Call (608-220-3450) or email and ask me questions - I'll explain how I do it.

ARTISTICALLY - Whether you are a novice or an expert, I feel confident saying that both your skill and knowledge will improve dramatically as you begin to associate with other stampers on a professional level. When I started this was my big challenge. I was never confident enough of my own work and was hesitant to show other stampers much less teach them. But by joining Stampin'UP! I suddenly had access to a whole world of creativity and shared knowledge and expertise from other demonstrators.

Here are some answers to frequent questions about MONEY
  • Price: $99.  This is a re-designed kit with a new price, the previous kit sold for $175.
  • You get $125 worth of stamping supplies (anything you want, you simply put together an order for $125 worth of supplies and you pay only $99)
  • You also get an additional $65 worth of business supplies . . . order forms, postcards, etc
  • You get discounts on all purchases as long as you stay active. . . 20% and up depending on sales
 Here are some answers to frequent questions about doing this as a BUSINESS:
  • This is an EASY BUSINESS to have. There is lots of networking among demonstrators and I can show you how easy it is to start this as a business.
  • However, there's also NO OBLIGATION to run it as a business, you get the discounts as long as you maintain your minimums. Some people love the idea of teaching and selling and others join to support their stamping hobby.
There are OTHER "PERKS" too:
  • You'd have access to Stampin'UP! website training materials
  • You'd have access to an exclusive Stampin'UP! demonstrator sharing site full of photos and discussion forums
  • You'd have access to an exclusive Stampin'UP! demonstrator magazine full of project ideas and business ideas
  • You are invited to attend the yearly Convention and other Regional meetings
  • And, as a member of MY Team you have access to my exclusive training website
  • And, as a member of MY Team you have access to monthly meetings with other local demonstrators (if you are not local we still support you - you can participate in our trades and you'll get additional support by phone and by email and via the web)
  • Plus, its totally fun! You meet great people, you make new friends and you help others develop their skills. 
Please call if you'd like to discuss this opportunity.  608-220-3450 or by email

 Think about it. How many people get to say they totally LOVE their job?  

Happy Stamping
--Katie