Thursday, March 29, 2012

Last Chance to Sale-a-Brate with FREE Paper for the Rest of 2012

The Sale-a-bration Starter Kit special  is ending soon!  Are you aware that right now the Starter Kit is on special?  Over $340 worth of product normally sells for $175 and is on special for the rest of the month for only $125.  This promotion also includes your choice of FREE DESIGNER PAPER either a designer series pack or digital downloads every month for the rest of the year. But this promotion lasts  only 3 more days!

Why would you want to buy the Starter Kit?  
 1)  To start or develop your stamping hobby
     Its a great selection of paper, stamps and accessories at an amazing price
     And you can customize the kit - if you already own some of the things that come with the
     kit you can exchange for something of equal value that you don't have yet.
     (Check out what you can do with the Kit contents HERE)


2) To start a business as a workshop demonstrator or teaching stamping classes
     Let me show you how easy it is to establish yourself with regular monthly events teaching others
    how to stamp and helping them grow their skills. 

3) AND: You won't be alone.  You'll be joining a world-wide network of demonstrators
     and you'll be joining my growing team.
     *access to Company sponsored exclusive demonstrator website
     *access to MY downline website
     *monthly Stampin'UP! demonstrator Magazine
All three designed to help you develop your product knowledge, your presentation skills, your business knowledge

$$$ !?
Contact me with questions.  You can totally make this hobby pay for itself and I can show you how.
**I hold monthly meetings for my local downline.
**If you are not local its no problem. I have a private Yahoo Group I use to support you. And you can swap by mail if you want.  Photos of all our swaps are available on the Yahoo Site.
Our next meeting will focus on financing your business and keeping it profitable.

PLUS:
You'll be eligible to attend demonstrator events like area Regionals and the Yearly convention.
This "convention Commercial" was made by demonstrators as part of a contest.  We're a wild and crazy group (maybe I should have said "crafty" group?) but we do have fun. And you can be part of that . . .

2012 Stampin'Up! Convention Commercial

Registration for convention starts next month! Join now while the starter kit is on sale (remember: only $125 for over $340 value of product and business supplies).   Deadline for this Sale A Bration promotion is March 31st.

What a Deal!  Only $125 to start this hobby, to grow your hobby or start a business.  I am available by phone (608-220-3450) to answer any of your questions, or you can find out more from my Stampin'UP! website.

Hope to hear from you soon
--Katie

Wednesday, March 28, 2012

Bright Blossom Sneak Peak

Are you ready for a Sneak Peak?  This card is made with a stamp set called Bright Blossoms. It will be in the next catalog, but Stampin'UP! is releasing it early - Whoo Hoo!  Demonstrators can already get this set and we're all busy making samples to show. I made this card as a Demo Trade for a meeting last night.

Customers can get this set early too! Starting April 1st (no "fooling"!) this set will be available to all customers. Be sure to check this blog on Sunday to get all the details about this offer.

The Sentiment on this card is from a set called Teeny Tiny Wishes. I love this set, it has 24 different sentiments and they're all small enough to fit in Stampin'UP!'s Word Window Punch

However . . . 

The image on this card was punched with Stampin'UP!'s Jewelry Tag Punch. To make it fit I used a marker so that only the "for you" part of the sentiment got inked.  Pretty tricky huh? I just turned that set of 24 stamps into a set of 25! Then I punched the same shape from Real Red and Tempting Turquoise and layered them all together.
Notice that the image on the fabric matches the Bright Blossom stamp image. This is a new fabric that  will also be available in the new catalog. I wrapped a 1" wide strip of fabric around the card stock and taped it to the back. Then I tied it in the middle with some of Stampin'UP!'s Linen Thread and punched a hole in the little sentiment tag to tie it onto the card.  
 

Important Dates to Remember:
March 31st
**the LAST day to take advantage of Sale-a-bration
**the LAST day to get both the Starter Kit at the reduced price AND a free package of Designer Paper each month for the rest of 2012
April 1st
**the first day the Sneak Peak items are available to customers

Happy Stamping
--Katie

Tuesday, March 27, 2012

He is Risen Punch Flower Easter Card

This Easter Card features punched flowers and the He Is Risen sentiment. This sentiment is from the current Mini Catalog and is sold as a single stamp. Despite all the cute punch art bunnies and Easter eggs, this is of course the reason for the celebration.

For added texture the card has a layer on the front that was embossed with the Manhattan Flower embossing folder.  I love using the Big Shot and embossing folders to create extra texture on a card. It really adds richness to a project.

The sentiment is gold embossed and punched with the Decorative Label punch. The same punch is used to make the framing layer punched out of gold metallic paper. I showed in an earlier post how to use the one punch to get this layered effect. Check here to see how its done. This is a really cool technique and its a great way to get double duty from your punches. It works especially well with the Decorative Label Punch.


The flower is made from 1 white piece punched from the new Blossom Punch and 2 white pieces punched with the 5-Petal Flower Punch. They are held together by a gold brad. The green leaves are also punched from the 5-Petal Flower Punch.

Did you notice that the flower has some dimension too?  After we put the flower layers together we curled the petals with a bone folder.  Its such a simple easy thing to do, but again, it adds more dimension and interest.


Please feel free to contact me with any questions. I appreciate your interest in my creations and your interest in my business.  If you are not already on my mailing list you can click here to be added now.  You'll get a monthly newsletter, notification of all Stampin'UP! promotions and occasional little extras that I don't always post on the web.

Happy Stamping
--Katie

Monday, March 26, 2012

Punch Art Easter Egg

Punch Art Easter Bunny and Punch Art Easter Egg
This punch art Easter egg was added to the punch art bunny card.  Look familiar? The bunny was in yesterday's post. But at the last minute I decided to add the egg to the card to for the Easter Stamp Camp.

The Easter egg is so easy to make.  It only takes 2 oval punches. The egg itself is punched from the Extra Large Oval Punch. 

To create the color bands I first used the Extra Large Oval punch to punch out a small area from the edge of my scrap paper.  Then I placed the Scallop Oval punch over the hole and punched out the ridge you see on the  egg.  Then glue them to the egg and trim the edges.  See the "recipe" card below. 


I'm sure you could do something similar with just one oval punch.
How to make the punch art Easter Egg

Here is the "recipe" Card for the Easter Bunny
How to make the punch art Easter Bunny
Reminders:
Please contact me with any questions, I'm happy to answer them.

"Hoppy" stamping
--Katie

Friday, March 23, 2012

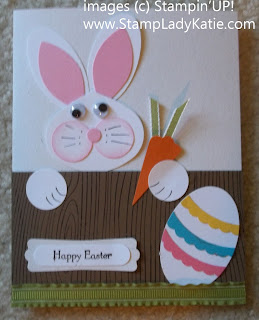
Punch Art Easter Bunny

This Punch Art Easter Bunny is one of the cards we are doing this weekend at the Easter Stamp Camp.  Are you registered?  If not you can RSVP HERE

Easy enough for beginners! When I do a Stamp Camp I need cards that are not too hard. A beginner should be able to listen to a few instructions and then figure it out based on the supplies and the sample. This guy is really just that easy.

If he looks familiar its because I was CASEing a similar card with a punch art snowman.

The fence was stamped with the Wood Grain background stamp. The "grass" is the Lucky Limeade Ruffled Ribbon. The sentiment is from a wonderful set called Teeny Tiny Wishes and it was punched with the Word Window Punch and layered on top a piece punched with the Modern Label Punch.

The Carrot was punched with the Scallop Circle Punch and then snipped with scissors to make the point. The carrot leaves are the 1/8" Taffeta Ribbon in Old Olive.

The Bunny's head is the Ornament Punch
The ears are the Large Oval punch and the pink is from the Build-a-Blossom Punch
The cheeks and paws are a 3/4" circle punch enhanced with a black marker
The nose is a 1/8" circle punch.

Remember that Stampin'UP! markers have 2 ends: a brush end and a fine tip end. The fine tip did a "fine" job making the paws and whiskers. You can see that I did sponge a little Pink ink around the cheeks. This helps give it some definition against the white face.

Do you like making punch art? If you are coming this weekend you'll get to make this little cutie.  And if not he's pretty easy to make if you have the right punches. You could try a large oval punch if you don't have the ornament punch.  And if you need any supplies to make him or any other stamping project you can find it at my on-line store. Shop 24/7 HERE.

"Hoppy" Stamping
--Katie

Tuesday, March 20, 2012

Blown Glass Easter Egg

Card made with the Blown Glass Technique. Made by StampLadyKatie
Do you send Easter greetings?  If so  then sign-up for the Easter Stamp Camp this Sunday.

There will be a choice of 7 projects - 5 cards and the other 2 will be 3D items. Normally at a stamp camp there are only 5 choices and you make 10 total, 2 of each. Your class fee for this event still pays for only 10 projects so you'll have to pick and choose or we can adjust the price if you want to make 2 each of all 7.

You'll be learning the Blown Glass technique at this event. This technique requires overnight drying so I'll be making 1 egg ahead of time for each registrant so you can walk out with a finished card and you will make one egg yourself.

Are you interested?  If so, please register NOW, because then I can get a head start on making the eggs ahead of time.

close-up of the Blown Glass Technique by StampLadyKatie
Sunday March 25th starting at 1:00.  
**Click HERE to RSVP on my Stampin'UP! calendar 

Hope to see you soon
--Katie

Saturday, March 17, 2012

Well Worn Masculine Card

Do you have as much trouble as I do in finding a good card suitable for giving to a man? I don't know what you look for in a masculine card but for me the criteria for a "man" card is:
*no ribbon
*no pastel colors
*no glitter
*metal somewhere

This sample is a great masculine card. The designer paper is from a pack called "Well Worn" and the colors are perfect. I backed it with a piece of Not Quite Navy and a Cajun Craze circle. The sentiment is from a set called On Your Birthday and it was punched out using the Decorative Label Punch. My metal here is one of the retired Jumbo Brads.
 
I'd love to tell you this was all my inspiration - but its not. I got a card similar to this as a trade card at a recent demonstrator meeting. Often when I get trade cards I use the general idea and tweak it a lot. This one I used almost as is.

I love going to Demonstrator Meetings. We get so many great ideas for cards and other projects. If you've ever wondered about joining Stampin'UP! now is a great time to join. For the next 2 weeks (until the end of March) the Starter Kit is on sale - only $125 for over $300 worth of stuff. In fact, whether you want to be a demonstrator or not, the Kit is a good deal!  Oh, almost forgot, you'll also get a FREE package of designer paper EACH MONTH with your first order of the month for the rest of 2012.

*If you are kind of interested you can read more here: on the Stampin'UP! website 
And you know, if you have questions and are wondering about what it means to buy a "Starter Kit" just call.  608-220-3450.  I'll answer any of your questions.  
  • If you decide to buy the starter Kit you've made a smart purchase with your stamping money. That could be the end of it - you have $300+ worth of stuff for only $125.
  • If you decide to actually become a Demonstrator it can change your life.The extra spending money is nice and I've made so many new friends its been wonderful.
You get so much more than just the product in the Starter Kit. Which ever your reason for buying it, when you buy the Starter Kit you have access to tons of support material from Stampin'UP!
*an exclusive idea website
*monthly magazine
*training webinars
AND, you have access to an exclusive website I maintain for my downline with even more ideas and business help. What ever you're looking for - I'll help you find it. Doesn't matter if you're local or far away, the internet is an amazing tool in a business like this.

I hope you are inspired to join my team
--Katie

Friday, March 16, 2012

Re-cycling Buttons

Card Made with Stampin'UP!'s Blossom Punch and Stripes Embossing Folder - by StampLadyKatieWhat do you do with old clothes? You know, the ones with too many holes to go into the Goodwill Box. My box of rags is well stocked - and besides, some fabric just does not make a good dust rag. One idea is to make them into a rag rug. Another idea is to use them in the garden to tie plants to stakes. We also use little strips of cloth to mark the electric fence for the animals.

Of course you have to take off the buttons and zippers for these uses. I donate the zippers to a local high school home ec teacher but I keep the buttons and use them on cards. At first glance these cards may all look the same, but on closer inspection you'll see they all have different buttons.

These cards were my latest batch of thank-you notes for people who placed orders at the early March events. I wanted to showcase product that people had bought from me - to help them see additional ways to use their new stuff.  Specifically I wanted to showcase embossing folders and the new Blossom Punch.

Card details:
*The card face was embossed with the Stripes embossing folder
*Then a piece was punched out using the Blossom Punch
*That piece with the hole in it was laid over a piece of Designer Paper and mounted on a card base.
*The sentiment is from a set called Thank-You Kindly
*The sentiment layers were punched with the Scallop Oval punch and  Extra-Large Oval Punch
*The two extra flower were punched with the Boho Blossom Punch
*Colors: Calypso Coral and Pear Pizzazz


Happy Stamping
--Katie

Thursday, March 15, 2012

Two Tags Die to Label the Orders

Do you make home made gift tags for your packages?  This usually is not an issue for me except at Christmas. (The kids are old enough that they just get a card and money for birthdays.) Anyway, here is an idea using the Two Tags Die and the Big Shot.

The tags were really easy to make. I actually printed the names on Avery Labels with the computer and stuck them to the tag. Super easy! Hmm, now you're wondering what the font was. I think it was MV Boli.

What do you think of the flower?  Its from a set called Pocket Silhouettes. I find myself using that set often because the images are both pretty and natural looking and because they're small. They were just the right size for this tag. 


The reason I made the tags is because I got tired of trying to remember which person's bag was which after I'd packaged up an order. I wanted a super cute way to label the bags - not just writing on them with a Sharpie. And this was a good way to get the job done and also showcase more of our product.

Most of these orders earned a FREE Sale-a-bration item. Each $50 of product you buy during Sale-a-bration earns you an item from the Sale-a-bration catalog. You don't have to wait until you see me. You can view the catalogs on-line and place your order on-line. And Clearance Rack items DO count towards the $50.  It will be delivered right to your door (of course you won't get a pretty package like this but you will get a Thank-you card from me). 

Time is running out - Sale-a-bration ends March 31st!
SHOP NOW

Happy Stamping
--Katie

Wednesday, March 14, 2012

GreenHouse Garden 2-step stamping

Are you a gardener? The garden catalogs have started to arrive at my house and I'm caught up in dreams of what my yard could look like this summer. All you gardeners out there know exactly what I mean. We see the gorgeous pictures of flowers and we know right where they should be growing in our yards. 

I'm sharing a photo of one of my favorite flowers: a mallow. These are great self-seeders and so pretty. I love the darker veins on the bright pink petals.  Thats the look I was going for with this card.

We did this card at the March Stamp-a-Stack. The stamp set is called Greenhouse Garden and its a 2-step Stamp Set. By "2-step" I mean that there is one stamp to create the light pink for the body of the flower and a 2nd stamp that makes the veins. You stamp the 2nd one over the first one. Don't you think its perfect for trying to re-create the mallow?

Card made with Stampin'UP! stamp set: GreenHouse Garden. Made by StampLadyKatie
The colors used on this card are Rose Red and Regal Rose. I chose those colors for a very practical reason - I had seam binding to match. 

Yes, Stampin'UP! sells seam binding too. Thats the great thing about getting all your supplies from one company, all the colors match: paper, ink, ribbon, buttons . . .everything.

The black edging was created with the Scallop Edge Border Punch and the flowers are accented with the Jumbo Self-Stick Pearls.


You can get all the supplies to make this card from my Stampin'UP! Store.  Just click HERE. Shop 24/7 and your order will be at your house in less than a week.

Happy Stamping
--Katie

Tuesday, March 13, 2012

WOW! Demonstration: a 2-4-6-8 Box

There were some great WOW! demonstrations at the Regional this weekend. Four different demonstrators were asked to share a special project. In past years they've done this on stage  and then disappeared into the crowd. This year they were set-up in booths with an overhead mirror. We could get "up close and personal" and ask questions while they worked. The over head mirror really helped to see what they were doing. WOW! What a great way to do things.
 
One of the demonstrators showed how to make these cute boxes. She used the Simply Scored tool to score an 8-1/2" piece of paper at 2", 4", 6" and 8". The box was then a 2" square. The other dimension depends on how tall you want the box to be.

These boxes are really easy to make. I can't wait to start making them. And she had so many  different variations. . . tall, short, some had handles, some were closed on top, some had a flap lid, some had acetate windows in the side, some had lacy top edges. This was indeed a WOW!

Do you see the same possibilities I do?  I can just see so many uses for these boxes. We will definitely be doing one of these easy boxes for the Easter Stamp Camp on March 25th. Are you signed up for this yet?  You can register on-line HERE And remember to bring a camera with you. I'll have a big display of the trade cards I got in Milwaukee.

Happy Stamping
--Katie

Monday, March 12, 2012

Milwaukee Regional Fun

It is so much fun going to the big Stampin'UP! events. Saturday was the Milwaukee Regional. I drove over with one of my downline (Sue Ampe) and her guest Bonny. Here they are working on one of the Make-and-Takes. Look at that crowd behind them! I didn't count but I'll bet there were 700-800 people there.

Our local group has really grown over the years. Our core group is located in the Madison area but we have group members from all over the US. These pictures represent people from southern Wisconsin: Janesville, Sun Prairie, Mt. Horeb, Hudson, Poynette, Madison, Stoughton, Milton, Waterloo and Deerfield. 

Does it look like we had a good time? You bet we did. These events are so energizing!  
  • We  re-connect with stamping friends we only see occasionally
  • We make new contacts
  • We try new product and make projects
  • We get business ideas
  • We see "WOW" demonstrations
  • We hear about new product from the upcoming catalogs
  • There are lots and lots of display boards with card samples
  • and . . . it included a great lunch!

 Would you like to attend events like this?  Contact me about joining Stampin'UP! some of these people are running active businesses like me. But not all of them. Others are doing small card events occasionally with neighbors and friends and a some have purchased the Starter Kit as a way to get a discount on their personal purchases. 

What ever your reasons for buying the Starter Kit, Stampin'UP! is there to support you. With events like this one and with access to an exclusive demonstrator website and a monthly magazine just for demonstrators. Need a little more convincing?  Check these pictures. There was a WHOLE wall of display boards with card samples like the photo below. There were lots of product displays including a chance to play with the new Cookie Stamps. In case you missed it, Saturday's post showed a little cookie treat I made for everyone in the group.
The Starter Kit is a great deal . . . whether you want to start a business or just want a ton of stamping stuff for a really really good price. There are 2 versions, one is all stamps and paper crafting supplies and the other includes our Digital Software. Check out the details HERE. and you CAN SUBSTITUTE other items in the catalog for the stamps an inks in the kit. It doesn't matter if you are local to Madison or anywhere in the US. Buy the Starter Kit and you can attend events like this. Its an incredible experience and you will be so glad you did.  Call me with any questions (608-220-3450) or just buy the kit HERE - click Join Now.

The Starter Kit really is a great deal - it  contains over $340 worth of product for only $175 - that alone is a good deal. Through the rest of March it is on sale for only $125 and you'll get a free package of Designer Paper each month for the rest of 2012 with your first order for the month. Check out the website or contact me about this great Kit.

Happy Stamping
--Katie

Saturday, March 10, 2012

St. Patrick's Day Stamped Cookie Treat

Cookie image stamped with Stampin'UP! Cookie Press Stamps. Made by StampLadyKatie
Here's a little treat I'm giving to my demo group today. Its a cookie stamped with our new Cookie Press Stamps. I know...if its for St.Patrick's Day I should have colored the dough green. I thought of that too late.

You may wonder why my demo group is getting this little treat. Well we're all going to the Stampin'UP! Regional Conference in Milwaukee today.  There are 22 of us going (my husband was worried there wouldn't be any cookies left for him!). 

And I even included the recipe in the package. These were pretty yummy if I do say so.  I think the REAL vanilla makes a difference. Using butter instead of margarine also helps. Send me an email if you want the recipe.

I love being part of something so special. Stampin'UP! is a great company and these are a great group of demonstrators. Do you enjoy stamping with others? Have you ever thought about joining Stampin'UP!? Now is a great time to join
  • The Starter Kit is discounted for Sale-a-bration 
  • AND if you join during Sale-a-bration you'll get a FREE package of paper or digital download of designer paper with your first order EVERY month for the rest of the year.
Read more about this special opportunity to join Stampin'UP! HERE. I'd love to have you join my team. Please feel free to contact me with any questions about what this could mean for you.

Do you like the Shamrock?  It was so easy to make. I just punched a 1/2" circle and 4 small hearts. I glued the hearts to the circle. That was my easy way to be sure they were aligned properly.
And how about that gorgeous green jewel? I love using Stampin'UP!'s self-stick rhinestones to dress up a project. But of course they have no color. But guess what, you can color them with a sharpie! Sweet.

 
"Top 'o the morninin' to ya" and have a great day.
Happy Stamping
--Katie

Friday, March 9, 2012

Think Green: for St. Patrick's Day AND Re-Cycling

St. Patrick's Day card made with Stampin'UP! Stamp Set: Turtle and company. Made by StampLadyKatie
What do you think of when someone says "think green"? Well this time of year St. Patrick's day comes to mind. We did this card at the March Stamp-a-Stack. Check the events calendar for more great stamping opportunities.

The green on this card is Lucky Limeade. I know that frogs have nothing to do with St. Patrick's day, but hey, frogs are green so it works right? The frog is from a Stamp Set called Turtle and Company. This is Stampin'UP!'s Ronald McDonald Charity set for this year. The sentiment is from Teeny Tiny Wishes.

How about that green organdy ribbon! I got that for FREE as a Sale-a-bration gift. Read more about Sale-a-bration here . . .

I've been trying to offer choices at my stamping events. I know that not everyone celebrates St. Patrick's day so . . .

Here's the same card made into a "hello" card. The sentiment on this one is also from Turtle and Company. The floral image is from Pocket Silhouettes. Where do you like the sentiment better?  Under the ribbon or up in the corner?  Leave a comment below.

Card made with Stampin'UP! Stamp Set: Turtle and company. Made by StampLadyKatie   Card made with Stampin'UP! Stamp Set: Turtle and company. Made by StampLadyKatie
OK, so where does the RE-CYCLING come in?  The hearts on this were punched from scrap paper. I am a saver and I save every little piece that could possibly be used to punch something. I had some thin strips of paper left over from another project and the Small Heart Punch worked perfectly on them.

THINGS TO REMEMBER
  • Sale-a-bration ends March 31st. Now is the time to inventory your papers and embellishments and stock-up for the next few months. Don't waste the opportunity to get something for FREE.
  • Hostesses get even more.
    If you are local
    then contact me to see if we can squeeze in a Sale-a-bration event for you towards the end of March.
    Not local?  No Time to have an event?  Contact me about "hosting" a Book Party.

Happy Stamping
--Katie


Thursday, March 8, 2012

Newsletters and Trades

Are you on my Newsletter List?  I just sent out the March newsletter. If not you can sign-up HERE and you will get the March Newsletter.

You'll also get a small thank-you gift (a little pdf technique tutorial) for signing up. I think "ewe" will find it very interesting.

Today is my busy day - finishing all my trades for the Milwaukee Regional.  I'm doing both a card trade and a 3D trade. This little bunny is my 3D trade. He's made with Stampin'UP! round Treat Cups #116802 ($2.50/dozen).

Happy Stamping
or maybe I should say "hoppy" stamping!
--Katie

Wednesday, March 7, 2012

Kindness Matters

Stampin'UP! stamp set: Kindness Matters
Kindness Matters - So Does Getting Stuff For FREE! This is one of the FREE sets I got for a Sale-a-bration purchase.  Each $50 purchase during Sale-a-bration earns you a FREE item from the Sale-a-bration catalog. Check your Sale-a-bration choices here.


Some of the Sale-a-bration options are EXCLUSIVE to the promotion catalog. But this one is from the main catalog and I'd been wanting it for a long time.  So I was really happy to see it was part of this year's Sale-a-bration offerings.

card made with Stampin'UP! stamp set: Kindness Matters. Made by StampLadyKatie

We used this set at the March Stamp-a-Stack. This card was really quick and easy to make. We used the Aquapainter to color the images (Wisteria Wonder, Melon Mambo, and Tempting Turquoise). Of course, since we were watercoloring we stamped the image in Staz-ON ink so the lines would not smudge.
card made with Stampin'UP! stamp set: Kindness Matters. Made by StampLadyKatie


There is no sentiment on this card. That way people could use it as a note card. Or you could stamp a sentiment on the inside to make it any occasion you wanted. How would you use this card?  Birthday, thinking of you? Thank-you?  Maybe using it for a thank-you might be a good use - after all the set is called Kindness Matters!


We also "Smooch'ed it". Smooch Spritz is a wonderful product for adding just a subtle hint of sparkle to a product. It comes in several colors, for this card we used the Vanilla Shimmer Smooch.

Stampin'UP! Staz-ON Black Ink Pad
Black Staz-ON Ink
Stampin'UP! AquaPainter
Aqua Painter
Stampin'UP! Vanilla Smooch Spritz
Vanilla Shimmer Smooch

You can get these supplies from my Stampin'UP! Store. Shop here 24/7. And remember, if your product order is at least $50 you can get this stamp set for FREE.
Click HERE to start shopping.


Thanks for stopping by
Happy Stamping
--Katie

Tuesday, March 6, 2012

Scrapbook Options: Traditional or Digital

Are you a scrapbooker?  What is your format? Do you work with traditional materials (paper, ink, scissors, printed photographs . . .) or digitally? There are advantages to each.

If you've never tried digital scrapbooking and are curious about why people like it, then consider this:
  1. With digital scrapping you can alter the SIZE of the photos and other elements
  2. You can alter the COLOR of the elements to perfectly match your photos
  3. You can ROTATE elements and photos to create different effects
  4. This is just the basics, there is so-o-o-o-o-o much more you can do!
Stampin'UP!'s digital program is called: My Digital Studio There is a whole web community of active users who share, support and teach each other new tricks to use with the program. You can browse this web community for free at www.mydigitalstudio.net

There are 2 versions of My Digital Studio. One comes on CD's which you install on your computer. The other comes as a download from the internet. Watch the video below to see the difference.


Isn't it great to have a video to watch to help explain things. You'll find TONS! of useful videos like this on: www.MyDigitalStudio.net

Are you inspired to try digital scrapping?  Would you like to try it before you buy it? You can get a FREE 30-day trial version of My Digital Studio Express. Follow the link in the middle of the page as shown in the picture to the right.

Do you still have questions about what a digital scrapbook program can do for you?  Please feel free to call me (608-220-3450) or write an email. I can answer your questions.  But really, just download the free 30-day trial version and play with it. Then you'll see for yourself.

AND definitely spend some time lurking around on the community website. You'll learn so much about the program and what you read on the community site will make so much more sense after you've had a chance to play with the program. FREE is great - even if it is only for 1 month.

Happy scrapping
--Katie

Monday, March 5, 2012

Its All About CHOICES!

The Stampin'UP! Sale-a-bration Catalog
Sale-a-bration 2012 has so many wonderful options. Which Sale-a-bration set did YOU choose? Click on the catalog image or the link below to see all your choices. You'll find some EXCLUSIVE sale-a-bration items and some items from the regular catalog that you could choose.


Sale-a-bration ends March 31st. This is the last month of Sale-a-bration so don't delay. Each $50 purchase during Sale-a-bration earns you a FREE item from the Sale-a-bration catalog, so now is definitely the time to stock up on consumables: paper, ribbon, buttons, brads, glitter . . .

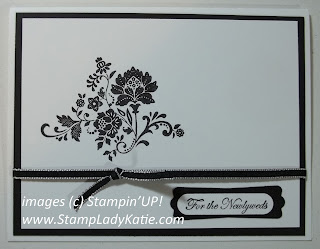
Card made with Stampin'UP! Sale-a-bration stamp set called Fresh Vintage. Card made by StampLadyKatie
One of your choices is a Stamp Set called Fresh Vintage. I used it on these cards. Isn't is amazing what you can do with just black and white?

This was my choice for a workshop I did for a group of novice stampers. I chose this as their first card for several reasons:
1. it uses only black ink
2. the floral image is very forgiving - it
   didn't matter if it was stamped crooked
3. because the sentiment was punched,
   it did not matter if they stamped
   it crooked.

I also picked this because they had a choice of sentiments. The words are from a set called Teeny Tiny Wishes. This set has 24 different sentiments all the same size. This way my new stampers became emotionally involved with the project as they planned out how they were going to use it - instead of just copying my design.

Card made with Stampin'UP! Sale-a-bration stamp set called Fresh Vintage. Card made by StampLadyKatie
We are using the same set for the March Stamp-a-Stack, but with another choice. This time we'll be adding a bit of color and the stampers will have to choose what color to add.

And speaking of colors: I love how well Stampin'UP! coordinates colors. Papers (and ink) and ribbons all are a perfect match. These cards showcase the 1/8" Taffeta Ribbons. With such great product from Stampin'UP! there really is no other choice.

You can view all the Stampin'UP! catalogs online HERE. Make your choice and purchase on-line and have your orders sent directly to your house.

Feel free to contact me with any questions, or leave a comment below.

Thanks for stopping by
Happy Stamping
--Katie


Saturday, March 3, 2012

Stampin'UP! Coordinates Product: Colors, Shapes, Sizes

Card made with Stampin'UP!'s Pocket Silhouette Stamp Set. Made by StampLadyKatie
What are your favorite spring colors?  I just started playing with Perfect Plum and River Rock and I'm really liking the combination.

Speaking of combinations and things matching: That is one of the signature advantages of Stampin'UP! 
1. Colors are carefully selected to 
    coordinate well together
2. Punches are carefully designed to nest 
    (as shown on the sentiment for this card)
3. Stamps and Punches are sized to fit together


Stampin'UP!'s Sincere Salutations stamp setThe sentiment on this card comes from a set called Sincere Salutations (#115068). There are 8 sentiments in the set and they are all the same size - so this card could be anything. What would you use it for???  birthday? sympathy? Thank-you?

Other product used:
  • The plants are from a set called Pocket Silhouettes  (#111672)
  • Scallop Oval Punch (#119856)
  • Extra-Large Oval Punch (#119859)

Happy Stamping
--Katie

Friday, March 2, 2012

New Diagonal Template for Simply Scored Tool

Image of Stampin'UP!'s new Diagonal Plate for the Simply Scored scoring tool

Something's NEW at Stampin'UP! - a diagonal plate for the Simply Scored scoring tool. We saw this amazing new tool demonstrated at Leadership convention in January and I can't wait to show you how it works.   If you are coming to the Stamp-a-Stack this weekend you'll get to play with it yourself.   RSVP for the event HERE


But you don't need to wait to see it in action. Check the video below to see it being demonstrated. Watch as Donna Griffith from the Stampin'UP! home office shows you the features of the tool AND how to make an envelope with it.


Here's a short list of Features for the Simply Scored Diagonal Plate
  • Sits on top of the Simply Scored base
  • Held securely in place by rubber pads on back of the plate
  • Has etched grooves every 1/8"
  • Can score any size card stock up to 12" x 12"
  • Includes instructions for creating common envelope sizes 
The Diagonal plate (#125586) is an accessory to the Simply Scored Tool (#122334).
Together these two tools open up a whole new world of papercrafting. Click HERE to order.

Happy Stamping
--Katie