Sunday, August 28, 2011

Colors!

   
Well, we're finally finished painting and have all the stuff moved back into the rooms. Whew, it sure feels good. Now, are you ready for a color challenge?  The colors we painted were: Banana Leaf, Showcase and Tony's Touch. Can you figure out which is which?

I figure the Showcase is almost a perfect Rich Razzleberry. The Banana Leaf is pretty close to Old Olive and the Tony's Touch is the Very Vanilla.

Aren't colors wonderful? Below is a color project I did with my downline this summer. We made display boards of the Stampin'UP! color collections.  We punched the paper, used the matching ink and a ribbon if I had one. (I don't own all the ribbons, my wall just looks like I do). This is  a business tool that we'll be able to display at workshops and classes we teach. You could make something like this for yourself.  


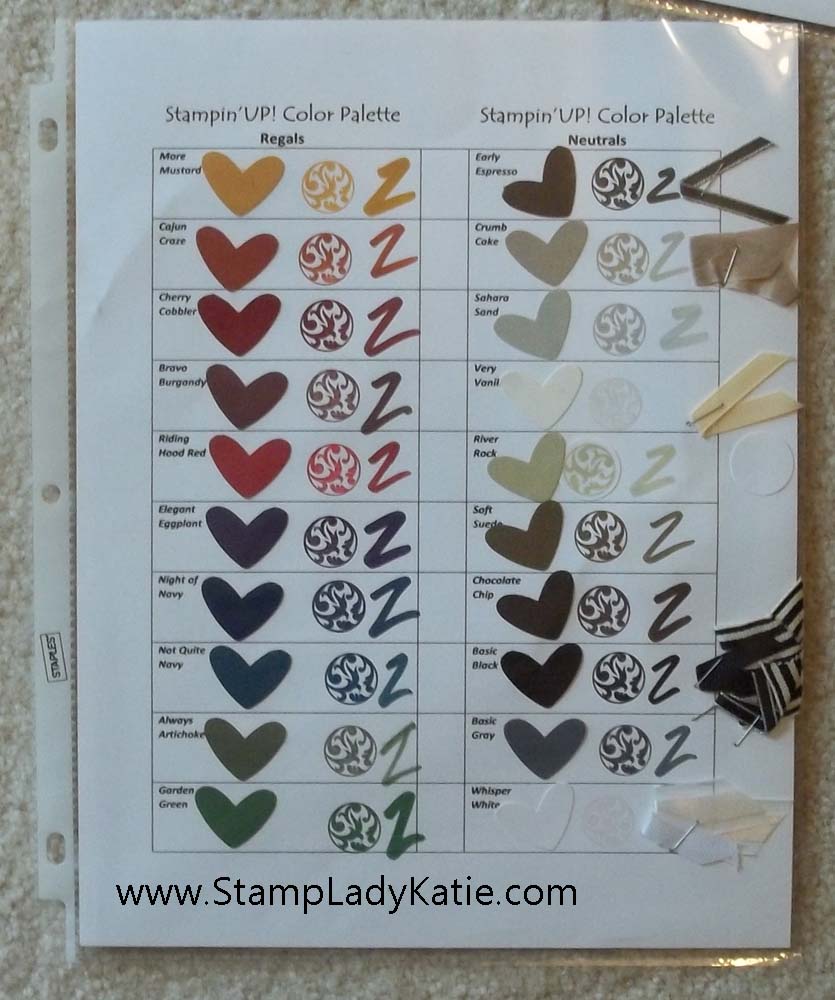
Stampin'UP!'s dedication to color coordination is one of the big selling features for this company. Don't you just hate when your ink color is not quite the right match for your paper? Or when you can't find the right ribbon color to go with the paper you're using. That never happens with Stampin'UP! products. With Stampin'UP! products everything matches: paper, ink, ribbon, brads, embossing powder . . . everything is color coordinated. Even the Designer Series papers. 

And speaking of Designer Papers, we are into the last 3 days of the August Special. Buy 3-Get-1-FREE. Buy 3 of the specially selected designer series paper packages and get the 4th for FREE. That is a 25% savings. But hurry now, because this offer expires August 31st. Click here for more details and to place your order online.

Happy Stamping
--Katie

Tuesday, August 23, 2011

Removing Unwanted Adhesive

Did you ever get the adhesive tape somewhere where you didn't want it?  When adhering 2 layers together you should always put the adhesive on the smaller of the 2 pieces, but occasionally someone forgets and puts it on the larger piece. If they put the adhesive too close to the edge of the larger piece, then when the smaller piece is attached you have sticky adhesive showing on the exposed edge of the larger layer behind it. Stampin'UP!'s Adhesive Eraser solves the problem. A little rubbing and that unwanted adhesive comes right off.

Well . . . I made a wonderful discovery today. Both my grown daughters have moved out and we are in the process of painting their rooms. Turns out both girls had used copious amounts of scotch tape to attach things to the walls in their rooms. Had to remove the tape before painting, it would have left a shape image on the wall. I could peel the cellophane part off, but the sticky was still there. It took me only a minute to think of our Adhesive Eraser. Sure enough, it worked perfectly.


It was actually very easy to do, it didn't take much rubbing at all. It did still leave some discoloration on the wall, but I was prepping it for painting anyway. The bonus is that it removed the sticky. The paint covered up the color and there was no tell-tale image where the tape had been. Who'd have thunk?  Glad I had that little gem on hand because otherwise I'd have been scraping with a blade and possibly even ended up damaging the wall.

The Adhesive Eraser (item #103684) is a handy item to have in your work area. Sometimes I'll get a little extra adhesive tape around the edge of little punched pieces or showing through the holes in a punched border. This little baby does the trick. And its also come in handy a few times to get me FREE merchandise and hostess benefits. Yep! Demonstrators get hostess benefits if we place a qualifying order. There have been times when my order has totaled a little less than $150 and by adding in the eraser at only $3.50 it was enough to reach the $150 level for an order that qualifies for Hostess Benefits. That little investment of $3.50 for the eraser earned me $25 in Hostess Dollars to spend on ANYTHING in the catalog. That's smart shopping!

Are you starting to think about Hostess Benefits for yourself?
*Begin by checking your supply of consumables: paper, adhesives, ink.
  Be sure to check your 12x12 designer papers - remember the August special
  Buy-3-Get-1-Free special on Designer paper.

  Now is a great time to stock up on Designer Series papers.
*Next: What's on your wish list? Any Big Ticket items?  Combine something from your wish list
  with some Designer Papers, place your order on-line and have it delivered to your house.
And remember to add an Adhesive Eraser if you don't have one.

Happy Stamping
--Katie

Monday, August 22, 2011

Turtle and Company

Today's card uses another one of Stampin'UP!'s philanthropy sets. This card uses stamps from a set called Turtle and Company. Proceeds from the sale of this set go to support the Ronald McDonald House. The RMDH is Stampin'UP!'s on-going charity. I'm so proud to be part of a company that feels so strongly about contributing in a meaningful way.

This would be a great stamp set to use with children because the images are all open drawings and the kids can color them. 

The image on the card was created from 2 stamps: the turtle is one stamp and the pile of gifts is another. I love, love, love the new acrylic blocks for the stamps because when you can see through the block it makes it so easy to line up images like on this card.

And what do you think of the texture on the background? Similar to yesterday's card, but this one uses the new Houndstooth embossing folder (#123134). Embossing folders are such an easy way to add texture and dimension and visual interest to a project. And they're inexpensive too, only $7.95 each. I have all 15 (plus the new one thats in the Holiday Mini). Demonstrators are privileged to get to pre-order items from catalogs that have not gone live yet. There is some really great product coming up, including a new Embossing Folder.

Join Stampin'UP! and be the First to See New Product!  
  • Learn new Stamping Skills
  • Learn Business Skills
  • Be the First to see New Product
  • Earn a Discount on all Personal Purchases
  • Earn other Incentives and Bonuses
  • Meet some Amazing people who share your passion
  • gain access to an exclusive support website maintained by me for my group
  • gain access to the wealth of ideas and business tips on Stampin'UP!'s Demos Only Website
Buy the Starter Kit and let me show you how to take your business to what ever level you want. Use it to create an income generating business or use it for the discount you get personally. Local or long-distance - join me and my group of demonstrators and watch your life change. I said in the first paragraph, I am so proud to be part of this company, I really am. Contact me and let me tell you all the reasons why.

Happy Stamping
--Katie

Sunday, August 21, 2011

The New Mini-Brads

 Summer seems to be going by so quickly. And with the end of August its also the end of your chance to buy items from the Summer Mini Catalog. August 31st is your last day to order from the Summer Mini.

One of my absolute favorites in the summer mini is this beautiful sailboat. Its called Sail Away and is one of the "Ala Carte" stamps that can be purchased individually. I love the fact that Stampin'UP! has started to sell these individual stamps. And I'm so sad that this one did not make it into the new catalog. 

Don't you just love how clean and simple this card looks. The color combo is Crumb Cake and Marina Mist. The image was stamped in Stazon (#101406) (because I did marker over the water and along the edge of the sails). The image is raised up on Dimensionals (#104430). A single piece of Crumb Cake Seam Binding (#122332) is wrapped around the card face.  I wasn't sure about these seam bindings when they first came out but I really like working with them.

The white layer of the card base was embossed using the Square Lattice Embossing folder (#119976). The embossing folders are a great way to add texture to a project. Another way to add texture is with embellishments like the seam binding or brads. 

Now check out the brads on this card. Notice anything? The brad on the seam binding is one of the 5/16" Jumbo Brads and the 3 in a vertical row on the right are the new little Mini Brads. The card to the right helps you compare the 4 sizes of brads that are now in the catalog. Cute aren't they? Isn't it great to have choices. I expect I'll be using these little mini brads a lot.

Remember, these mini brads are in the new catalog, but the sail boat is not. So if you like it, be sure to get your order in before the end of August.


Contact me with any questions
--Katie

August 31st  Deadlines:
**Last Day to purchase from the Summer Mini Catalog
**Last Day for the Buy-3-get-1-Free promotion on Designer Series Papers
**Last Day to Support Breast Cancer Research by purchasing the Strength and Hope Stamp Set


Saturday, August 20, 2011

New Punch Designs


Stampin'Up! has recently gone to a new design for their punches.
 
No more "whales"! 

The sleek new design has a locking mechanism on the bottom, they are stackable and have an image on the handle so you can see what the punch is.

If you are like me this is a great thing! It seems I just have to have every punch they make so I was running out of room to store my punches. I was storing my "whale" punches on towel racks on the wall. The cheap $1.98 ones from the big box home supply stores work just great. Mine are 24" long and no sags yet. But I was running out of room, the wall space was full!

This new design is perfect for stacking on a shelf right in front of my workspace. And the labels let me see at a glance which punch to grab for.


Oops! Looks like you are getting a sneak peek at a new product in this image. The September mini catalog has some great new product including a new punch. If I don't point it out maybe you won't notice it in this photo.

And now we have another new punch design, the Triple Punches. These punches have a slide bar on the handle with a choice of 3 settings. Each punch can actually make 3 different designs. I've already posted one card using these new punches. Now Stampin'UP! has posted a video explaining how these punches work, so be sure to watch it below. This short clip shows it much better than my words trying to explain it.


We'll be using these punches at the September Stamp-a-Stack.
BE SURE TO CHECK OUT MY EVENTS CALENDAR you don't want to miss any of the fun or the great tips and techniques you learn at these events. You can see the calendar here and you can RSVP right on the website, how cool is that?

REMEMBER THE AUGUST "BUY-3-GET-1-FREE" DEAL ON DESIGNER PAPER there are so many gorgeous papers to choose from. They're in your catalog starting on page 183. You can download a PDF of the catalog here. And the best part is you can place an order 24/7 from your computer at home. Late night shopping in your jammies - yeah!

Please contact me with any questions.
Happy Stamping
--Katie

Friday, August 19, 2011

Convention Trades! A Benefit of Being a Demonstrator

Just realized that I haven't posted anything about convention yet. Convention is so fabulous, there's so many great things about going. 

First the displays, walls and walls of 4x6 panels full of samples to look at and take pictures of. And for the new product the displays are hands-on, we get to try them! Like the scoring machine Simply Scored that will be available September 1st. And the Cookie Press Stamp and the new Avery Label stamps. 

There's also the business sessions and the Make and Take Sessions. And of course, the trading. I usually take more than one design to trade. This was my primary trade this year, made with the Pony Parade stamp set. I made 130 of this card and it does get a bit monotonous making so many of the same card, so to change it up a little I varied the colors. When I laid them out for this photo it reminded me of a circus or a carousel.

If you are as addicted to stamping as I am, you should consider becoming a demonstrator. You'd get to go to Convention and Regional Meetings. And we have an active local group of demonstrators who meet quarterly for business and learning more about product. You'd also be invited to participate in Mail-In trades with the group. And I maintain a private Yahoogroup just for my downline with all sorts of information sheets and images of the projects I do at workshops and classes. Is a good way to keep in touch with people, whether you are local or far away.  Check out all the Benefits HERE and HERE. Then email or give me a call (608-220-3450) so we can talk. My business is growing and yours can be too!

Happy Stamping
--Katie


Thursday, August 18, 2011

Highlighting Dry Embossed Images


I've posted 2 samples today to show how you can highlight the images produced by an embossing folder. The embossing folders create a raised pattern on your paper, sometimes the pattern is so subtle that you need a way to highlight the image.

The image on the left was created with the Elegant Lines Embossing Folder. To highlight the embossing the colors were sponged on with Sponge Daubers (#102892) in regular Classic Inks: Pear Pizzazz, Rich Razzleberry and Tempting Turquoise. The butterfly and the sentiment are from the Strength and Hope set. The sentiment was punched with the 1 3/4" Circle Punch an layered on the Extra Large Oval Punch (#119859).

Now, the card on the right was created with the Flower Garden Embossing Folder. This image was embossed on Designer Series Paper. The trick here is that the 2-sided designer papers are printed on a white core. So to get the image to show up white I sanded the raised image and removed the ink that was on it. And YES, we do sell the sanding blocks (#124304) The colors on this card are black, white and Poppy Parade and Crumb Cake. The cute border was done with the Pinking Hearts Border Punch (#117649). The sentiment uses the Extra Large Oval Punch (#119859) the Scallop Oval Punch (#119856) and the Word Window Punch (#119857). The sentiment is from a set called Teeny Tiny Wishes.I did add a little glitter to the center of the flowers.

Oops! It was definitely not my plan to have a card expressing hope for a cancer patient next to a sympathy card. That was an unfortunate choice of sentiments to put together. However you should know that the Strength and Hope Stamp Set is a philanthropy set, $3 of every purchase goes toward Breast Cancer Research. Even without that caveat, the butterfly in this set is gorgeous and should be incentive enough to think about adding it to your collection of stamps. But this is in the summer mini-catalog and only available until the end of August. So don't wait. If you like this set, now is the time to buy. And remember that during August there is a Buy-3-Get-1-FREE deal on Designer series papers. Check out all the great embossing folders Stampin'UP! has and try this really fun highlighting technique.

Contact me with any questions.
Happy Stamping
--Katie

Wednesday, August 17, 2011

Garden Greenhouse 2-Step Stamping

Today's post features 2-step stamping. Many stamp sets are designed to use 2 different stamps to create a single image. The stamp set: Greenhouse Garden is an example. Look at the lovely shading in these flowers. The set comes with the parts to create 3 different flowers using 6 different stamps.

The top card was done in  Tangerine Tango and Daffodil Delight with Peach Parfait ribbon. The sentiment is from Short and Sweet and layered on the Word Window punch and then the Modern Label Punch.

The bottom card is on a base of Always Artichoke with the grass from Inspired by Nature stamped in Artichoke. The flowers were Stamped in Regal Rose and Rose Red, and Wisteria Wonder and Concord Grape. The ribbon on this one is Pear Pizzazz.

This stamp set makes such beautiful images. The stamps are fairly forgiving, you really don't have to do much to line them up. It just looks good no matter what you do.

The little tag on the 2nd card was made using a set called Tiny Tags and punched with the Jewelry Tag punch. Its held on with some Linen Thread. The first card was one of the Make&Takes from a workshop this week and the 2nd card was from the August Stamp-a-Stack.

Be sure to check the class schedule. We have a fun time and you get a chance to meet new people who share your hobby.  Everyone is welcome, even if you are a new stamper or have never stamped before. We take care of you and you will have fun.

Hope to see you at an event soon
--Katie

Tuesday, August 16, 2011

Border Punch Focal Point

Here is another "level 1" card, i.e. a simple easy card that goes together quickly. This was one of the 5 we did at the

The only stamping on this card is the sentiment. Its from a stamp set called Sincere Salutations. This set has been around a long time, so long that its only available in wood mount. Its a great set, it has 8 different sentiments and they're all the same size. Perfect for designing 1 card and using it for many different purposes.

The visual interest on this card comes from the Lace Ribbon Border Punch (#122362). I just used a long piece of scrap white paper and cut it where it seemed to make the pattern balanced and symmetrical. The colored circles behind the white lace are Bashful Blue, Poppy Parade and Daffodil Delight. They were punched with the 1" circle punch (#119868). To finish off the card each of the circles has  one of our Self-Adhesive Rhinestones(#119246).

 When you're in a hurry you look for easy cards like this one. I like the sentiment set I used, but really any sentiment would work. To duplicate this card you just need the punches and the Rhinestones. 

Remember, you can shop on-line anytime.

Happy Stamping
--Katie

Monday, August 15, 2011

Turn Your Punched Images into 3-D Elements

Looking for a quick way to add depth to your cards? Here's an easy trick.

The 3D effect on these two butterflies is created by layering 4 punched images. Stamp and punch out 3 butterflies, the 4th one can be left blank.

Fold 2 of the stamped butterflies in half, with the stamped image on the inside of the fold.

Adhere one folded butterfly to each half of the blank butterfly. 

Adhere the fourth butterfly to the top of the two halves.
 

This technique works well with punched images because the shapes need to be identical. You can do something similar with the Ornament Punch and the Heart Punch. This is so quick and easy and it really adds a WOW! element to your projects. 

The sample card above was made using the Butterfly Punch, the Butterfly Prints Stamp Set and used the  Sincere Salutations Stamp set for the sentiment.

Contact me with any questions.
Happy Stamping
--Katie

Sunday, August 14, 2011

Party Favor Boxes

Yesterday I posted an image of a favor I made for my daughter's wedding shower. Now I'm working on design ideas for individual gifts for the wedding guests. As a demonstrator I have tons of swapped samples to use for ideas. Another great place to look for ideas is the Stampin'UP! catalog. That's why its called the Idea Book and Catalog. Contact me if you need a catalog. You can also see the Catalog on-line as a pdf file here. SAVE the pdf so you can look at it any time, even when you're not on-line.

Anyway, I was flipping through it the other day and came across this cute box with a handle and tea bag card. on page 54. The box in this sample used the same Big Shot die as in the party favor shown in yesterday's post. This favor had a handle added. Now why didn't I think of that for my box?  The catalog is great for getting ideas.

And I'm really intrigued by the tea bag card. I wondered what punches or dies were used to make the cup. So, I checked the supply list. Did you know that Stampin'UP! publishes a suply list for all the projects in the catalog. You can find the supply list on-line here. Again, be sure to SAVE the supply list file so you can refer to it anytime.

The supply list is not directions, its just a list. But it was useful in this case because I can see that the cup was not made using a die or a punch. The maker of this card created the cup shape themselves. Not as nice as having a punch or die, but still useful information.

So, remember to download the catalog and the supply list. The catalog has some really great ideas. Follow this link to access all the Stampin'UP! publications: the main catalog, the mini-catalog, both their supply lists AND the Spanish language catalog, which has more great samples.

Contact me with any questions.
Happy Stamping
--Katie

Saturday, August 13, 2011

Shower Favors

My youngest daughter is getting married this September. We are so happy for her and her fiance. Last weekend the bridesmaids threw a shower for her, and of course they asked me to make the shower favors.

The box itself is made using the Bigz XL Die: Fancy Favor (#115965). This is one of the bigger dies so you do need the Big Shot to use it. The concept behind all of the diecut/embossing machines is that your paper passes through the rollers of the machine and the pressure of the rollers either cuts or embosses the paper. Since the machines all work off of the same roller pressure concept the dies are mostly interchangeable. But the Big Shot machine is a little larger than many of its competitors so it can handle the larger dies. This die needs the larger machine.  The nice thing about this die is that it cuts the shape and ALSO embosses the fold lines. Putting the box together is so easy, you just fold on the embossed lines and glue the sides together.

It also uses larger paper - each favor was made from half of a 12x12 sheet of white paper. The embossing was done with the Finial Press Embossing Folder (#115963). warning: even though the folders can emboss 2 layers of our Whisper White paper at a time, you need to emboss each half separately, otherwise the front of the box is embossed and the back is debossed! Yes, this tidbit is passed along from personal experience. I love the fact that the folders are translucent, the fact you can see through them allows you to position the paper so your images line up.  Luckily I only had to make 18 of these.  Now I'm working on a design for a little favor for all the wedding guests.

The colors of course were chosen to match the color of the bridesmaid's dresses. Luckily I had a roll of Stampin'UP!'s 1 1/4" Striped Grosgrain Ribbon that was the perfect color. If you're thinking of duplicating this design you could use fabric or designer paper as the band. Or use regular colored paper and roll or stamp an image to create a pattern.

The flower was so quick to put together. That was my deciding factor in the whole design, when mass producing, make the design simple. The green base was punched with the 2 3/8" Scallop Punch (#118874). The white daisies were die cut using the Flower Die: Daisies #2 (#114520). Both parts of the flower center came from the Boho Blossom Punch (#119858). I used a little adhesive to hold the white daisy parts together and to hold the flower center to the daisy. A single black brad holds the whole flower together. The flower is adhered to the box using Dimensionals (#104430).

Feel free to contact me if you have any questions about this project or if you are working on wedding/shower/baby invitations or party favors. I'm up to my ears in designs right now. Follow this link if you want to see more Big Shot projects.

And when inspiration hits you - at 2am or whenever - you can shop 24/7 from your computer at home. How cool is that.  Click here for the on-line store or click here to see the main catalog on-line (PDF) or here for  links to the current Mini-catalog and the Spanish language catalog and the supply lists to make all those great projects in the catalogs.

Happy Stamping
--Katie

Friday, August 12, 2011

Punch Art Car

Here's a card that we made at the Mom and Me event this week. Its a fun card for kids and its really easy. I laid the sample on the table and didn't even need to give instructions. Its so easy a child can look at it and figure out what to do. Now granted, all the right punches were also sitting on the table so that was a big hint.


But seriously, it is easy:
body of the car
and the top
Poppy ParadeExtra Large Oval Punch, #119859
windshield windowWhisper WhiteLarge Oval Punch, #119855
headlightswhite and
Silver Metallics
1/2" circle punch #119869
3/4" circle punch #119873
tires
punch 1 and cut in half
BlackModern Label Punch
#119849
sentiment BlackModern Label Punch
#119849 and
Word Window Punch
#119857
The car is popped up on dimensionals and layered on some "Just Add Cake" Designer Series Paper. I used the 1/2" Stitched-Poly Ribbon for the accent. The texture of this ribbon is very informal and just right for this card. Don't you just love how the paper and the ribbon color coordinate?  That's one of the signature advantages of Stampin'UP! - the coordination of colors.

and what about that paper? Do you find yourself using the Designer Series papers as backgrounds on cards like on this one? The printed papers have so many uses. They come as 12x12 sheets for scrapbooking and boy are there some cute papers to choose from. But they're not just for scrapbooks. You can use them on cards to make a background layer or use them to "color" your image.

There are lots of ways to use strips of paper and cut out shapes to around your house too: you can decorate lampshades, use them as a mat in picture frames, make tree ornaments, or place mats or to decorate school folders or . . . Yeah, lots of uses.

And remember, this month is a Buy-3-Get-1-Free special on Designer Series Papers. Check them out in the catalog on pages 184-186. Buy them on-line or contact me.

Happy Stamping
--Katie

Thursday, August 11, 2011

Punched Medallion Card

This card is so crisp and clean. The colors are really vivid against the white card base. The color combination turned out really nice, Concord Grape, Lucky Limeade and Rich Razzleberry.

The purple frame was made with the Dotted Scallop Ribbon Border punch. I started with a 3" square and punched once on each side, centering the paper on each of the 4 edges. The punch is not quite long enough to reach the corners, so by punching only once you get those nice little squares in each corner. I punched 2 layers and adhered them at an angle to each other. It really makes a lovely frame.

With the scallop edge and the 2 layers, the center almost appeared as a circle, so the Limeade circle was perfect for the middle. And I wanted that white center to really POP off the card so its raised up on Dimensionals and has one of our Self-Stick Rhinestones in the center. That still didn't pop enough for me, so I set it on a small Razzleberry circle and now the card really hits your eye. I love how it turned out. 

The sentiment is from a set called Happy Greetings which is in the summer mini and sadly did not make it into the Main Catalog. Every stamper needs several good Sentiment sets and this one has some nice sayings with nice fonts. 

Check it out. If you like it you still order it, but only through the end of the month. This mini-catalog expires the end of August. And also remember the August special on Designer Series PapersBuy 3 get 1 Free. That's a 25% discount!

BTW: The white center was made using the new Blossom Bouquet Triple Layer Punch. I love how versatile this punch is and that you can make 4 different shapes with it.  Stampin'UP! has 2 of these "triple" punches. You choose the image to create based on where you set the lever on the end. I made a little reminder card of what this punch can do. Now, ideas for those little pieces?  Raindrops, seeds, put them together for a moustache? or a bowtie? or airplane propeller? hmmm... This requires more play time.

I hope you are having fun playing with your "toys".
Contact me with any stamping questions
--Katie


Wednesday, August 10, 2011

Catalog Bookmarks

Thank-you to everyone who attends my classes. It has been so much fun stamping with you and creating for you. And I know that you've made new friends that you met through the stamping you do here. 

You may not realize it, but many of the projects we do are actually inspired by you. We have so much fun talking while we stamp that its become a good way to get to know you better and allows me to create projects that are fitted to your needs.  

Replying for events is now easier than ever. My events are posted on my SU website. And you can now reply directly on the Calendar page if you want to attend any of these events. The arrows in the picture above show you where the RSVP link is located.

This summer I've been handing out these bookmarks of my stamping calendar. Of course this only goes up to early September, so be sure to ask for your new book marks when this one is out of date.  Its the perfect thing to use to mark your favorite card or stamp set in the catalog. 

Or use it to mark the page that details the Hostess Benefits (p9). I love the new Hostess Benefit Program. Don't worry, Stampin'UP! is still offering EXCLUSIVE stamp sets available ONLY TO HOSTESSES. But they've made a few changes to the way you earn them. Has this ever happened to you?
  • you host a party only to find that your party did not generate enough sales to earn the Hostess Set you wanted
  • you host a party, but wish you could use your Hostess Benefits on a catalog item rather than on of the exclusive Hostess sets
Problem Solved!  With the new program you simply earn Hostess Dollars based on your event sales. If your party qualifies for benefits, you can get ANY of the exclusive Hostess only sets, no more level 1, 2 or 3.  Or, you can choose to spend your Hostess Dollars on ANY catalog item. And, based on the volume of sales at your event you could also earn 1, 2, 3 or even 4 catalog items at HALF OFF!, even a Big Shot or the Markers or any of the dies.  Wow! Amazing! Super Exciting! . . . . . So when are you having your party? I'm now booking for September through December. Contact me for available dates.

Stamping is my passion, my joy, my creative outlet. Thank-you for sharing with me
--Katie

Tuesday, August 9, 2011

The Goose that Laid the Golden Egg

This card was really fun to make. I had this idea when the new Small Oval Punch (#120908) came out to use it for an egg. Then when the beautiful stamp set Cherish Friendship, showed up in the new catalog I knew I had to make this card. 
The card base is Ivory Naturals. It just seemed like Whisper White was too crisp, this card needed something more earthy.
The egg was punched from the Metallics Gold paper. The metallic papers are shimmery and really catch the light. Perfect for  the golden egg.
The Goose was stamped on Whisper White, colored with markers and then cut out and popped up using Dimensionals. Note that the feet were stamped on the card base, only the body was cut out.
The Sentiment is from a stamp set called Oval All. The letters "Y" and "U" are also colored  the same color as the goose's bill and feet, just for color balance on the card. The Oval All stamp set was designed to fit with our punches so its a perfect match for the Scallop Oval Punch (#119856). The sentiment itself was created on white card stock and popped up using Dimensionals. The bottom layer for the sentiment was the Gold Metallic Paper which was not popped up.
The Bean Stalk is punched out of Garden Green card stock using the 2-Step Bird Punch. Its easy to create the tall beanstalk by punching many of the branches and gluing together. Just be sure to trim them a bit so they look slightly different.
The grassy patch is a piece of Certainly Celery that had the top edge torn to suggest the uneven look of grass.

So easy to make and a great kids card. Ingredients are listed below.
stamp sets
Cherish Friendship
Oval All
colors
Garden Green
Certainly Celery
Pumpkin Pie
accessories
Brushed Gold Metallic Paper (#102935)
2-Step Bird Punch (#117191)
Small Oval Punch (#120908)


Contact me with any questions and Happy Stamping
--Katie

Monday, August 8, 2011

2011-2013 New In Colors

Ooh, yummy! I've been on a (fairly successful) diet this summer. My goal is to look good for my daughter's wedding later this summer. So far I've been able to reject the summer temptation of ice cream. But looking at this card doesn't help. This card was a lot of fun to make because I got to play with lots of punches and lots of new product. Lets see, where to start. . .

First, the card was designed to showcase the new In Colors.  Each of the stripes on the card including the horizontal stripe (and the ice cream) is one of the new 2011-2013 In Colors. The new In Colors for 2011-2013 are (in order of the stripes on the card): Island Indigo, Wisteria Wonder, Pool Party, Lucky Limeade and Calypso Coral.

The Ice Cream cone is made with 2 punches. The scoop is made with the Cup-Cake punch. The cone itself was stamped with a new stamp set called Pennant Parade and punched with a new punch called Petite Pennants.  Also new in this catalog is some darling 1/2" Scallop Dotted Ribbon.

I really like the way Stampin'UP! cycles through the color palettes. There are 4 Color collections, each with 10 colors. Each year we add 5 additional colors that stay around for a 2 year period of time. So in addition to the 40 basic colors you see to the right, there are the 5 in colors for 2010-2012 and now the 5 In Colors for 2011-2013. 

This new catalog does a great job showcasing the colors. Let me know if you need a catalog. Otherwise you can view the Big Idea Book and Catalog as well as the Summer Mini Catalog here. Remember that orders can be placed 24-7 online. Be sure to check out the Clearance Rack. And also check out the August Promotions.

Contact me with any questions and happy stamping
--Katie

Sunday, August 7, 2011

Strength and Hope for Breast Cancer

As a company Stampin'UP! believes strongly in giving to the community. The ethic is built into our business plan and is called the Making a Difference Program.

Have you noticed that each year there is one special stamp set that benefits the Ronald McDonald house. The Ronald McDonald House is Stampin'UP!'s special charity. 

This summer Stampin'UP! added a second charity set to the Summer Mini Catalog. For this set Stampin' Up! is proud to partner with The Breast Cancer Research Foundation. Again, Stampin' Up! will donate $2* from the sale of each Strength & Hope set and Strength & Hope digital kit to The Breast Cancer Research Foundation (BCRF).  The Breast Cancer Research Foundation®, BCRF is dedicated to preventing breast cancer and finding a cure in our lifetime by funding clinical and translational research worldwide. For more information about BCRF, visit www.bcrfcure.org.

This set is just beautiful. I love, love, love the butterfly. The filigree stamp and the word stamp make great background stamps to add depth and layers to an image.  The card in this post is one we did in the July Stamp-a-Stack. I love this set so much that we're using it again in the August Stamp-a-Stack. Try to picture something with purples, blues and greens, I'm still playing with the design but that butterfly will really "pop"! when I'm done.

Whenever you talk with someone about Breast Cancer it seems that the conversation becomes nostalgic as we recall family and friends we know who have been affected by this disease. So with that in mind I tried to give this card a vintage look. The colors are Regal Rose, Crumb Cake, and Very Vanilla.  The vanilla area was dry embossed with the Square Lattice embossing folder. The folded ribbon gives dimension and the butterfly was cut out and raised up on dimensionals  for added dimension, as was the "H for Hope".  Check back later to see the card we do at the August event - or better yet, join us for the event. Check my calendar on-line and register here. You can now RSVP directly on the Stampin'UP! events page.

The Strength and Hope stamp set is available in either wood mount (#118100 for $17.95) or clear mount (#123660 for $13.95). Both are very reasonable prices, and remember that $2 of that price is donated directly to the Breast Cancer Research Foundation. And remember, if you plan to place an order you should also inventory your papers and other supplies. You're going to pay a minimum shipping charge, so make the most of it. And Do remember to check the Clearance Rack for any Deals they have today.

Contact me with any questions and Happy Stamping
--Katie

Saturday, August 6, 2011

Flower Garden Embossing Folder

Stampin'UP! has several Catalogs:
The main Idea Book and Catalog is good for a full year and the new catalog just came out July 1st. The Mini-Catalogs are good for a 3-month period. But the Summer Mini Catalog expires the end of August, so I'm trying to highlight some of my favorite items in it.  This Summer Mini Catalog has some really great product. It is one of my favorite mini catalogs so far. Contact me if you need a copy, or you can view all of Stampin'UP! catalogs as PDF files here.

The mini-catalogs are used as a way to introduce new product and product that has a limited life. Yesterday's post featured a stamp that is only available in the mini, it is not in the new main catalog. Today's post features the new Flower Garden embossing folder (item #123113) which, happily, did make it into the new catalog.

I really love using embossing folders in the Big Shot to add texture to my projects. The image on this folder is so pretty. You can use it as texture only or you can color the image. I used the folder to make this trade card. As you can see I couldn't quite make up my mind where to put the brads: on the side or on the bottom?  I made some of each. Which one do you like best?


This card has a lot of dimension in addition to the texture from the  embossing folder. The sentiment is from a set called Oval All and is popped up on Dimensionals. The embossed image was sponged  with color. The green layer was stamped with En Francais. And of course, the brads add some dimension too.

Don't you just love getting new product. The colors at least are not new. Are you ready for a little test.  How well do you know the Stampin'UP! color pallette?  Can you guess what colors are on this card?  The answer is here: drag your mouse across the space between the dots to see the names of the colors . . . So Saffron and Always Artichoke . . .Were you right? 

I hope that worked for you. I just learned how to do that little bit of fun.

As always, contact me with any questions and Happy Stamping
--Katie


Friday, August 5, 2011

Sailing Away into the Sunset

I'm not a sailor but I love this set. The boat is such a pretty image and there is so much you can do with water. This is one of the ala carte stamps in the Summer Mini-Catalog. Stampin'UP! recently began including a small selection of stamps that could be purchased individually instead of in a set and this is one of them. 

This beautiful boat stamp is called Sail Away (item#123013). These ala carte stamps are available in wood mount only, that way you don't have to worry about whether or not you have the correct size acrylic block for it.

I've really had fun playing with this stamp. This card is one we did at the July Stamp-a-Stack. The image is embossed on glossy paper and the sails were colored in Sahara Sand using a Blender Pen

Now look closely at the water. Can you see the rippled effect? This was done using a Wax Paper Resist technique. This technique works best on glossy paper because you don't want the wax from the wax paper to sink into the fibers of the regular cardstock - you need it to be right there on the surface of the paper so it will "resist" the ink. 

Check out this dragonfly card that was also made using the same technique. You can read more details about how to do a Wax Paper Resist here

Sadly, that cute dragonfly stamp is part of a set that just retired. When you find a stamp you really love you should not hesitate to buy it while its current because the stamps do not stay around forever. So what do you think of the sailboat? As I said, its in the Summer Mini catalog, but "Sail Away" did not make it into the Main Catalog. So at the end of August, this stamp is gone. If you like it as much as I do you then get it now. 

And if you do decide to buy this stamp, why not also check the gorgeous selection of patterned designer paper. Stampin'UP! is having a "buy 3 get 1 free" sale on designer paper now through the end of August.  

The minimum shipping fee is $6.95 or 10% of the order, which ever is larger. Its silly to pay the shipping fee for just a little order like one stamp - you might as well check your inventory of papers and envelopes, inks, bling and adhesive and put in an order that takes full advantage of the shipping fee.  Click here to shop on-line now. And while you are at the on-line store, be sure to also check out the items in the Clearance Rack. They change often and there are some amazing deals.

Contact me with any questions
Happy Stamping
--Katie

Tuesday, August 2, 2011

Buy 3 Get 1 Free!

 
Have you seen all the great new designer series papers in the new catalog (catalog pages 183-185). They make great backgrounds for scrapbook pages and great layers for cards. Many of the papers were specially designed to coordinate with our stamp sets.You can also view them on-line here.

Be sure to save your scraps because even a small piece of designer paper makes a great layer on a card or other project. Here is an example of a quick and easy card using Designer Paper to add color and visual interest. Or check this card which uses DSP for the visual interest on the man's tie. 

Designer papers have so many possibilities besides just making a background for a scrapbook page. And what better time to stock up than now with the special "buy 3 - get one Free" deal going on for the Month of August.

Click here to shop now.

Happy Stamping

--Katie