Saturday, June 30, 2012

A Framelits Rainbow

Punch Art Pot of Gold Card made with Stampin'UP! dies and Punches
Do you love to play with shapes?  Do you love punch art projects?  Part of this card is punch art and part of it is an unusual use for the Framelits Dies - use them to make a rainbow! The framelits make a nice layer but they also make nice "frames". So for this project I just cut a series of different size frames and nested them on the card.  

This card is made almost entirely of punched and die cut pieces. 
    Stampin'UP! rhinestones colored with a Sharpie Marker
  • The pot of gold, its handle and the gold pieces are all made of circle punches. 
  • The legs of the pot are the ends of the Modern Label Punch.
  • The clouds are the top of the cupcake punch.
  • The ends of the banner were punched with the tip of a square punch. 
A few more details:
  • The hills were cut freehand and sponged to give a little more definition.
  • The sentiment is from a set called Teeny Tiny Wishes
  • The rhinestones are Stampin'UP!'s self-Stick Basic Jewels and they were colored with a Sharpie marker
Did this start your creative juices flowing?  Are you wondering what shapes are available with Stampin'UP! punches and Dies?  Click Here to download a PDF version of the catalog. You'll find the punches on pages 182-185 and the Big Shot Dies are on pages 188-194.  Everything in the catalog is available from my Stampin'UP! Store.  And while you're there, be sure to check out the Clearance Rack.  There are actually quite a few punches (in the old style) and some retired dies on the clearance rack so you might find some really good deals on something you've been wanting.

Happy Stamping
--Katie

Thursday, June 28, 2012

Scalloped Quintessential Flower

What do you think of Stampin'UP!'s "ala carte" stamps?  The ala carte stamps are sold individually instead of in sets. 

There were only 2 stamps used on this card. One was the sentiment, which is from a set called Teeny Tiny Wishes.  The rest of the imagery is from a single stamp called Quintessential Flower.  This stamp is designed to go with 4 punches:  the 2-3/8" Scallop Circle Punch, the 1-3/4" circle punch and the 3/4" circle and the 1/2" circle.  On this project I stamped the imagery in black and colored it with Lucky Limeade and Tempting Turquoise.  

I really like how the scallops in the flower image coordinate with the scallop oval for the sentiment and the scallops on the paper ribbon.  One more project illustrating how well Stampin'UP! coordinates its product.

Thanks for stopping by
Happy Stamping
--Katie

Wednesday, June 27, 2012

Framelits and Embossing Folder - a Matched Set

Card made with Stampin'UP! Framelits, embossing folder and Bordering on Romance Stamp Set
 I LOVE how Stampin'UP! designs products to coordinate with each other.  Are you getting tired of hearing me say this? This project show how well 3 of our proeucts coordinate: 
**Extra-Large Oval Punch (#119859)
**Designer Frames Embossing Folders (#123130)
**Labels Collection Framelits (#125598)
For this project these three are as good as a matched set.

The Framelits are sets of 6 nested frames with a thin cutting edge. Each frame is slightly larger than the next so they create nice layers. Thats how the white and pink layers were made for this card. For hints on successfully using the Framelits see this post.

By the way: This was one of the projects done at the Big Shot class last Friday.
Stampin'UP!'s Designer Frames embossing folder coordinates with the Labels Collection Framelits.
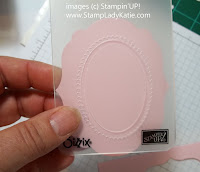
For added interest we embossed the center of the pink layer. We used the oval shape from the Designer Frames Embossing Folder Set. This set has 2 shapes: an oval and a square. 

Its super handy that the embossing folders are translucent so you can see through them. That  makes it easy to ensure the embossed oval is centered in the pink piece.  By the way, the pink color is our Pink Pirouette.  This is my favorite pink, I love this light pastel.

The image from Bordering on Romance fits in the Oval of the Designer Frames Embossing Folder.
The image is from a stamp set called Bordering on Romance. It was stamped in StazON ink (#101406)because we were going to color it with markers. The StazOn is a permanent ink that won't smear when it is colored. Our black ink is water soluble and would smear leaving black streaks on both the image and on the end of the pink marker.

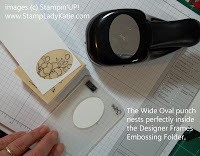
Notice the image was stamped on white paper.  Turns out that the Extra-Large Oval punch is the perfect size to fit in the embossed oval.
The Extra-Large Oval punch coordinates with the Designer Frames Embossing Folder
For a little quiet bling I added a self-stick pearl (#119247) to the center of each flower. I love the elegance of these pearls and you can't beat how easy it is that they are self-stick.

TIP: if you have trouble with the pearls not sticking it means that the adhesive stayed on the dispenser sheet instead of lifting off with the pearl.  Be sure you press down as you lift off the pearl, or use your thumbnail under the pearl, to ensure the adhesive comes up with the pearl.

In choosing the stamp set to use I first punched an oval and then used the hole laid over the stamp to be sure it was a pleasing image.

Are you eager to try this gorgeous layering yourself?  You can get all the supplies to make this project from my Stampin'UP! Store. You will need either the Big Shot (#113439) or any other die cut machine in order to use the embossing folder and the Labels Framelits

Thanks for stopping by
Happy Stamping
--Katie

Tuesday, June 26, 2012

Circle Circus Community Card

Card made with Stampin'UP! Stamp set:  Circle Circus
Here is one of the June cards I'm doing with the Community Stampers.  If you are local to the Madison, Wisconsin area you are more than welcome to join us.  Right now I have groups at 3 different locations: we meet once a month at the Oregon Senior Center, the Monona Grove Senior Center and the McFarland Senior Center. And there is a 4th group starting at one of the larger apartment complexes in Sun Prairie.

You'll find all the events listed on my Stampin'UP! events calendar along with information about how to register for the events. The events are billed as "Cards with Katie". The Sun Prairie event is this Wednesday and there is room for YOU if you want to join us.  Just call me 608-220-3450 or send an email to let me know you want to come and I'll reply with directions.

Attendance is flexible. I design one set of cards for the month and do the same set of cards at each venue. If you miss your own location for some reason you are always welcome to attend at a different location. 

I try to keep the cards fairly simple - this one is just several different images from the Circle Circus stamp set. We colored some of them with markers and accented some with small punched out circles. The colors used were Summer Starfruit and Pool Party.

I also try to give people options for being creative.  There is almost always a choice of sentiments. and often there is an opportunity to be creative in other ways.  Check out these cards made by a few of the class attendees.

The Ladies who stamp with me are definitely a creative bunch. Carol K at the Oregon Center made the card on the left and the bottom card. She changed the pattern of the circles.  Carole M at the Monona Grove Center did the card on the upper right.  She chose to make her card all one color. Notice that both women also changed the images they chose from this set.  

Circle Circus is the perfect set us use for a card like this because it has 10 different designs to choose from.  What pattern and color combination would YOU choose? 

BTW: Tomorrow is my last June event.  We do 3 different design, this is the 2nd June card I've posted. Here is the 1st Card of the June set. Be sure to check back often to see the 3rd design for June and to see what designs we do for July.

We'd love to have you join us at any of the venues. No matter which group you join its a great bunch of ladies. Everyone is super friendly.  If you are a novice stamper they'll help you along and even if you are an experienced stamper you'll probably still learn a trick or two.  Check the calendar of events and find one that fits your schedule.

Happy Stamping and I hope to see you soon
--Katie

Monday, June 25, 2012

Edgelits and Matching Embossing Folder

Card made with Stampin'UP! Edgelits and Matching Embossing Folder
One of the things I really appreciate about Stampin'UP! is how well the different products coordinate. For example, the matching Edgelit Die and Embossing folder used on this card. This is one of the projects we did at the Big Shot class this week.

The Big Shot part of this card was the embossed line running across the front edge of the card and the matching shape cut below the line.

You want to be sure the embossed line is level with the edge of the card. I just make sure the edge of the embossing folder is touching the edge of the card, then I know the 2 are parallel.How to use Stampin'UP!'s Border Embossing Folders
Sometimes you get them perfectly lined up and then they slip as they go through the machine. To prevent this use a post-a-note to keep them in position.How to use Stampin'UP!'s Edgelit Dies - shown by StampLadyKatie
I kind of eyeball it to match the shape of the Edgelit Die  with the Embossed line already on the card. Then to ensure they are parallel I lay them on lined paper and make sure the Edgelit Die is the same distance down from the edge of the card. Again, secure with Post-a-notes before running through the Big Shot.How to use Stampin'UP!'s Edgelit Dies - shown by StampLadyKatie
And, I tried doing them in reverse order, cutting first and then embossing the matching line. It worked equally well either way.

What great product!  I really love how simple and elegant this card is.
Do you have a die cut machine?  Try this card yourself, its really pretty simple. You can get all the supplies to make it from my Stampin'UP! store - SHOP HERE NOW.

Product Used on this card:
Card made with Stampin'UP! Edgelits and Matching Embossing Folder
  • Mixed Bunch Stamp Set 
  • Perfectly Penned Stamp Set
  • Blossom Punch 
  • 3/4" Circle Punch
  • Gumball Green Paper
  • Summer Starfruit Ink
  • Raspberry Ripple Ink
  • Adorning Accents Edgelits
  • Adorning Accents Embossing Folders
Thanks for stopping by and Happy Stamping
--Katie

Saturday, June 23, 2012

Embossed Garden Stake

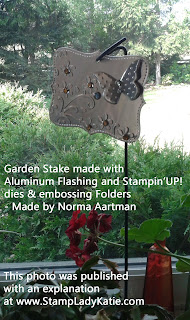
Embossed Metal Garden Stake made with the Big Shot
Are you a gardener?  Maybe you like to decorate your flower pots with pretty garden stakes.  Check out this gorgeous embossed garden stake made by my fellow demonstrator Norma Artman.  

First let me say how much I love being part of an active Demonstrator group. We meet on a regular basis to exchange business ideas and stamping ideas.  It has been great training for me to grow in my stamping skills and to grow in my understanding of what it takes to make money as a demonstrator.  

The support goes both ways.  I gain from my association with these ladies.  But I also turn that around and support the people who have chosen to join my team.  The support is face-to-face  and its also online.  I meet regularly with my downline, but I also maintain a Yahoo Group site filled with business documents and project how-to's as well as photos from our face-to-face meetings.  

There are many great reasons to buy the Stampin'UP! Starter Kit. 
  • First, its only $99 and its completely customizable.  And, when you choose your product you get to choose $125 worth of product while you only pay $99. That alone is reason enough to buy the kit.
  • It also comes with $65 worth of FREE business supplies.  And here is my guarantee, if you don't make back your $99 investment in your first year with Stampin'UP! I'll buy the unused business supplies from you - and you didn't even pay for them! That's how confident I am in this business.
  • Tons of support from Stampin'UP!:  website support, monthly magazine, conventions ...
  • And lots of support from ME!  Call (608.220.3450) or email if you'd like more information. Whether you are local or not you'll have lots of support as you start your business.
  • And if you join during June you get a Free Stamp Set, Designer Paper and Digital Download from the New Patio Party Suite
Business or Hobby?   Whether you want to start a business or just get the discount, when $99 = $125 it totally makes sense to buy the Starter Kit! Yep, thats right! You can buy the starter kit just for the discount, there is no obligation to do anything at all with the business.  Again, contact me with questions. Or click here to get your $125 for only $99 now.

Embossed metal garden stake made with the Big Shot.
OK - Back to the Garden Stake: Norma used Stampin'UP!'s Top Note die (#113463) and Beautiful Butterflies Die  (#114507) to cut the shapes. The Butterfly was embossed with the Perfect Polka Dots Embossing Folder (#117335) and the Top Note was embossed with Elegant Bouquet Embossing Folder (#115964).  She decorated the piece with colored Rhinestones.  

TIP: Did you know that you can color Stampin'UP!'s Rhinestones (#119246) with a Sharpie Marker.

Have you been patiently waiting for me to tell you what material Norma used?  It is Aluminum Flashing which you can buy at the hardware store.  Amazing that you can not only die cut it but also emboss it. 

Maybe you wonder why she gave away such a wonderful project.  This was her trade to the members of our group at convention last year.  There is a whole group of us going again this July and I can't wait to see what Norma comes up with this year.  Just 1 more "perk" of being a demonstrator in MY group.

Remember, if you buy the kit in June you get the Free Stamp Set, Designer Paper and digital download too.

I hope to hear from you soon
Stampin'UP! is a great company and you'll love the discount.

Happy Stamping
--Katie


Thursday, June 21, 2012

Serene Silhouettes with Butterflies

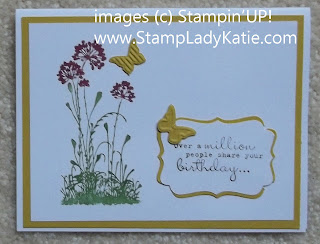
Card made with Stampin'UP! set called Serene Silhouettes, by StampLadyKatieAre you loving the new catalog as much as I am?  The stamp set used on this card is  one of the new sets in the 2012-2013 catalog.  I can't believe how long my wishlist is from this catalog, in my 5 1/2 years with Stampin'UP! I think this is my favorite catalog yet!  BTW: do you have your catalog yet?  If not contact me today to make arrangements to get your catalog to you. If nothing else you'll enjoy looking a it just for the beautiful images.

This card was made with one of the new stamp sets: its called Serene Silhouettes.  The flowers and stems are all one stamp so it was colored with markers.

Other Details:
The Sentiment words are from a set called One in a Million. The front of the card says "over a million people share your birthday . . . " and the inside of the card completes the thought. It says "that makes you one in a million"

The Sentiment layers were created with the Decorative Label Punch (#120907).  Its the SAME punch that made BOTH the white piece and the yellow frame.  Check this earlier blog post to see the trick for making the layers.

Do you like the Colors? This card uses 3 of the new InColors: Raspberry Ripple, Gumball Green and Summer Starfruit.

Aren't the Butterflies sweet?  These were embossed and die cut at the same time using Stampin'UP!'s Beautiful Wings Embosslit (#118138).  Embosslits are hinged steel edged dies that emboss and cut at the same time.  The Beautiful Wings Embosslit makes 5 different butterfly shapes and we used the 2 smallest ones on this card.

The embosslits work with any of the Die Cut Machines.  Stampin'UP! sells the Big Shot but they all work on the same principle - the project is maneuvered  through a pair of rollers that puts enough pressure on the paper and die to either distress (i.e. emboss) the paper or to cut through the material.  Stampin'UP!'s choice of the Big Shot as the brand to sell is because this machine is a little larger than some others on the market and thus more versatile in the projects it can handle.

Would you like to learn more about this machine and get some hands-on experience with some of the dies?  This summer I am offering a series of Big Shot classes, each month features a different set of embossing folders and dies.  There is still room if you want to join the June class tomorrow - session 1 starts at 9am and session 2 begins at 6pm.  Call now if you want to join us 608-220-3450.  Otherwise click here to register for the August Big Shot class which will be held  Friday, August 24th.

Thanks for Stopping by
Happy Stamping
--Katie

Friday, June 15, 2012

Layered Punches for Dad

Here is another idea for a Father's Day Card. This one uses the Blossom Punch and the Modern Label Punch. I've actually already sent my Father's Day Card (you can see it here). One of the things I really appreciate about Stampin'UP! is how well the product coordinates. On this project you'll see how the punches are designed to layer well with each other.

By the Way: I like this color combination for a masculine card, the Always Artichoke paired with Crumb Cake and black speaks to me on an earthy, outdoor level that really fits the men in my life.

Notice the layered punches for the words. The words themselves are from a set called Teeny Tiny Wishes. They were STAMPED FIRST and then punched with the Word Window punch. This punch layers nicely on top the Modern Label Punch.

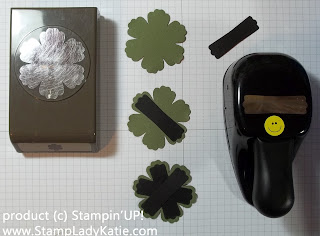
The flower on top was really easy to make using punches.  Notice how perfectly the Modern Label punch fits across the Blossom Punch. The pictures tell it all:  punch one (1) green blossom and layer three (3) of the label punches across it.  Then cover with a punched circle. Easy Peasy!

I hope you found something to inspire you here. Please feel free to comment below or contact me with any questions.  You can get the supplies used on this project and all your Stampin'UP! supplies from my online store.

By the way, did you also notice the vertical score lines on the bottom half of the card. These were created using Stampin'UP!'s scoring tool.  Of course its possible to create the same end result using a stylus with your paper cutter as a scoring guide. But the Simply Scored tool makes this go so much faster!

Product used on this Project:
Word Window Punch - - Blossom Punch - - Modern Label Punch
Stamp Set: Teeny Tiny Wishes
Always Artichoke Paper - - Crumb Cake Paper - - Black Paper
Simply Scored Scoring Tool
Black Dotted Scallop Ribbon

Thanks for Stopping by and Happy Stamping
--Katie


Tuesday, June 12, 2012

Lovely Tree for Father's Day

Do you struggle to find good images for men's cards? With Father's Day coming up that is an issue for many of us.  My dad will turn 74 the day after Father's Day this year.

Of course this card doesn't have to be for Father's Day. There is plenty of room in the corner for almost any sentiment you have. The sentiment for this card comes from a stamp set called Best Dad Ever.
The tree stamp is from everyone's favorite stamp set. I'm so glad that Stampin'UP! did NOT retire Lovely as a Tree. This set is so well loved by so many people - and of course, perfect for men's cards like Father's Day.

This was a pretty simple card to make:
*The tree is heat embossed in black
*the green color was applied with
  sponges
and the tree trunk was
  colored with marker
*the brads were spaced to underline
  the word DAD

STAMPING TIP: The ink will not dry on top the heat embossed part of the image so be careful of smudges. Use a tissue to gently blot up the extra ink that has not adhered to the paper.

Colors on this card (all Stampin'UP!) are:
Crumb Cake - Early Espresso - Always Artichoke and Soft Suede marker for the tree trunk

Lovely as a Tree is now available in Clear Mount. With this new catalog Stampin'UP! is making ALL stamps (except for the small ala carte ones) available in BOTH wood mount AND CLEAR mount. Even the older sets. Just be sure you also have the right size clear blocks. See this post on How to Choose the Right Size Clear Block

Get your Stampin'UP! supplies here: You can order Lovely as a Tree and all your Stampin'UP! supplies HERE.  If you don't already have a Stampin'UP! demonstrator I'd love to be yours. Thanks for stopping by and be sure to shoot me an email if you have any stamping questions.

Happy Stamping
--Katie


Thursday, June 7, 2012

Everything Eleanor Scrapbook Page

scrapbook page made with Stampin'UP! Everything Eleanor set
The new Everything Eleanor stamp set makes a gorgeous frame for these photos from my daughter's wedding.  If you follow this blog then you know that Sara and Jeremiah were married May 19th. 

Notice the groom's shirt?  Yep, its what you think it is. The man always wears Hawaiian shirts even to his wedding. The grooms men and ring bearer too.  Actually even the flower girl had a matching Hawaiian print for her dress.  She was of course the first photo posted from the wedding (no offense to my daughter the bride). You can see the flowergirl here.

Back to the scrapbook page:  The colors used here are Wild Wasabi, Perfect Plum and River Rock. They were a good match for the men's shirts.  And the imagery from the Everything Eleanor stamp set really fit the theme.   Here's how I built it:

For the stamped part of the page: I stamped the flourish down both sides and added the flowers to the right side. The green piece is a full size piece of Wild Wasabi paper (8.5" x 11"). I printed all the photos on one regular size sheet of paper and trimmed it so it was nicely framed on the green - I think it ended up being about 7x10. 
scrapbook page made with Stampin'UP! Everything Eleanor set scrapbook page made with Stampin'UP! Everything Eleanor set

The final detail was some punched flowers. They really help to soften the edge of the photo and make it seem to blend in to the flowers on the page.  These were Stamped with a set called Mixed Bunch and then punched with the new Blossom Punch.

Be sure to check out the Clearance Rack - its the first link in the list on the left. I notice there are several packs of Designer Paper and lots of scrapbooks. But the product changes often so check this site regularly.

Happy Stamping and Happy Scrapping
--Katie

Wednesday, June 6, 2012

Everything Eleanor and a Paper Saving Tip

Can you figure out this paper saving tip from the photos?  The flower in the center of this card was stamped on dark blue paper and punched out. The same color was used as the base layer for the center piece. So . . . since the dark blue is the bottom layer, you can use it to punch the flower's circle. No one will know there is a hole in it. How's that for a paper saving tip?

The flower is from a  new stamp set called Everything Eleanor. There is some really gorgeous imagery in this set, the more samples I make with it the more I love this set. Check out this card to see how I used some of the other images in this set.

Just a few details on this project:
**Stamp the flower in white craft ink and heat emboss with white embossing powder BEFORE punching out the circle.
**I love how Stampin'UP!'s pearls are self-stick! It makes a beautiful center for the flower on this project.
**the colors used here are Night of Navy and Bashful Blue
**punches:  1-3/8" circle2-3/8" Scallop Circle  and Dotted Scallop Ribbon Border Punch

You can get all the supplies to make this card from my Stampin'UP! store.

Other Recent News from Stampin'UP!
  • HOSTESS SPECIAL During June and July Hostesses can earn an extra $50 for parties of $450 or more. That's $115 of free product and 1 item at half price. Contact me today to schedule your event or ask about running a Book Party.
  • STARTER KIT SPECIAL If you purchase the starter kit during June you will get a trio of 3 additional free products: a stamp set, a pack of designer paper and a digital download. All part of a product suite that is not yet available in the current catalog but will be available in the next mini catalog. Buy the kit to start your business. -or- Buy the kit because its a great deal on stamps ($125 worth of product for only $99!)  Contact me with your questions or purchase the Starter Kit online HERE.

Thanks for stopping by
Happy Stamping
--Katie

Monday, June 4, 2012

The New 2012-2013 InColors

This card showcases the new 2012-2013 InColors. Its a very simple design: each piece started as a punched square and then we used a corner rounder punch to round opposite corners on the square.
* 1-3/8" Square Punch . . . #119877, $16.95
* 3/16" Corner Rounder Punch . . . #119871, $6.95

The little image that is stamped on 3 of the squares is from a stamp Set called Betsy's Blossoms. This is one of the new stamp sets just released in the new catalog. Do you have your new catalog yet?  If not, then contact me to see how we can get one to you. Its also available on-line.
The sentiment is from a different stamp set called Petite Pairs. I really like this set: I like the words in it and I like the font. By the way, inside the card is the rest of the sentiment - it says "for everything you are to me".

And ALL the stamps in this catalog (except the individual ala carte stamps) are available in either wood mount or clear mount.

I really appreciate the fact that Stampin'UP! carries rhinestones that are self-stick! Our package of rhinestones comes as a sheet with 3 different sizes and I used the small ones on this card. They are smaller than a glue dot and I can't imagine how I would have attached them if they weren't self-stick. What a great innovation! #119246, $4.95

Like I said, these are the new InColors. One of the signature features of Stampin'UP! products is the color palettes and the color coordination among palettes. We have 4 regular color collections and a 5th, more trendy set of colors that rotates on a 2-year cycle. So, the new 2012-2013 In Colors are:
*Midnight Muse
*Summer Starfruit
*Raspberry Ripple
*Primrose Petals and
*Gumball Green

REMEMBER:
And if you don't already have a paper catalog then contact me to discuss how we can get you one.

Happy Stamping
--Katie


Friday, June 1, 2012

Happy New Year! New Catalog & New Promotions

Happy New Year! OK, its not a new calendar year but it is a new catalog year. The new Stampin'UP! catalog is now available for on-line browsing and for purchasing.

Do you have your copy yet? I love browsing the new catalog and making my "wishlist". And believe me, this catalog has generated a lo-o-ong list!  I love so many of the new sets. Can't wait to show them off personally at events and here on-line. If you don't have your paper copy of the catalog yet then contact me now to get yours.

Of course you can also view the catalog on-line. Here is a link to a PDF version which you can view on-line or download to your own computer.

Not only do we have a new catalog, we also have a new promotion.


Hostesses in June can earn an EXTRA $50 with a qualifying party. And folks, you'll love this: the party can be an in-home gathering with your friends or a BOOK PARTY.  Check out the details HERE or call me for more info. 608-220-3450. Especially if you want to know more about a Book Party. There is so much great new stuff in this catalog that you're gonna want it all and extra $50 sure helps.

I have lots of samples ready to share from this great new catalog so be sure to check back tomorrow for more project photos.  To place an order you can contact me directly or order it yourself on-line (after 12 noon today MST). 

Happy Stamping
--Katie