

I LOVE how Stampin'UP! designs products to coordinate with each other. Are you getting tired of hearing me say this? This project show how well 3 of our proeucts coordinate:
**Extra-Large Oval Punch (#119859)
**Designer Frames Embossing Folders (#123130)
**Labels Collection Framelits (#125598)
For this project these three are as good as a matched set.
**Extra-Large Oval Punch (#119859)
**Designer Frames Embossing Folders (#123130)
**Labels Collection Framelits (#125598)
For this project these three are as good as a matched set.
The Framelits are sets of 6 nested frames with a thin cutting edge. Each frame is slightly larger than the next so they create nice layers. Thats how the white and pink layers were made for this card. For hints on successfully using the Framelits see this post.
By the way: This was one of the projects done at the Big Shot class last Friday.

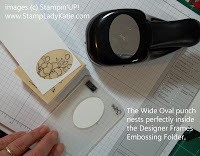
For added interest we embossed the center of the pink layer. We used the oval shape from the Designer Frames Embossing Folder Set. This set has 2 shapes: an oval and a square.
Its super handy that the embossing folders are translucent so you can see through them. That makes it easy to ensure the embossed oval is centered in the pink piece. By the way, the pink color is our Pink Pirouette. This is my favorite pink, I love this light pastel.

Notice the image was stamped on white paper. Turns out that the Extra-Large Oval punch is the perfect size to fit in the embossed oval.
For a little quiet bling I added a self-stick pearl (#119247) to the center of each flower. I love the elegance of these pearls and you can't beat how easy it is that they are self-stick.
TIP: if you have trouble with the pearls not sticking it means that the adhesive stayed on the dispenser sheet instead of lifting off with the pearl. Be sure you press down as you lift off the pearl, or use your thumbnail under the pearl, to ensure the adhesive comes up with the pearl.
In choosing the stamp set to use I first punched an oval and then used the hole laid over the stamp to be sure it was a pleasing image.
Are you eager to try this gorgeous layering yourself? You can get all the supplies to make this project from my Stampin'UP! Store. You will need either the Big Shot (#113439) or any other die cut machine in order to use the embossing folder and the Labels Framelits.
Thanks for stopping by
Happy Stamping
--Katie
No comments:
Post a Comment