Monday, October 31, 2011

Serene Snowflakes and some Cold Trick-or-Treating

Christmas Cards made with a Stampin'UP! set called Serene Snowflakes
Serene Snowflakes -v- Violent Storm and on Halloween Yet! So here we are on October 31st - Halloween and I'm posting about snow! That's because the east coast was just hit with a freak snowstorm that dumped a foot and a half of snow. I can empathize with that because living here in Wisconsin we get our fair share of the fluffy white stuff. Luckily we did not get any snow from this storm so while it may be a bit cold we'll have trick-or-treating as usual.

These cards were all made with a stamp set called Serene Snowflakes. These were part of the display at the recently held Christmas Open House. The top 5 cards are all the same card, just made in different colors. Isn't it fun to take one design and then play with the colors.
Update: Everyone needs a good snowflake set and I have many.  Actually the card in the close-up was made with a different stamp set: Snow Swirled.  

Christmas Card made with a Stampin'UP! set called Serene Snowflakes and Iridescent Ice Embossing Powder
Snowflakes sparkle with Iridescent Ice Embossing Powder.  The top card in this bunch was covered with Iridescent Ice embossing powder. You can see a close-up here to see how it really sparkles.

Embossing powders need something to hold them to the surface until they are heat set. I just pressed my Versamark Ink Pad over the whole piece with the snowflakes, sprinkled on the Iridescent Ice and Heat set it. Super Easy and the results have a great "wow" factor. Click these links to see more details about this card. You'll have to keep scrolling down this link but you'll see the explanation of this card as well as many other cards made with Iridescent Ice.

FYI: The colors on this card are River Rock and Always Artichoke.

Get your Stamping Supplies HERE
Serene Snowflakes (wood mount only) . . . . . . . 115438
River Rock Paper . . . . . . . . . . . . . . . . . . . . . . .108640
Iridescent Ice Embossing Powder . . . . . . . . . . . 101930
Scallop Trim Border Punch . . . . . . . . . . . . . . . . 118402
River Rock Ink Pad . . . . . . . . . . . . . . . . . . . . . . 109010
Always Artichoke Ink Pad . . . . . . . . . . . . . . . . . 105219
Versamark Ink Pad . . . . . . . . . . . . . . . . . . . . . . 102283
Heat Tool . . . . . . . . . . . . . . . . . . . . . . . . . . . . . 100005


Happy Stamping
--Katie

Sunday, October 30, 2011

Holiday Place Card with a Red Glimmer Pointsettia

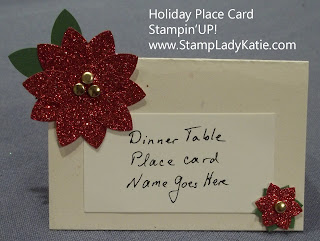
Place Card with Red Glimmer Paper PoinsettiasUse your stamping supplies to make Place Cards for your Holiday Table. This project needs minimal supplies and goes together very easily. A set of place cards like this one would be easy to assemble. This is a great project for the kids to help with.

The base of this card was made with a piece of White Confetti paper cut at 5" by 3-3/4". The confetti paper has flecks of color which add to the "wintery" look of the card. But it would look just as nice in plain white paper.

The Red Glimmer Paper makes an extra special poinsettia. The large poinsettia is 2 flowers punched with the 5-petal Flower Punch. The leaves were made with the same punch in Garden Green. The smaller flower was made with the Boho Blossom Punch. The shiny centers of the flowers are Gold Brads.

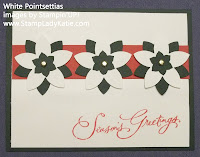
The 5-Petal Punch Makes a beautiful Poinsettia. The white poinsettia card on the left also used the Boho Blossom punch for the center of the flower. The sentiment is from a stamp set called Many Merry Messages (p 166 in the catalog). The 3 flowers are laid out on a strip of Real Red paper. The single Red Glimmer Poinsettia on the middle card is laid on a piece of 5/8" Red Satin Ribbon. The sentiment on that card is from a stamp set called Four the Holidays (catalog p168)
5-Stampin'UP!'s 5-Petal Punch Display from the 2011 Christmas Open House Poinsettia Card made with Stampin'UP!'s 5-petal Punch Poinsettia Card made with Stampin'UP!'s 5-Petal Punch and Red Glimmer Paper

Make these projects with minimal supplies. For your convenience here are item numbers. Pick and choose what you need for your project.
5-Petal Punch . . . . . . . . . . . . . . . . . 119880
Red Glimmer Paper . . . . . . . . . . . . . 121790
White Paper . . . . . . . . . . . . . . .  . . . 100730
Red Paper . . . . . . . . . . . . . . . . . . .  102482
Garden Green Paper . . . . . . . . . . . .  102584
5/8" Red Satin Ribbon . . . . . . . . . . . .117286
Stamp Set: Four the Holidays  . . . . . . 116921 (wood mount only)
Stamp Set: Many Merry Messages . . .116586 (wood mount only)
Gold Brads . . . . . . . . . . . . . . . . . . . . 104337
Confetti White Paper . . . . . . . . . . . . . 102028

  • Get a FREE stamp set with the purchase of 2 Simply Sent Card Kits
  • Get $100 of FREE Merchandise or a FREE Big Shot when you buy the Stampin'UP! Starter Kit.
Contact me for details on either of these offers. But Hurry there's only 2 days left! These specials end October 31st.

Happy Stamping
--Katie

Saturday, October 29, 2011

Christmas Lodge Gift Bag for Christmas

The cards on Table #5 of the Holiday Hope House in StoughtonThis season use your stamping supplies to make handmade gift bags. Who wouldn't be delighted to receive a gift in this beautiful bag.  I had a Christmas Open House in my home this week. For those of you unable to attend the tables were arranged by Stamp Set - which means that the tables had a mix of cards and other projects - like this beautiful Gift Bag.

Christmas Gift Bag using the Stamp Set: Christmas Lodge, shown at the Christmas Open House in StoughtonBags like this are so easy to assemble. This bag started out as a plain white bag, purchased as a set of 8 from Wal-Mart. The image is stamped on Whisper White and layered on a piece of Designer Paper. Add a ribbon and some tissue paper and you're done.

The image is from a new stamp set called Christmas Lodge. The set has that gorgeous tree, a beautiful Lodge Building, 2 sentiments and a little evergreen bough. Our family spends a lot of time in Wisconsin's north woods and that tree reminds me of being up north.

The stamp set itself is part of a larger collection called the Frostwood Lodge Collection: it includes Designer Paper, Mini Jingle Bells, some quilted Satin Ribbon, some Stitched Felt accessories and a Digital Download. Its found on pages 28-30 of the New Holiday Mini.

Let me know if you need a copy of the Mini Catalog. You can also download it  HERE as a PDF file. When you scroll through to pages 28-30 you will notice that those 3 pages have a green background. This is Stampin'UP!'s way of telling you that the items on these three pages are coordinated as a collection of products designed to work together. And did you notice how perfectly that tree fits into the plaid pattern of the designer paper. Just like they were made for each other - which of course they were.

Decorating a bag like this is a quick and easy way to add a personal touch to your gift giving. And if you give home made cookies be sure you check out the cookie bags I made for the Open House guests.

Products used to make this bag:
Christmas Lodge Stamp Set . . . . . . . . 123767 (wood mount) or 123769 (clear mount)
Frostwood Lodge Designer paper . . . . . 124002
Cherry Cobbler Seam Binding  . . . . . . . 120992

Order your supplies on-line NOW and get a head start on your Holiday preparations.
Get them HERE

A few Quick Reminders - Only 3 days left to take advantage of these specials:
  • Buy 2 Simply Sent Card Kits and receive a free matching stamp set
  • Join Stampin'UP! during October and receive and additional $100 of FREE MERCHANDISE. Choose the Big Shot or any other product of your choice. Contact me TODAY to see if this opportunity is right for you. Call 608-220-3450 or email
Happy Stamping
--Katie

Friday, October 28, 2011

Festive and Fun - Letter Perfect!

Card made with Stampin'UP!'s Festive and Fun stamp set
Do you enjoy cutting images?  What do you thinkof this card?  The images are from a set called: Festive and Fun. Among the ladies who attend the Stamp-a-Stack events here at my house in Stoughton, there is an on-going debate on whether they prefer to cut or to color. With this card they both win.

The colors and textures are festive too. I just love Christmas colors and they're so well done on this card. The background texture on the red was done with the new Star Burst Embossing Folder found in the Holiday Mini Catalog.

This was a Trade Card. One of the advantages of being a Demonstrator is the opportunity to participate in card trades. This is true whether you are a Business Demonstrator or a Hobby Demonstrator. A Hobby Demonstrator is essentially a discount buyer.
Read more about the differences here.

I am continually wowed by the top notch quality and amazing creativity of the ladies I trade with. This particular card was made by a fellow demonstrator, Norma Artman who lives in the nearby town of Deerfield. Did you notice the "O" in Jolly. Norma turned it into a shaker window using Stampin'UP!'s new nested Shaker Window Frames and the new Mica Flakes. Check out this stamp set and the shaker windows on page 28 of the new Mini Catalog.  You can see another card made with one of the larger window frames HERE. That window is filled with the Glassy Glitter.

Order the supplies for this card HERE

Happy Stamping
--Katie


Thursday, October 27, 2011

Cookie Gift Bags for my Christmas Open House Customers

Cookie Gift Bags from the Christmas Open House in Stoughton
These Cookie Gift Bags were quick and easy to make. Lucky for me because I made one for EACH customer who had RSVP'd they were coming to the open house. The open house was so much fun for me to prep. It gave me an excuse to be continuously creative and just keep stamping. Once I started the ideas just kept coming. There were over 150 items on display before I was done and they filled 6 tables. Yesterday's Post shows one table. Keep watching this blog for more about what you missed if you weren't able to come. 

The Bag Top went together very quickly. It was so easy to mass produce these because I did NOT have to cut out each shape. This set is coordinated to work with the Decorative Label Punch. If you give gifts like this cookie bag you'll love how this punch saves you time.

Don't you love how Stampin'UP! is making punches to go with the stamp sets! The image was stamped with a set called Four Frames. As the name implies, there are 4 cute stamps in this set. This one was perfect for a Holiday gift.

The Self Stick Rhinestones really made a difference - they elevated this project from being "nice" to being "special". Try adding rhinestones to your next project, they add sparkle and class.

The bag top was cut from a piece of designer paper - this gorgeous green and white check is from the FrostWoods Lodge collection on p28 in the Holiday Mini. Each bag top is 4" by 5" square folded in half. The image is framed by a piece of Garden Green cut at 1-1/2" by 2-1/4" and then a piece of Cherry Cobbler cut at 1-3/4" by 2-1/2".

Use a stronger adhesive on projects like this which get more handling than a card. I used Sticky Strip Tape to hold the top to the bag and to close the bag.

Cookie Gift Bags from the Christmas Open House in Stoughton
As an extra bonus for my customers: the bags were not just a gift - they were usable! The deal was that if you RSVP'd then there would be a bag waiting for you with your name on it. As you can see, no name. That way my customers can re-use this gift bag.

The cookies were made with the new Cookie Press Stamp. Its so new that its not even in any of the catalogs yet, but you can read more about it here. You can read more about the cookie press stamps and the other October specials on the Stampin'UP Promotion page  

This set is perfect for the holidays. The set comes with 3 images (a pumpkin, a snowflake and a heart). It also comes with 2 recipes. I used both recipes for this project and wanted to tell them apart so I used food coloring in one batch.

A few days ago I posted images from when I made a batch. Try rolling the dough and stamping it flat or roll out the dough - stamp - and cut with a round cookie cutter. HINT: tap the stamp in flour in between each time it touches the dough. It helps keep the dough from sticking to the stamp.

The finished product makes a great gift. Present them in a package like I gave my customers or wrap them up like you see in the bottom image. And did you know you can also get the cellophane bags from Stampin'UP!  We sell 3 sizes: for my customer gift I used the medium bags. The cookies in the promo photo are in the large bag. Who do you know who would enjoy a package of holiday goodies?

I appreciate your business.  Its your business that supports this website. Contact me to get the supplies for this project or order these and all your supplies from my on-line store
Supply Item
Cookie Press Stamp
Four Frames Stamp Set
Decorative Label Punch
Cherry Cobbler Paper
Garden Green Paper
Frost Woods Lodge Designer Paper
Self Stick Rhinestones
Medium Cellophane Bags
Sticky Strip
Product Number
125152
123440(wood mount), 123442(clear mount)
120907
119685
102584
124002
119246
102757
104294

Only 5 days left - these specials expire the end of October
  • get your FREE Big Shot or additional $100 FREEE merchandise when you Join Stampin'UP! By joining you also get: (1) a 20% discount on all future purchases until March 31st (2) access to an exclusive company website with tons of ideas (3) access to my support website for members of my team (4)the opportunity to start a business with Stampin'UP! if you want to do that.
  • Buy 2 Simply Sent Card kits and get a free matching Stamp set. Choose from the selected options. The kits do not have to be the same kit. Three to choose from - see them here. This is a really quick way to make a card.
Contact me with any questions
Happy Stamping
--Katie
Tuesday, October 25, 2011

Holiday Open House - Stuff Your Stockings Here

The Holiday Open House is Tomorrow so today is a very busy day for me. Busy, but fun! I have 6 tables of cards, gifts, gift tags, and more . . .

The samples will be arranged either by stamp set used or by the tool used.  This table shows 4 stamp sets: Dasher, Pennant Parade, Tree Trimmings and a new set called Stitched Stockings (which you can see in the new Holiday Mini Catalog: view it online HERE.

AND: The new stamp set has a matching punch! You can see it in the lower left corner of the pictures.  The stamp set has 5 different stocking designs and separate stamps to stamp the toe, heel and cuff. The punch is sized to match the shape of the stocking itself and the shapes of the toe, heel and cuff.

When punching a stamped image remember to stamp first, then punch. Its easy to get a perfect punch by looking through the opening in the bottom of the punch to line up the images.

Use them together or separately. Most of these cards use both the Stamp Set and the Punch. But you don't need to punch out the image. And you can use a punched  out image that has not been stamped. The images in the stamp set all face the same direction so when you are using the stamped images your stockings will all hang the same way. If you just use the punched image you could change the direction. (see the lower left of the table)

The close up shows a stocking that was just punched, not stamped. The stocking was punched from Old Olive paper and then embossed with the Snow Burst embossing folder. This is a new folder, also found in the Holiday Mini. The embossed image was sponged with Old Olive ink to give it more definition.

The cuff, heel and toe were punched from the new Silver Glimmer Paper. Now, if you think this doesn't really look silver, you're right. The silver seemed too bright for this card, so I sponged Daffodil Delight onto the glimmer paper and it worked just fine! Wow, you can color the glimmer paper.

I wanted the stocking to look like it was hanging, so I embossed the background with the Stripes Embossing Folder. Here is a quick supply list.

Stocking Builder Punch . . . . . . . . . . . #124095
Stitched Stockings . . wood mount . . . #123782
Stitched Stockings . . clear mount . . . #123784
Snow Burst embossing folder . . . . . .  #124096
Stripes embossing folder . . . . . . . . . . #123128
Silver Glimmer Paper  . . . . . . . . . . . . #124005


  • During October, buy 2 Simply Sent Card Kits and get a FREE matching Stamp Set. These cards come with the images pre-printed and already folded. 8 to a package with envelopes. You just add a sentiment and/or an embellishment. The embellishments come with the kit. See more details here.
  • Only 6 days left to get $100 of FREE merchandise - yep that could even be the Big Shot. Join Stampin'UP! during October and get a Free Big Shot or $100 of additional merchandise free. This is a NO OBLIGATION promotion. You join. You get the free stuff. And more . . . You have access to a company sponsored demonstrator only website for sharing samples. You will be WOW'ed by what you see here! You also get a 20% discount on all purchases for the next 3 months.  After that its up to you whether you continue or not. 
  • No Obligation means just that. But also know that I support my downline.
    By joining me you will also have access to an exclusive website with additional training materials and project ideas. You'll see far more samples on my downline website than what you see on this blog. I'm just not able to post everything to the blog but I do post all my workshop and class samples on my downline website. Contact me TODAY to discuss how this can benefit you. Remember, this is only available through October, there are only 6 days left to this promotion. What will you get with your free $100?
    Get your questions answered by calling 608-220-3450 or by email
 --Katie


    Monday, October 24, 2011

    Christmas Gifts and Packaging - Get Your Ideas Here!

    Are you looking for creative ideas for hand made Holiday Gifts and Gift Packaging?  Get your ideas here. Don't see what you're looking for?? Email me with a suggestion for a project you'd like to see here.

    If you are local to the Madison/Stoughton/Dane county area then
    You are Invited to the Christmas Open House

    Date: Wednesday - October 26th
    Time: Noon to Nine
    Location: My House in Rural Stoughton (call or email for directions, 608-220-3450)
    • Bring your camera and your questions, tons of samples
    • Holiday Greeting Cards
    • Holiday Thank-you Notes
    • Place Cards for the table
    • gift ideas for teachers, neighbors, and co-workers
    • Gift Tags
    • Gift Packaging
     Catalogs and order forms will be available but no purchase is necessary.
    This is your opportunity to collect ideas and get creative help.

    This cute bag is a plain white bag that's been dressed up with some ribbon and paper.  The star is an easy fold on Vellum Paper. Come Wednesday and I can show you how I did it. Or email and ask for the directions.

    Hope to see you Wednesday
    --Katie

    Saturday, October 22, 2011

    New Ideas for Christmas Cards, the Big Shot and Mica Flakes

    Stamp Set: Snow Much Fun
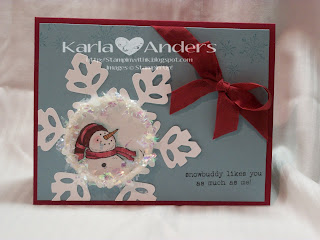
    Looking for ideas for quick and easy homemade Christmas Cards? This card was made by my very talented upline: Karla Anders. This would be so easy to mass produce. The Snowflake is made with the Big Shot and our Snowflake Die #2 (#113460). Did you know that with the Big Shot you can cut 3-4 papers at a time. That helps the job go quickly.

    These colors are just right a for winter card:  Marina Mist and Cherry Cobbler. They may be non-traditional Christmas colors but they work well on this card. The blue makes me think of snow and the cherry adds a warming touch.

    Stamp Set: Snow Much Fun
    Don't you love that ribbon color! Its the Cherry Cobbler Seam Binding (item # 120992) The bow in the opposite corner from the snowflake adds balance to card. I think Karla had a great design.
      
    That cute little snowman is from a stamp set called: Snow Much  Fun. He's stamped on Whisper White and colored and then punched out and adhered on top the snowflake. The sentiment comes from the same set. The sentiments in this set are really very versatile. This does not have to be a Christmas card, it can be just a winter thinking of you card.

    And I love that happy little snowman. Despite the fact that my husband says I'm always cold, I do love living here in Wisconsin and this little guy reminds me that winter will soon be here along with all the fun snow activities.

    Stampin'UP! Mica Flakes
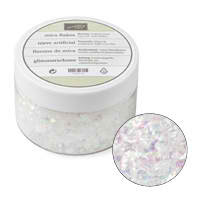
    Speaking of snowflakes, what do you think of the "snow" on this card? Karla used Stampin'UP!'s new Mica Flakes found in the Holiday Mini Catalog.  They give just the right touch to this card. She also stamped some snowflakes along the top of the card.

    Get the supplies for this card 
    and all your stamping needs HERE
    Wish you had a Big Shot so you could quickly mass produce your Holiday cards?  GET A FREE BIG SHOT this month when you purchase the Starter Kit. The kit sells for $175. It contains over $300 worth of product and supplies. The kit is customizable - that is you can choose  what the kit contains. Add to that the value of the Big Shot and this is a deal you can not afford to pass up!  Already have a Big Shot?  You can get an additional $100 in product instead of the Big Shot.  Call me for more details on this amazing offer. But contact me TODAY because this offer ends Oct 31st. 608-220-3450 or StampLadyKatie@aol.com

    Happy Stamping
    --Katie


    Friday, October 21, 2011

    Make Your Own Christmas Cards - Easy to Mass Produce

    Card made with the Stampin'UP! Stamp Set: Punch Pals
    Do you make your own Christmas Cards? Some people make individual designs for each person they send to. Most folks (me included) look for a design that's easy to mass produce. Check out this darling card made my my downline Mary Ploeser. 

    Mary is a busy lady, she works full time and does volunteer work, as well as running her Stamping Business.
    **One thing she has going for her is her talent
    , isn't this a super cute card?
    **Another thing she has going for her is that she is part of our local group
    . We have a very active group of demonstrators in the area who share ideas and trade cards often. With that kind of success you can't help but be successful. Contact me if you'd like to hear more about this powerful group.


    This card is easy to Mass Produce
    . This was Mary's trade card from our last demo meeting. Its such a simple design that it was easy for her to mass produce. She used 3 punches: the 1-3/8" square punch for the white piece with the images, the Scallop Square Punch for the scalloped layer behind the images and the Scallop Border Punch for the vertical black scallop strip. That vertical strip also has a 1/2" strip of Whisper White and is tied with the 1/4" Black GrosGrain ribbon.  The images are from a stamp set called Punch Pals. The whole thing is set on a base of our Real Red paper. Imagine her pride in sending out these for the Holidays and how impressed her friends and family will be to receive them.
    Hint: one trick to making this card go faster is to remember to stamp first then punch. By stamping first it was easy for Mary to line up the image in her punch. You can get the supplies for this card and all your stamping needs here

    • Would you like to see more samples of Christmas Cards?
    • Would you like some ideas for hand made gifts?
    Be sure to attend the Christmas Open House this Wednesday.
    • Come anytime between noon and nine.
    • Call to RSVP and get directions 608-220-3450 or email
    I'll have a little package of cookies - made with our new Cookie Press Stamps, for everyone who RSVP's!

    Happy Stamping
    --Katie
    Thursday, October 20, 2011

    New Cookie Press Stamps - Yum!

    Stampin'UP! introduced a new kind of stamping this fall - stamping on cookie dough. The set comes with a sturdy wooden handle and 3 interchangeable rubber stamps: a blue snowflake, a red heart and an orange pumpkin. Perfect for all the fall and winter holidays.  


    What you see here is my messy kitchen the first time my daughter and I played with them. The set comes with 2 recipes: a shortbread recipe and a sugar cookie recipe. We tried both but what you see in the picture is the sugar cookies.

    The instructions suggest to roll out the dough, stamp the image and cut with a cookie cutter or doughnut cutter. Thats what you see in the top photo. Helpful Hint: we found it useful to dip the cookie stamp in flour between stamping the dough. Maybe our dough was too sticky (I confess to being somewhat cooking challenged) This process makes a lovely cookie, perfectly round with smooth edges.


    An alternate suggestion was to roll the dough into a ball and use the cookie press to smash the dough flat. We tried that too. The cookies are less round and the edges are not smooth - but they're just as yummy!

    In fact you can taste them yourself at the Christmas Open House next Wednesday (the 26th). See the full calendar of events here. Call to reserve your goodie bag 608-220-3450! There will be treat bags for everyone who RSVP's.


    What kind of holiday baking do you do?  Do the kids help? Can't you just imagine the fun the kids will have making these cookies as well as eating them. 

    And really, cooking together with kids is such a great way to build memories and family traditions. Stampin'UP! is a family oriented company and this is one product that supports strong families.

    Get your Cookie Press Stamp Set today! and start cooking up some family memories. Order your Cookie Press Stamp Set now and have it in time for Halloween baking.  Click here to order item #125152
    Happy Stamping and Happy Eating!
    --Katie

    Wednesday, October 19, 2011

    Be a Demonstrator to be a Better Stamper

    Trade Cards from our Demonstrator Meeting
    Trade Cards from our Demonstrator MeetingI invite you to think seriously about the current offer from Stampin'UP! The offer is to join - as a demonstrator - at the regular price, and get either a FREE BIG SHOT or $100 of free merchandise from the catalog. Why should you think about this? One reason is to become a better Stamper. We learn from each other. Look at the pictures running down the side of this post. These represent trades I got at our local demo group last weekend. In other words, I came home with all these cards!  And do you notice that some of these trades are 3D items and some are 6x6 Scrapbook pages. Using them as models in hand will help me improve my skills and be a better stamper.

    And if you are not local, you can still get the trades. We had several people trading at this event who were not actually present, they just sent their trades in and will receive all these goodies in the mail.

    Trade Cards from our Demonstrator MeetingAs a stamper I love having all these ideas IN HAND! I may not own all the stamp sets personally, but when I have these samples it gives me ideas for lay-outs and color combinations to use with the stamps I do own. And I love getting the cards that are cut in an unusual way or have unusual folds. Having those samples to study is so helpful as I make my own projects. As a demonstrator it gives me samples to show to my customers.

    Trade Cards from our Demonstrator MeetingIf you are worried about where to get customers? 
    First of all you don't actually have to have customers. There is a difference between a hobby demo and a business demo. Hobby demonstrators join for the discount. Business Demos join to make money.

    Now, if you do want a customer base then just think of the friends you currently give your cards to and show your cards to. Have you ever asked them to come stamp with you just for fun? Have you ever asked them to come to a workshop that you are attending? Have you invited them as a guest to a workshop you hosted? Have you ever asked them if they wanted to add anything to an order you were already placing? 

    Trade Cards from our Demonstrator MeetingWhen you join Stampin'UP! you get so much support. The company itself provides some, but I am there to help you think through possibilities and generate ideas. My success depends on how well I support you. People who sign up with me also have access to an exclusive training website where I post stamping ideas and business ideas.

    Joining Stampin'UP! is a growth experience. When I first joined my goal was to become a better stamper. I really was not even thinking about the business aspect. I've certainly achieved that first goal. I'm amazed when I go back and look at the difference between the cards I make now and the cards I was making when I first started.

    Gradually as I progressed with my stamping skills my goals changed. For some folks, they develop their skills and find they no longer need the support offered by the demonstrator community and they move on in life. I know several people who started when I did who are no longer demonstrators. For me, the joy of sharing what I do prompted me to change my goals to develop this into a business. Thats where I'm at now.  I invite you to join me in this venture. I can help you meet what ever your goals are.

    What ARE your goals? 
    • Do you just want to be a better stamper?
    • Do you want to join a community of talented stampers?
    • Is there a potential business in your future?
    For more information about this opportunity visit the Stampin'UP! site
    and please, contact me with your questions and concerns (608-220-3450). This opportunity really could be right for you. But get your questions answered NOW because the Free Big Shot or $100 is only for the month of October.

    --Katie


    Tuesday, October 18, 2011

    Always Thankful

    Card made with the Stampin'UP! stamp set: Always Thankful
    This time of year I'm Always Thankful I live in Wisconsin! I love fall. First: its just gorgeous watching the scenery change and second: there are so many fun holidays. Halloween is only a few weeks away, Thanksgiving is in another month and then Christmas. What a great time of year for stampers and other crafters. And if you are lucky to live in a place with changing seasonal scenery you also get some new insipration from nature.

    Today's project uses a Stamp Set called Always Thankful. This is a new stamp set (available in either wood mount or clear mount) featured in the Holiday Mini Catalog (which you can view online). The colors are inspired by the tree colors this time of year: So Saffron, More Mustard and Chocolate Chip. Actually this card is very similar to a card I made last year with a gold embossed wheat image on a dark base. Or check out these gold embossed leaves.

    These fall colors are very muted so I added a little pizzazz! First the image was embossed in gold. Then I colored the grass  in Wild Wasabi and the can with Basic Gray. The 3 gold brads add balance as well as bling. And the Linen Thread is there for balance and texture.

    This sentiment is a perfect fit for the punches I used. With this sentiment this would make a great Thanksgiving card. And the sentiment is part of the same stamp set. Notice how perfectly it fits inside our Large Oval Punch #119855, which can then be layered inside our Scallop Oval Punch #119856. One of the things I really love and appreciate about Stampin'UP! is how they support their product. The stamp sets are designed to work with the punches. There is no guarantee that random punches with work with random stamps, but Stampin'UP! really tries to ensure that your product can all be used together.

    The little popped up pumpkin is one more extra on this card. Ordinarily I'd never think to do something like this, but I got the idea from the card shown in the catalog with this stamp set. The catalogs themselves are great Idea Books! Check it out on page 19 of the Holiday Mini Catalog. The little pumpkin is actually part of the stamp with the wheelbarrow.

    If you'd like to get these or any other stamping supplies
    you'll find
    everything you need HERE.

    Happy Stamping
    --Katie


    Monday, October 17, 2011

    Get a Free Big Shot and Join Our Group

    Madison Wisconsin Stampin'UP! Demonstrator MeetingDid you know that Stampin'UP! has a special right now. Join Stampin'UP! during October and get a Free Big Shot. Actually there are many good reasons to join Stampin'UP!. In addition to the stamping supplies and business materials you get so much more:
    • a company exclusive website with ideas and training materials
    •  regional and national meetings
    • a demonstrator exclusive magazine
    • personal discount on purchases
    And by joining ME you also
    • become part of our local demonstrator group and attend regular training meetings.
    • have access to my exclusive downline website filled with pictures and additional training and how-to's (this website is a very effective way to help service my downline who are not local)

    I'm so energized about my business right now - Saturday was our Quarterly meeting and I'm always energized and excited after we meet. Its so good to get together with everyone and see what they are doing with their own stamping groups and see the projects they've done with their groups. We shared business tips and project ideas and had a chance to play with new products at the Make and Take tables.
    card made with Stampin'UP!'s Stocking Builder Punch

    The top picture shows my downline, Mary Ploeser. She was running one of the Make and Take tables. She had this  darling Holiday card made using the new Stocking Builder punch and one of the Big Shot embossing folders.

    Boxes made with Big Shot Dies: The Petal Cone Die and the Mini Milk Carton DieLook at these cute boxes made with the Big Shot dies. Can you see the cute candy corn table decorations in the background made by my upline Karla Anders. She demonstrated how she made them using the Big Shot and the Petal Cone die. Oh my gosh - it was so easy I have to try it myself.

    The 5 boxes in the foreground were made by Lori Verdon using the Mini Milk Carton Die. She showed us how she made them and had written directions for us. This is just one of the advantages of being part of a supportive group of active demonstrators.


    If you love stamping and learning new ideas and new ways to use materials then you should join us. You will love our local group of ladies. We meet quarterly as a large group of 20 or so with demonstrators from Dane county and beyond. A smaller, more local group meets monthly. And I am in constant contact with my own downline offering what ever support is needed.  

    You work toward your own goals, whether they be stamping goals or business goals. Joining Stampin'UP! will be a growth experience.
    • Let me help you develop your stamping skills. 
    • Let me help you grow a business.
    You will become a better stamper for sure. You can make the business aspect into anything you want it to be. You'll have opportunities to learn and to share your expertise with the rest of the group. I want you to succeed. Whether you want to build your stamping skills or build your business, I am there to help.

    Contact me today (608-220-3450) to talk about this opportunity. 
    Ask me all your questions. You need to know if this is something that can benefit you.

    Looking forward to talking with you soon
    --Katie


    Wednesday, October 12, 2011

    Fall Inspiration: Cards for October Stamping

    My Stamping Inspiration: Fall River Trip in Wisconsin.
    People often ask me WHERE I get the Inspiration for my cards. Well, I take my inspiration from everything! My advice is to just look around and then think about the colors and stamps you have. For example, here in Wisconsin the fall this October has been just breathtaking. This picture is from a recent river trip I did with my family and friends (BTW: I'm totally loving this retirement gig!). Nature is one of the best places to look - but really you can get inspiration anywhere: like a fabric print, or a group of colors or . . .

    The leaves outside are "Gently Falling" and this card is made with a Stamp set called Gently Falling. If you don't recognize it that's because its new! Its in the current Holiday Mini Catalog. We made this card at the October Stamp-a-Stack this last weekend. Yesterday's post showed the whole group of cards we made.

    The bottom half of the card is embellished with a series of parallel vertical lines made using the new scoring machine: Simply Scored. This is my new favorite tool, its so easy to use. I actually made a "cheat sheet" showing 2 pages of possible score patterns and included it as a "freebie" with the October Newsletter. If you like getting little help sheets like that then be sure to sign up for my newsletter. * * SIGN UP HERE * *

    You get a 2nd chance to get that free PDF file of score patterns. I've gotten feedback from some folks that the link in the newsletter did not work. I need a day or 2 to fix it and be sure its fixed so by Friday morning I hope to have it ready to re-send. If you're not already on the newsletter list then SIGN UP NOW

    The top of the card was stamped on Naturals Ivory. It has a much more natural look for fallen leaves than if the card had been stamped on plain white. That gorgeous flowing sentiment is also from a new set, its called Hand Penned. You will definitely be seeing more projects made with it.  And of course I used the Mat Pack to ensure the brads were evenly spaced and parallel to the card edge.  Its amazing how simple little tools like the Mat Pack can really help make a card look so professional.

    The Gently Falling stamp set is designed for 2-step stamping.  And the mottled colors on these leaves were done with a technique called "Thumping"This Feather card shows another example of Thumping. Thumping is a quick easy way to blend colors. You pick up ink in a light color from the ink pad and add a darker color with a marker. Hold the marker balanced on your thumb with 2 fingers on top. Use your pointer finger to balance it and use your index finger to bounce the marker tip on the stamp.

    The new Victoria Ribbon looks great on this card. It has just the right "vintage" look to finish off this card.

    I'm so happy with how this card turned out. I may mass produce this one and use it as my Thanksgiving Greeting to friends and family.

    You can get all the supplies for this card HERE:

    As always, feel free to contact me with any questions
    Happy Stamping
    --Katie


    Tuesday, October 11, 2011

    Fall Cards for the October Stamp-a-Stack

    Here are the Fall Cards we did for the October Stamp-a-Stack. I tried to make cards with images and colors for the fall, but I see there's one "stray" in the bunch.

    We used some different products this time. Sometimes I find my self stuck in a rut and just using the same product time and again. I've been trying to stretch myself lately and use different products, so I wanted to give my stampers a chance to play with other products too.

    Most recently I've been playing with the Treat Cups. If you've been following this blog then you may be aware of seeing several other posts about the Treat Cups. There are 2 shapes available: round and heart. They match a 1-3/4" circle punch and Stampin'UP!'s Full Heart Punch. We used the Round Treat Cup on the Sunflower Card. (upper left in the photo) The card we did at the Stamp-a-Stack is very similar to this card I made for a trade. I also used the sunflower on this card posted with the sunflowers from my daughter's wedding.

    Stampin'UP! nested Shaker Frames
    Two other new products we used are Stampin'UP!'s new Glitter Glass and the new Shaker Frames.

    The Shaker Frames come as 6 sets of 6 different sized foam adhesive rings. That's 36 different rings total. We used them to make the penguin shaker card.


    Shaker Card made with Glitter Glass and the Northern Flurry Embossing FolderThis card sparkles for several reasons: The Glitter Glass in the shaker window, the Self-Stick Rhinestones on the snowflakes and the paper itself is Shimmery White paper

    The card itself is easy to make. 
    • Emboss the Shimmery White piece using the Northern Flurry embossing folder
    • Stamp the image - I used the penguin from Zoo Review
    • Place a foam ring around the image
    • Add some Glitter Glass to the ring
    • Add the "LID" to the ring to keep the glitter in.
    • Put the layer on the card base - I used Pool Party
    • Add a few Self-Adhesive Rhinestones and voila!
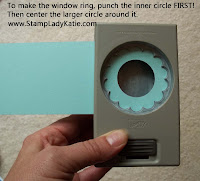
    Making the lid involves several layers. The bottom layer, closest to the foam ring, is a 2" acetate circle to keep the glitter contained. The next layer must have a hole so you can see the image. For the scallop we used the 1-3/8" circle punch for the actual window and the 2-3/8" Scallop Circle punch around it. I added a top ring to frame the window using the 1-3/8" circle punch for the hole in the middle and the 1-3/4" circle punch for the ring.  CAUTION: punch the inner hole (ie the window hole) first and then center the larger punch around the hole. 


    Would you like to make a Window Card?  Get all the supplies to make this card HERE .  I appreciate your business and am ALWAYS willing to answer your questions about how to make projects.

    101910 . . . Shimmery White Paper
    120902 . . . Northern Flurry Embossing Folder
    120995 . . . Silver Glitter Glass
    124155 . . . Shaker Rings
    114323 . . . Acetate Window Sheets
    122924 . . . Pool Party CardStock
    119850 . . . 1-3/4" Circle Punch
    119860 . . . 1-3/8" Circle Punch
    118874 . . . 2-3/8" Scallop Circle Punch
    119960 . . . 1/8" Taffeta Ribbon
    119246 . . . Self-Adhesive Rhinestones
    113439 . . . Big Shot Machine

    Don't have a Big Shot?  Want one for FREE?! Read more about Stampin'UP!'s October only promotion. Do the math for yourself. $175 = $345+$99.99 . . . . WOW! Almost $500 worth of product for less than $200. Unbelievable numbers. Love the math. Buy the Starter Kit Now

    wait a minute: Can it get any better?  Yes it can!  Buying that Starter Kit means you've "joined the Stampin'UP! family" and you automatically get an additional 20% off your purchases

    Great! Can it get any better? Yes it Can! Once you "join" you have access to a company sponsored support website. This website has all kinds of ideas for both business minded demos and for hobbyists. There is also a monthly magazine. And you can attend national and regional stamping events.

    Amazing, can it get any better? Yes it can! Your first qualifying purchase after buying the Starter Kit is actually a 30% discount.

    Wow, can it get any better? Yes it Can! If you join with me you also get access to an exclusive website that I maintain for my downline. It has additional images of card ideas and business ideas. Including ideas for how to start your own clubs and classes for your friends and neighbors and how to meet new customers. This is a wonderful perk for people in my downline and a perfect way for me to support people who are not local to my area of Wisconsin. By joining me you will also be joining a larger group of locally active demonstrators and have access to our monthly and quarterly meetings. For people who are not local, my website allows you to benefit from all the business and project information that comes from being part of our group.
    • For the hobbyist: It is an excellent way to build your skills and knowledge about the craft. 
    • For a business builder: You have a strong support team 
    Rest assured, there is no obligation to run a business or to become an active demonstrator.. . .You are just getting a whole lot of product (granted in one lump sum) for a really amazing price. You can also be confident that when and if you're ready for it,  the business support is there too.  And for me, this has been a really, really fun way to start a business.

    Could this be the right thing for you right now?
    Call me and let me answer your questions. 608-220-3450

    More coming soon with details on other individual cards.

    Happy Stamping
    --Katie


    Monday, October 10, 2011

    Treat Cups: How to Get at the Contents

    Do you like to send treats for Halloween? Stampin'UP!'s Treat Cups make a great container for a few goodies. They have an adhesive ring base to hold them to the card, but that can also make it difficult to get at the contents. Keep reading to see one solution.

    First: a few words about the Treat Cups. They are available in both round and heart shape and they are designed to work with the 1-3/4" circle punch and Stampin'UP!'s Full Heart Punch. Stampin'UP! does a nice job of supporting their punch designs with coordinating stamp sets.

    Something Sweet

    Sweet Centers

    Sweet Snowglobe

    Sweetheart

    These sets do a nice job of covering the Holidays. Aren't they just the cutest? Look at all the different shapes you can make: a hot air balloon, gum ball machine, flowers, a snow globe and a baby rattle. Ok, now the creative juices are flowing, I'm thinking porthole on a ship, a bug's head . . .
    Now, imagine what you could put in these shapes. The snow globe could hold glitter or mica flakes. The Baby rattle could hold beads. And the Hot Air Balloon and Hearts could hold all kids of goodies! Check out this cute SnowMan and SunFlower. At $2.95 for a box of 12 this has definite possibilities! And speaking of possibilities, I have a list of over 50 different things you can use for fillers and ideas for ways to use them. Send me an email if you'd like the list - just ask for the Treat Cup Fillers List. StampLadyKatie@aol.com
    Now lets talk about using them. The simplest, easiest way is to:
    • stamp the image on a card 
    • fill the Treat Cup with the goodies
    • peel off the protective ring from the adhesive
    • stick the ring to the card.
    Imagine getting this in the mail from your friend. "Sweet!, Looks good enough to eat", you say. But . . . you can't access the goodies without destroying the card.


    Here is one solution to getting at the contents: make a secret trap door on the back of the card. This will involve making layers on the card. This series of photos shows you a card made with the Delicate Doilies Stamp Set. I found a package of erasers whose colors seemed to coordinate with Stampin'UP!'s Melon Mambo, Concord Grape and Daffodil Delight. ( I love how well Stampin'UP!'s colors coordinate with today's fashion colors! - just like the colors of the M&M's here)

    Anyway, one eraser fit just perfectly inside a round Treat Cup. The easy access is with an extra piece on the back, held on with a brad, that rotates out of the way to allow access to the contents. Now I didn't want the brad legs to show through on the front of the card so thats where the layers come in, they hide the brad legs.
    Card made with Treat Cups and Delicate Doilies Stamp SetCard made with Treat Cups and Delicate Doilies Stamp Set


    I'm glad there were lots of erasers in the package because I have 4 little nieces that would just love to get this card. Actually I'll bet they'd love to actually MAKE the cards too!

    Cooking and crafting with kids is a great adult child bonding experience. And Stampin'UP! offers many products to support strengthening family relationships
    • The Treat Cups are one Example
    • If you like to give home made cookies, be sure to check out the new Cookie Press Stamps.
    • Also be sure to check out the new Long Cellophane Bags found on page 11 in the Holiday Mini Catalog
    • And there are lots of stamp sets that kids just love: we have some great Halloween Stamps as well as stamps sets with ponies, and monsters and bulldozers . . .
    You can see them all on the on-line catalog or contact me for a your own catalog.

    You can shop for these and any other Stampin'UP! product HERE
    I appreciate your business, be sure to let me know if you have any questions about any product OR how to use the product.

    Happy Stamping
    --Katie