Showing posts with label Well Written dies. Show all posts

Sunday, February 24, 2019

Triangle Kiss Container Makes a Cute Wedding Favor

How cute would this look sitting by each guest's place at the table? What big event do you have coming up?  Wedding? Bridal Shower?  These are so easy to make, no trouble at all for a big event.

Triangle Kiss Favor made with dies from Stampin'UP!'s Well Written and Be Mine die sets

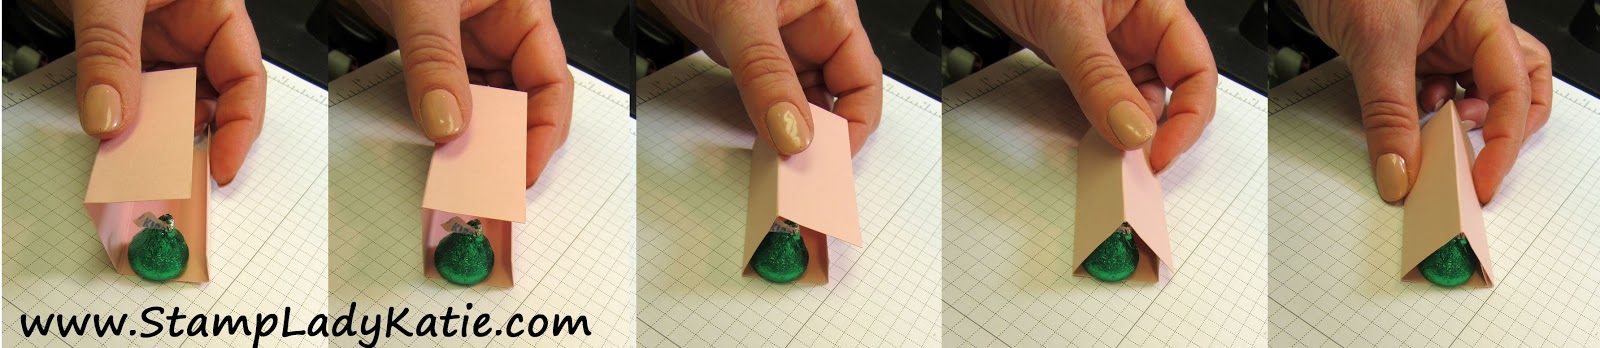
The actual construction of the favor is very quick and simple to make.

How to make a Triangle Kiss Favor, dimensions and score lines

How to make a Triangle Kiss Favor

After construction you'll need to decorate one panel that measures 3" by 1.25".  

I added some pizzazz by die cutting the word from black foil paper and layering it on a strip of glimmer paper.  Foil paper and glimmer paper are 2 easy ways to get your projects noticed.  Product links are at the end of the post.

Triangle Kiss Favor made with dies from Stampin'UP!'s Well Written and Be Mine die sets

The reason for the 3" length is because each Hershey's Kiss is a little less than 1" diameter 
and this favor holds 3 Kisses.


Triangle Kiss Favor made with dies from Stampin'UP!'s Well Written and Be Mine die sets

You can see from the pictures how easy it is to make these candy kiss treats. Think beyond weddings These could even be decorated for a Baby Shower or anniversary party. This triangle kiss holder would work for any time you want to show your guests a little "love". Or heck, just drop one of these favors off on a co-worker's desk.
I hope I've inspired you to try this "sweet" project. I'm happy to answer questions about this or any other project you're working on. And if you need any product check the links below.


If you haven't browsed the Stampin'UP! store I encourage you to spend a little time there. This is a great company with wonderful product. I do receive commission on sales and I appreciate your business - thank-you. My commission is paid by the company, you pay nothing extra when purchasing product through me.

Because I do appreciate your business, you can earn extra rewards when you shop with me
Just be sure to use the Rewards Code for the month (found in the left pane at the top of this blog) when you place your on-line order.

Thursday, February 21, 2019

Well Said and Well Written

Here is a beautiful happy birthday card.  The high contrast on this card really makes a statement, I think you could say it was "well said"!


Simple birthday card made with Stampin'UP!'s Well Said Stamps and Well Written Dies. Card is high contrast with foil paper and glimmer paper on black background

Contrast, Glimmer and Shine makes a statement.  The high contrast of the reflective Lovely Lipstick foil and sparkle from the white glimmer paper against the black background is very eye catching.

BTW: that gorgeous Lovely Lipstick foil is one of this year's FREE items for Sale-a-brationCheck out all your Sale-a-bration options here.

Simple sentiments:  For added contrast the diecut word "happy" was intentionally overlaid on the foil strip and the word birthday was heat embossed on the foil. 

Simple birthday card made with Stampin'UP!'s Well Said Stamps and Well Written Dies. Card is high contrast with foil paper and glimmer paper on black background 

If you're looking for a good word set with lots of options and a complementary set of word dies then check here to see enlarged images of the Well Said Stamp Set and Well Written Dies.  I'm impressed by the range of sentiments AND the fact that the Well Said stamp set also has sentiments to cover the INSIDE of the card.

The stamps and dies can be purchased separately, or now through May, you can save 10% if you purchase them as a bundle.

 
Darling little flowers: The only imagery on this simple card is from the cute trio of little punched flowers. I'm glad to see that Stampin'UP! has added a pack of ittle flower punches to the product line.

The Bitty Bloom Punch Pack:  How cute are these?


Can you see the possibilities of simple cards with a focus on the sentiments?

Simple birthday card made with Stampin'UP!'s Well Said Stamps and Well Written Dies. Card is high contrast with foil paper and glimmer paper on black background

I hope this has inspired you to dig through your sentiment sets and word dies.  And if you're looking for a good sentiment set or set of word dies you can't go wrong with the Well Said Stamp Set or Well Written Dies. The supplies I used on this project are listed at the end of the post.  I'm happy to answer questions about this or any other project.


If you haven't browsed the Stampin'UP! store I encourage you to spend a little time there. This is a great company with wonderful product. I do receive commission on sales and I appreciate your business - thank-you. My commission is paid by the company, you pay nothing extra when purchasing product through me.

Because I do appreciate your business, you can earn extra rewards when you shop with me
Just be sure to use the Rewards Code for the month (found in the left pane at the top of this blog) when you place your on-line order.


Well Said Cling Bundle

Save money
when you buy the BUNDLE

The stamps and dies
can also be purchased separately
Big Shot
[143263] - $110.00
Versamark Pad
[102283] - $9.00
Heat Tool
Heat Tool
[
129053] - $30.00

Thursday, January 24, 2019

Foil Inlay in Glimmer Paper

This card features a die cut technique called Inlay.  If you were to run your finger over the words they would not be raised up - they have been 'laid into' the base paper. Its one of those "wow" cards where people will ask you how you did it.  And we love to hear people say that about our projects, right?

Die cut Inlay card featuring Stampin'UP foil and glimmer papers and Well Written Die set by StampLadyKatie

The concept of an inlay is very simple  (product list is at the end of the post)
  • die cut the words from black foil paper, and throw away all the little pieces from inside the words
  • die cut the words again from the pink glimmer paper so you'll have a hole to place the black foil into.  AND SAVE ALL THE LITTLE PINK PIECES so you can put them back into the spaces in the black words.
The bonus is that now you have pink glimmer words to use on another project - yay!

Die cut Inlay card featuring Stampin'UP foil and glimmer papers and Well Written Die set by StampLadyKatie

The concept was simple, the actual construction was a bit of a challenge because those little centers from the loops on the words are very tiny.  For me the best way to accomplish this was to use a pick tool to dab a bit of liquid glue on the back and then use that same pick to maneuver the piece into its hole. Yes, I know. its very fussy. But so worth it with the final look.

Make inlay easier with the right tools: silicone craft sheet, paper piercer and liquid glue

Having the right tools helps: I love the liquid multipurpose glue, its a good strong glue that dries fast.  A paper piercer is so useful, if you've been crafting for any length of time you have one of these laying around.  You can put your puddle of glue on any non-porous surface, I used my Silicone Craft Sheet. This sheet has a ton of uses, I'll save those comments for another post. These three items are basic supplies for every paper crafter and I'll put  links to these basic supplies in the product list below. 

Its all about the papers!  Did you notice there is no stamping on this card?  This card is all about the papers and how they sparkle and contrast. Stampin'UP! papers are the best! This card uses both the pink and white glimmer paper which pairs well with the gorgeous shiny black foil.  The words on this card are from the Well Written die set, but you could accomplish this look with any set of dies you have.

Die cut Inlay card featuring Stampin'UP foil and glimmer papers and Well Written Die set by StampLadyKatie

Has this post stimulated some creative thought for you?  Time to head to your craft supplies and try out this inlay technique.  By the way: I usually keep a few sheets of all the glimmer and foil papers in my craft stash so I'm ready whenever inspiration strikes. Its a great time saver to have them on-hand when I'm inspired to try a new project.

I hope I have inspired you to try this techniqueI'd love to hear your comments below. I'm happy to answer questions about this or any other project. I can also answer questions about the advantages of joining Stampin'UP!

If you haven't browsed the Stampin'UP! store I encourage you to spend a little time there. This is a great company with wonderful product. I do receive commission on sales and I appreciate your business - thank-you. My commission is paid by the company, you pay nothing extra when purchasing product through me.

Because I do appreciate your business, you can earn extra rewards when you shop with me
Just be sure to use the Rewards Code for the month (found in the left pane of the blog) when you place your on-line order.

Big Shot
[143263] - $110.00