Tuesday, December 28, 2010

Last Day to Order from the Holiday Mini

Only a few days left to order products from the Holiday Mini Catalog!
The Mini-catalogs serve 2 purposes: In addition to offering some seasonal stamp sets for a limited time (3 months), Stampin'UP! also uses the mini-catalogs to introduce new product. So while many of the stamp sets will disappear, there are some items that will still be available (see the list below). Actually, some of the stamp sets may re-appear in the next big catalog, but we never know ahead of time. There are some really cute sets that I'll be sad to see go. My favorites are the French Foliage Stamp set, Day of Gratitude Stamp Set and Tags til Christmas.

You can order On-Line from my StampinUP! Website.
Orders can be placed online up through 11:50 pm (MT) on Monday, January 3. Your order will be shipped directly to your house. Be aware that there is a minimum shipping charge of $6.95 or 10%, which ever is higher.
You can also contact me to place your order.
I can place the order for you to ship to your house. Or if you are local and if it saves you some shipping charges, I will add your order to my next order. It would then ship to me and I would deliver it. NOTE: I'll be placing my final Holiday Mini order on Friday, Dec. 31.

The following items from the Holiday Mini WILL still be available after the catalog retires.
item #Description Price
120890 Candy Wrapper Bigz L Die $32.95
120903 Scallop Squares Duo Bigz Die $21.95
120893 Tasteful Trim Bigz XL Die $42.95
120901 Northern Frost Decorative Strip $21.95
120902 Northern Flurry Textured Impressions Embossing Folder$  7.95
120889 Spider Web Textured Impressions Embossing Folder$  7.95
120982 Northern Trim Letterpress Plate $  5.95
120980 Trick or Treat Letterpress Plate $  7.95
120908 3/4" x 15/16" Oval Punch $10.95
120984 Waffle Paper (Assortment 1) $  9.95
122124 8" x 8" Page Protectors (20) $  7.95
120981 Joyful Season Letterpress Plate $  5.95
120910 Vintage Frames Décor Stencils $14.95
122265 Uninked Craft Stampin' Pad $  4.95

Be sure to let me know soon if you want me to place a final order for you from the Holiday Mini Catalog.

And be watching your mailbox for delivery of both the new Occasions Mini Catalog and the Sale-a-Bration Catalogs.

As always, let me know how I can help you with your stamping needs. Thanks for choosing me as your source of stamping inspiration and thanks for your support.
--Katie

Sunday, December 19, 2010

Filled With Love Promotion


Amazing isn't it. Christmas isn't even here yet and the Valentines's Day Promotions are already launching.  This special started Friday. I can understand why. Just look at this beautiful paper and the new Valentines's Day stamp set. This special offer is good December 17-January 24.  The stamp set and the paper will be in the new Occasions Mini catalog starting Jan 3rd.  If you already have your mini you can see these items on page 43.  Or click the images above to see them larger.

There are 3 choices in this special pre-Valentines Day offer: 2 of the items are the cute new Stamp Set with this gorgeous new Valentines Day paper, either as a wood mount set or a clear mount set. The third item is just the paper.  If you order either bundle you'll also get a FREE package of the bitty buttons. See them in the bottom of the right hand picture.  They are so cute and they're designed to match the shape of our bitty punches.

I really like this paper, the stripes and the small designs.  When I make cards I like a paper that does not compete with the rest of the elements on the card.

Contact me if you'd like to place an order for this special.  Also, BIG REMINDER - the Holiday Mini expires soon.  Time to dig out that Holiday Mini Catalog and check to be sure you have everything you wanted from it before those items disappear. If you don't have a copy of the mini you can download a PDF of the catalog by clicking here.

My guests start arriving tomorrow: all 4 siblings, their spouses and kids and my parents will be here for the holidays.  I'm so excited to have everyone here. We'll play in the snow, lots of indoor games with a cribbage tournament, and (of course) some stamping!

I hope you and your family have a wonderful holiday.  Blessings to all.
--Katie

Friday, December 17, 2010

Razzleberry Swirl

I pulled out my favorite stamp set: French Foliage. My plan was to make another wreath card with the leaves. I never got that card done, but this is one I did make with the set earlier this fall. The colors are Rich Razzleberry on white, its very striking. Its a very simple card although I did emboss the back piece with the Elegant Lines embossing folder. The taffeta ribbon and the little self-stick rhinestones add a little sparkle. The sentiment is from Teeny Tiny Wishes and punched with the Word Window Punch. The back layer of the sentiment is the Modern Label Punch.  All supplies used on this card are from Stampin'UP!

This is a pretty quick card to make. I do cards with some of my co-workers at lunch and I need to create cards that are simple and easy so we can do 2 of them on our half-hour lunch break. We did this as one of those cards. To make it go more quickly for the lunch group I did emboss the background piece ahead of time. 

This is a really fun way to spend one day a week. Its is creative, it builds friendships and people learn while they have fun and have a useful product to take home. The group enjoys telling how they used the cards they made. I started a group at the high school where I taught  5 years ago when I first became a demonstrator. I've switched schools now and started another group here at my new school. Both groups have been a blessing in my life, I've really met some wonderful people and changed working relationships into friendships. Its been a positive thing in my life. Would a lunch group work at your job? If you'd like ideas or help getting a work group together just contact me. I have lots of ideas to share.

Thanks for choosing me as your source of inspiration and thanks for your support of me and of this website.

--Katie

Thursday, December 16, 2010

Lovely as a Christmas Tree

Wow, this card turned out better than I'd hoped.  I needed to make a card really fast and did not want to spend a lot of time thinking up a design. So I decided to just remake a card I'd already done using different colors and a different stamp set. This is the card I chose, it used Cajun Craze with the Autumn Days stamp set. I re-did it using Wild Wasabi and Lovely as a Tree.  Same background image, the Wonderfully Worn background stamp with Versamark. Same gold cord and gold embossing.  Left off the brads because they didn't work with shape of this image.  Card turned out really nice. 

Made the card in a rush and wrote this post in a rush.  Isn't it nice to have some standard designs to fall back on.  I love being able to take one design and re-do the colors or the stamps or both.  Makes life easy and keeps people impressed with my talent. (oops, there goes my secret!)

As always, let me know how I can help you with your stamping needs.  Thanks for choosing me as your source of stamping inspiration and thanks for your support.

--Katie

Wednesday, December 15, 2010

Ribbon Storage Ideas

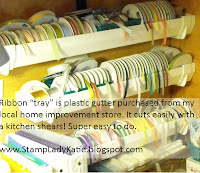
How to store craft ribbons - use rain gutter.
Here is an idea for storing ribbon: Plastic Rain Gutters!  Before I set-up this system I was throwing my ribbon rolls into a basket or a plastic bin. I could never find the one I wanted and they always unrolled and got all tangled together. GRRR! it was a mess. 

BTW: did you notice there is a new TAB on the top of my blog?  I'm starting a whole new page for just storage ideas and I have more details there about these rain gutters. Let me know if you have any special storage concerns because this page is a work in progress. It will grow according to your needs.

I love my stamping group. I got this great idea from Karla Anders who part of my stamping group. It has worked really well (except now I have so much ribbon that I'm running out of room again). Thanks for the idea Karla. I really appreciate being part of a large group of sharing supportive ladies. I've learned so much, both artistically and professionally. 

Would you like to join us?  Would you like to be a demonstrator? There are many reasons to join Stampin'UP!  Some people just want the discount and others, like me,  want to start a business.  Give me a call (608-220-3450) or send me an email. I can answer your questions and give you some ideas about how this business could be the right thing for you.

--Katie

Tuesday, December 14, 2010

Bells and Boughs

Most of my posts are simple cards because I use them with my lunch stamping group. This is one took a little longer to make. I was going for a water colory glow, if that makes sense. 

I embossed the image from the Bells and Boughs stamp set in black. I used Water Color Wonder Crayons to color in the pine branches (in Always Artichoke) and the pointsettia flowers (in Real Red). Then I went over the color with the Aqua Painter to blend the colors and give it a water color feel. It looked ok, but needed to blend in to the paper more, it stood out too much.  So I sponged on more artichoke and more red around the image and that helped alot. Then I sponged on some Early Expresso in the corners where there was just white paper and that really helped. Then I used the Color Spritzer Tool to add black speckles to the paper. I also used put a little glue in the center of the flowers and heat set some gold embossing powder in the center of each flower. Then to top it off I covered the whole thing with versamark and sprinkled on Iridescent Ice embossing powder and heat set that.  Turned out very special. The image is layerd on black, then metallic gold paper and then Always Artichoke. The card base is stamped with the French Filigree background stamp

All supplies on this card are Stampin'UP!  BTW: this stamp set - Bells and Boughs -  is in the Holiday mini. Which means if you like it you have only 3 weeks left to buy it because the mini retires the end of December. And even better yet, this stamp set is part of Stampin'UP!'s Holiday Bundle Promotion. You can get this stamp set and a pack of holiday paper for 20% OFF.  Read about this and other bundles on my business website or click this image to view a larger version. Read the details and act soon. This promotion ends Thursday.

Let me know how I can help with your stamping needs. One week til Christmas. Three days til my house starts filling up with family (I'll have 20 staying here for the holidays and it will be great!). I hope you are looking forward to a pleasant holiday too.

--Katie

Monday, December 13, 2010

Time to Change the Wreath

Even though its December and only 2 weeks away from Christmas, it still felt like fall around here - that is up until this weekend. We got dumped on Saturday night!  Any way, I noticed on Sunday morning how pretty the fall wreath looked.  Its on a covered porch but it was lightly dusted with snow (which all blew away by the time I took this photo.) Well I got to thinking about making a card with a wreath image. I don't have any stamps that are specifically a wreath. But then I got to thinking, what is a wreath anyway.  Its a circle of foliage of some sort. I've seen some lovely cards done making wreaths of leaves, or flowers or stars, so I decided to try my hand at it.

It took several tries and you are only seeing the final one. I really like the final result. This wreath has a comfortable country casual look. The foliage I used on this card is from the Autumn Days stamp set. Check it out in the image of the stamp set below. Its kind of fun to take one image and use it in a different way.

I stamped the image 5 times each in three different colors: Rich Razzleberry, Garden Green and Sahara Sand. The card base is White and the framing layer for the wreath is Crumb Cake. I tied a little Razzleberry ribbon using the 1/4" grosgrain and held on with a Mini Glue Dot. The sentiment is stamped in Razzleberry from the Heard from the Heart stamp set. The corners were punched with the Ticket Corner Punch


All supplies used on this card are from Stampin'UP! Contact Me if you have any questions about this card.  Let me know if there is any way I can help you with your stamping needs. 

Thanks for choosing me as your source of inspiration and I appreciate your support of this website.

--Katie

Sunday, December 12, 2010

Inspired by the Snowy Trees

the inspiration: Southern Wisconsin got hit with a major snow storm this weekend. Husband said he plowed at least 8 inches from the driveway. Good thing we have a tractor with a blade on it. But it sure is pretty when everything has that new coat of fresh snow. This picture is from the back of the farm house looking at the chicken house. That big birch was just a sapling when we moved here, its amazing how its grown. Of course its roots are probably well fertilized growing under the chicken yard!

It was really pretty coming down last night too so I tried to make my card capture the way the sky looked last night. These trees from Lovely as a Tree were the perfect stamp choice. I stamped them in Staz-On. To create the moon I punched a 1" circle from scrap paper and tacked it down with Dotto  and then sponged Marina Mist above the ground. Dotto is a great product. It is a temporary adhesive created to be repositionable, made especially for scrapbookers. When you are making a scrap book page you can use the dotto to tack photos to the page as you play with layers and embellishments. Because its repositionable you can easily play with your lay-outs.


I finished off the focal point by covering the image in Versamark and adding some Iridescent Ice Embossing Powder. This inexpensive product is great for snowy scenes. The card base is Night of Navy.  I used Versamark with the background stamp: French Filigree to create the illusion of the windy night.  Now its time to go out and play in the fluffy white stuff. 

As always, contact me if you want more information about any of these products, whether you want to buy them or just want more information. Orders usually take about 8 days, but with the holiday volume there are no guarantees. You can order on-line yourself from my website or contact me to place an order.

Thanks for choosing me as your source of stamping inspiration and education. I'm here to help you. Your choice to purchase your stamping supplies through me helps to support this website.

--Katie

Friday, December 10, 2010

A "Beary" Easy Child Card

Here is a quick and easy card for a child. This is another card I made from scraps as I was cleaning up my work area.  I had used the green squares on a Halloween Card, but the bear's face and actually the black piece were all scraps. The background was embossed with the Petals-a-Plenty embossing folder. What I did was to emboss a piece that was 2 1/2" square and then punched it out with the 1 1/4" square punch.  I suppose it would work just as well to punch the squares first and then emboss them. The dark parts of the bear are Chocolate Chip and the light parts are Crumb Cake. I punched his head with the Scallop Circle Punch.  His muzzle and the chocolate piece for his ear are a 3/4" circle punch and the inside of the ear is a 1/2" circle punch.  I just drew on his mouth and nose. The black piece is 3"x4" to allow for space for the ribbon. The ribbon is the 1/4" grosgrain in Certainly Celery. I used the Mat Pack to position and poke the holes for the brads.

The card actually began with the sentiment, which is from a cute Build-a-Bear sentiment set called Beary Nice Wishes. I have a lot of Build-a-Bear product that I should really play with more often.

Except for the shaker eyes, all the supplies for this cute little guy can be purchased from my website. Let me know how I can help you with your stamping needs. I love sharing my passion for stamping with others and helping you create your own versions of a project. Note: if you are purchasing items to use as gifts they should be ordered soon to ensure delivery by Christmas. Usually it takes about 8 days from the time an order is placed until its delivered so you might be good with orders placed next week. But with the Christmas rush its always better to order earlier than later.


Thanks for choosing me as your source of stamping inspiration and education. I'm here to help. Your choice to purchase your stamping supplies through me helps to support this website.

--Katie

Wednesday, December 8, 2010

Big Shot SnowMan from the Top Note Die

card shaped like a snowman's face
Oh I've been wanting to try one of these snowmen for a long time.  Finally had time this weekend to sit down and play. Turns out he's really easy to make. 
  • His head is from the top note die. Cut the face and the top of his hat using this die.
  • The 2 layers of the flower and the flower leaves are with the 5-petal flower punch
  • His hat has a thin strip of the green and then the brim of his hat. For the brim I cut a strip of black paper 3/4" wide and stuck one end at a time into the wide oval punch to round the corners. See the picture below.
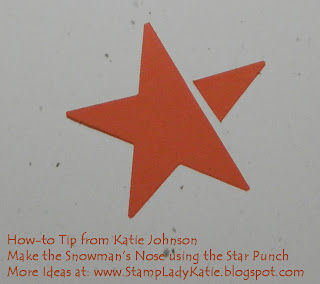
  • The nose was made from the star punch - although it would be really easy to cut his nose free-hand. See the picture below
  •  His mouth is made with the largest circles on the Owl Punch. I tried using my 1/2" circle punch and just felt they were too big for this image. 
how to round the end of a strip with an oval punch how to make a nose from the star punch

card shaped like a snowman's faceI've seen other similar cards using the Top Note Die for a head. But I was really inspired to play when I received this card as a trade from my friend and fellow demonstrator, Deb Geier. I did change a few things. I used Cherry Cobbler, Deb used Real Red. She used the 2-Step Bird Punch for the leaves in the snowman's hat and gave her hat a Designer paper Trim.  She also used the larger punch for the mouth.

The supplies used on My card are:
The Big Shot Die Cutting Machine
The Top Note Die
The 5-Petal Punch
The Wide Oval Punch (for the hat trim)
The Star Punch (for the nose)
a Gold Brad (in the flower)
The Colors I used were:
Cherry Cobler
Always Artichoke
Whisper White
Basic Black

Except for the shaker eyes, all the supplies on both these snowmen card can be purchased from my website.  Let me know how I can help you with your stamping needs.  I love sharing my passion for stamping with others and helping you create your own versions of a project. 

Thanks for choosing me as your source of stamping inspiration and education. I'm here to help. Your choice to purchase your stamping supplies through me helps to support this website.

--Katie

Tuesday, December 7, 2010

Emboss Resist Medallion Snowflake

card made with the background stamp called Medallion
This card is made with a technique called Emboss Resist. The concept is that you put something on the card, embossing powder in this case, which will "resist" the ink. For this card I started with a piece of white card stock and then embossed the medallion image in white. Stamp in either Versamark or White Pigment Ink, sprinkle with either white embossing powder or clear embossing powder, and heat set. I used white ink and white powder.

HINT: White on white is very hard to see. You should hold the card in a bright light and view it from several angles to be sure you've embossed the whole image. If you miss a spot you'll just smear the embossing powder when you add the color.

After you heat set the image, go back with a sponge and sponge on color around the image. Start out lightly because you can always go back and add more ink. I tried to make the center of the medallion look darker than the edges. I'm not sure how successful I was. The image on this card is a background stamp called Medallion. I love the intricate design on this medallion.  But given all the snow we've had recently in the Madison area I started thinking of the medallion as a snowflake instead. 

I saw a similar card done on Splitcoast that used a larger sentiment, and the sentiment was actually stamped over the medallion.  I decided to use something smaller so I chose a sentiment from a versatile little set called Short and Sweet. The little diamond in the middle is one of Stampin'UP!'s new self-adhesive rhinestones.  I think its just the right amount of bling on this card - not too showy but it adds a little sparkle. And I really appreciate these rhinestones being self-adhesive, it makes them SO EASY to use! 

So what do you think of this "snowflake" card?  I bet it would look just as nice done in dark green with a red gem in the center and then it could be a Christmas card.  I'll have to try that next time. All of the supplies used on this card can be purchased from my Stampin'UP! website.

Thanks for choosing me as your source of stamping inspiration and education. I'm here to help. Your choice to purchase your stamping supplies through me helps to support this website.

--Katie

Monday, December 6, 2010

Golden Reindeer

a Card made with the stamp set called Dasher
I had a wonderful weekend. Husband and kids were happily occupied with things that did not involve me so I got to stamp. The weekend was made all the more wonderful by all the beautiful, beautiful snow that is covering everything. Southern Wisconsin is a great place to be in the winter. Love the snow! The snow(flakes) on this card are from a stamp set called Serene Snowflakes.

The reindeer on this card is from a stamp called Dasher. Dasher is not actually part of a stamp set - you buy him as a single stamp. Stampin'UP! has a small collection of individual stamps each less than $10.  Isn't he beautiful?

I've had this stamp for a while but just never got him out to play. I love this little guy - there are so many cute cards I've seen done with him. And I love this combination of black and gold. The gold embossing really highlights the images against the black. I added to the sparkle on this card by layering the black on gold metallic paper.

Many people have asked where I get my inspiration and the answer is always varied. Sometimes I get an idea from what I see outside or from an up coming holiday. Sometimes its from a song. Sometimes it just comes when I look at the stamp set. I got this card idea from a card I saw on SplitCoastStampers. 
  Supplies:
  *Gold Embossing Powder
  *Versamark Ink Pad
  *Heat Gun
  *Gold Metallic Paper
  Stamp Sets:
  *Dasher
  *Serene Snowflakes
  *Four the Season
  All of these supplies can be  
  purchased on my SU website
I hope you are finding inspiration here on my site.  Please contact me if you have any questions.  I really enjoy sharing my passion for stamping and helping others be creative.  


Thanks for choosing me as your source of stamping inspiration and education. I'm here to help. Your choice to purchase your stamping supplies through me helps to support this website.

--Katie

Saturday, December 4, 2010

A Re-Used Lay-out with Serene Snowflakes

I'm thinking snow again today - we woke up to a couple of inches of the soft fluffy white stuff on the ground with more on the way. 

Does this card look familiar? Just a few days ago I posted another card with exactly the same lay-out.  The other card used a stamp set called French Foliage and this card uses a stamp set called Serene Snowflakes. Its always fun to find a cute lay-out that works and then see how many different cards you can make using that same lay-out.     

BTW: the colors on this card are Concord Grape, Pacific Point and Marina Mist.

I'm so glad I own the square punches! Of course I could use my paper cutter to make the small squares, but it would be really hard to line up the images on those little squares.  Its so much easier to stamp first and then punch. AND, by using the punches I'm guaranteed a perfect sized colored frame around the white piece. If I am cutting those little pieces there is always a risk that my sides are not perfectly parallel.The Stampin'UP! square punches I used are the 1 1/4" and the 1 3/8".  Normally you make a layer a full 1/4" larger than the one it is framing but these punches create layers that are only 1/8" larger. Truthfully, this looks much better for these small squares. A larger frame would just look out of place.

So, start thinking about all your stamp sets.  How many different cards could you make with this lay-out?  Remember, the image does not have to fit fully in the little square. You can catch just a small part of the image.


Are you hoping you'll get stamping supplies for your holiday gift(s)? I can help with that. Just click on the image to the right to download a Wish List.Give this to the "Santa" in your life. Items may be purchased through me or can be purchased on-line and sent directly to your house. Have the gift giver contact me with any questions. Best to order within the next week to ensure delivery by Christmas.


Thanks for choosing me as your source of stamping inspiration and education.  I'm here to help.  Your choice to purchase your stamping supplies through me helps to support this website.

--Katie

Friday, December 3, 2010

A Sparkly Pine Bough

Masculine Card made with a the Autumn Days Stamp SetToday's card is a little more masculine than previous posts. When I do the Stamp-a-Stacks at my house or plan out the cards for the ladies who stamp with me at work at lunch, I always try to have a few "man cards". What makes a man card? You have to consider 3 thingsthe image, the colors and the embellishments.

The image on this card is very neutral. Please, no tirades about sexism here, but outdoorsy, sporty images or images with animals or vehicles are all good for a "man card". You can also use a geometric design. This pine branch is from a stamp set called Autumn Days.  The wheat image on this card I made last week is from the same stamp set. I also used the background stamp Sanded on the brown card base. It seemed to add to the "woodsy" feel of this card.

Generally the colors on a man card will be darker colors or brighter, bolder colors, but general rule is to avoid pastels.  This combination of Chocolate Chip and Always Artichoke works well. 

The embellishments on a man card should just not be too frilly.  This card does have a ribbon on it, but it is the grosgrain ribbon, not a taffeta or satin.  And it is tied in just a knot, not in a bow. After I stamped the image I pressed the whole piece onto my Versamark pad and then covered with Iridescent Ice embossing powder and heat set it. While it does make this card very sparkly I think it still works well for a man card for 2 reasons. First, we are entering winter and the sparkly just brings to mind snow.  Second, the iridescent ice embossing powder is much more subtle than Dazzling Diamonds Glitter. 

All supplies used on this card are Stampin'UP!  Let me know if you want to purchase these or any other supplies.

Thanks for choosing me as your source of stamping inspiration and education. I'm here to help. Your choice to purchase your stamping supplies through me helps to support this website.

--Katie

Thursday, December 2, 2010

Faux Snow - Grated Paper Fluff Again!

Card made with a Stamp Set called Scenic SeasonYou have to love Wisconsin weather!  Last night we had the most beautiful light crystalline snowfall.  It was picture perfect illuminated by the barn light after dark. So my inspiration for this card is those lovely little sparkly flakes. Of course its not really winter yet so it didn't really stick on the ground, but this card is what it made me think of.

I'm so happy with the way this turned out - especially the "snow".  Its another example of the technique I showed in October, which I was calling "Grated Paper Fluff". This is just the coolest thing - so simple to do and so effective.  All you do is roll up some scrap paper and
grate it with a kitchen grater. The grater cleans up really easily. It is a little dusty, but not too bad.  If you look back at the October post you'll see that I was grating colored card stock to make fall foliage for a tree image. There are lots of great (pun intended) things about this technique:  first it uses up scrap paper!  Second, by using your own paper you can get a perfect color match for any paper you have. Third, you didn't $pend money to buy a fluffy product and you don't have another bottle of bling to find a place for on your stamping shelves. 

I wanted to make a card that felt cold and frosty.  I chose the trees from a stamp set called Scenic Season (which my daughter chose in her Starter Kit when she joined me as a demonstrator. I didn't ink the stamp too heavily because I didn't want the black ink to overpower the frosty snow.  The sparkles on the tree are very subtle, I made them with Iridescent Ice embossing powder.  (I made several versions of this, the final card above does not have the sentiment on it that you're seeing here)

How to make a pleated ribbon strip
Notice the ribbon? I laid a strip of Sticky Strip across the base of the focal point. It is the same width as the 1/4" grosgrain ribbon. Then I just started sticking the ribbon to the sticky strip and bunching it up as I went along.  I wanted to have the ribbon continue the feel of snow on the bottom of the image. 

I stamped the image on a piece of Crumb Cake card stock and layered it on top a piece of black cardstock.  Then I randomly stamped snowflakes on the white card base.  I used snowflakes from a stamp set called Serene Snowflakes - but this card would look good with any snowflake set you have. 

All the supplies are from Stampin'UP! (except the kitchen grater!).  Let me know if there is any way I can help you with your stamping needs. 


Thanks for choosing me as your source of stamping inspiration and education. I'm here to help you. Your choice to purchase your stamping supplies through me helps to support this website.

--Katie

Wednesday, December 1, 2010

Technique - Spotlight Sponging

Inspiration = Fall colors:  This card is so similar to yesterday's post - I think that southern Wisconsin fall colors have taken over my brain.  The technique used on this card is similar to yesterday's card except that this time I just sponged color on the tree itself.  Isn't this a lovely tree image?  Its from a stamp set called: Thoughts and Prayers.  This set is shown in the main catalog on page 150, item# 113252.  The sentiments in this set work well for sympathy cards and get well cards.  I did not use a sentiment on this card so I can use it for any occasion.

Technique Talk: Color Just like yesterday's card, I sponged on the color.  Yesterday I just stamped the tree image.  On this card I embossed the tree.  Notice all the little black spots on this card?  I put them there on purpose.  I felt the card was just too crisp, bright white and clean with out them.  The tool I used to place the spots was the Color Spritzer Tool. (catalog page 195)  This tool is essentially a little air gun, you clamp a marker into it and squeeze the bulb and it splatters color onto the paper.


Technique Talk: Lay-Out  Notice that the brads are in a perfect line parallel with the bottom edge of the paper and evenly spaced.  I'd love to tell you that I'm just good! But the truth is that I use the Mat Pack to line up the holes.  The Mat Pack is one of my top 5 Must Have Tools.  You can see the Mat Pack in the catalog on page 198 (item# 105826 - $9.95)


Thanks for choosing me as your source of stamping inspiration and education.  I'm here to help you.  Your choice to purchase your stamping supplies through me helps to support this website.
--Katie