Wednesday, February 29, 2012

Vintage Vogue Thank-You

This is my trade card for my demonstrator meeting last night. The flowers and foliage are from a  really pretty stamp set called Vintage Vogue.  The "vintage" look comes from the lettering which is part of the big flower image and the fact that the small flower looks "worn".  I stamped both flowers using Perfect Plum and the foliage with Always Artichoke.

The lacy image in the background is the large doily from Delicate Doilies. It was stamped in River Rock. The sentiment is from a set called Thank-you Kindly. I added one of the new Large Self-Stick Pearls to the center of the flower. 

This was an easy trade card. Let me explain.  When doing trades we make many (many, many!) of the same card. For this meeting we only had to do 10 cards. This card was so easy that I might even use this as my Regional Trade - which means I'd make 100 of them. 

In another sense this card was hard for me - hard in the sense that the main layer is only 1 level. Usually my cards have many layers to them - which you'll notice if you have browsed through very much of this blog. Anyway, its easy to add a little more dimension to this card. In this second sample I stamped the main flower on another sheet of paper and cut it out and layered it on top the flower on the card.


Oh - and if you are local, i.e. Madison/Stoughton area, we'll be doing this card at the March Stamp-a-Stack!
Click here to register. Two options, Sunday afternoon starting at 1PM or Monday night starting at 6PM

Hope to see you this weekend.
--Katie

Tuesday, February 28, 2012

Sale-a-bration Celebration

Card made with Stampin'UP! sale-a-bration stamp set: Outlined Occasions. Made by StampLadyKatie
How do you spell celebrate?  At Stampin'UP! we spell it Sale-a-brate! Sale-a-bration is Stampin'UP!'s big once-a-year customer appreciation event. For every $50 of catalog merchandise you purchase during Sale-a-bration you can choose a FREE item from the Sale-a-bration catalog.

This card uses one of the FREE Sale-a-bration items: a stamp set called Outlined Occasions. I love coloring in the letters to match the papers on the project. The colors used here are: Tempting Turquoise, Lucky Limeade and Elegant Eggplant.

To make this card I cut a piece of paper 3" by 5-1/4". Using this as a base I glued on alternating strips of the colored paper. I wrapped the White Satin ribbon around this piece before adhering to the card base. Then I stamped the sentiment and colored it with markers. I also used some Dazzling Details along the dotted line in the sentiment.  BTW: Dazzling Details is quickly becoming a favorite product. This glitter glue in a squeeze bottle is so easy to use and it really dresses up a project.

What's your favorite item in the Sale-a-bration catalog?  My favorites are this set: Outlined Occasions and another set called Sprinkled Expressions - but I also like Fresh Vintage. Yesterday's post showed a card with Sprinkled Expressions. Did you see the red and black wedding card I made with Fresh Vintage? And the 2 valentines made with Outlined Occasions:  #1 and  #2. . . . . . . Truly they're all great -  its so hard to decide.  And remember you can see the Sale-a-bration catalog online HERE.

Did you get your FREE set yet?  There's still time. Sale-a-bration lasts through the end of March. You can even shop online HERE and have your order sent directly to your house.

Feel free to contact me with any questions
Happy Stamping
--Katie

Saturday, February 25, 2012

Love the Sprinkled Expressions Set

Today's project uses the Sale-a-bration set called Sprinkled Expressions. It's perfect for a Valentine or Thinking of You, or Thank You. Or in this case, when you want someone to know they make you smile.
Card made with the Stampin'UP! Sale-a-bration Stamp Set: Sprinkled Expressions. Made by StampLadyKatie

This card uses 2 punches for the sentiment. The background pink piece was cut with the Decorative Label Punch and the sentiment was stamped and then punched out with the Curly Label Punch.  I think these 2 punches layer very nicely. There is just enough color showing above and below the white piece.

The details make the project. I used the Dotted Scallop Ribbon to separate the heart image from the sentiment, but then felt that it needed something to tie everything together. The dots on the ribbon fit with the white hearts in the main image. The final touch was adding some little self-stick pearls to the flowers on the sentiment layer. A perfect match for the dots in the ribbon.

Products Used on this Project:
119851 . . . Curly Label Punch
120907 . . . Decorative Label Punch
119247 . . . Self Stick Pearls
100730 . . . White Card Stock
115320 . . . Melon Mambo card Stock
122985 . . . Melon Mambo Dotted Scallop Ribbon

Sale-a-bration Stamp Set: Sprinkled Occasions

Contact me with any questions
Happy Stamping
--Katie

Tuesday, February 21, 2012

Permanent Stamp-a-ma-Jig Templates

I love my Stamp-a-ma-jig! Plain and simple. When people ask me what stamping tools I use most often I tell them #1 of course is a paper cutter and #2 is the Stamp-a-ma-jig. This tool is indispensable for proper alignment of stamped images.

I've made permanent templates for all my wood mount sets using vellum cardstock. Its just easier than stamping a fresh image each time on the plastic card that comes with the handle.

I've found an easy way to keep the cardstock clean and unwrinkled - I keep them in a plastic pocket that I've glued to the lid of the stamp set. The pocket is the medium cellophane bag that we sell 50 per package for $4.50

I cut a piece of vellum about 3.25" x 4.25" and stamp one image in each corner. Most sets have only a few stamps so there is only 1 or 2 vellum sheets. The set: Teeny Tiny Wishes posed a bit of a problem because there are 24 stamps in that set so you need 6 sheets. It was tedious to look through all the sheets to find the 1 that had the image I was using. So . . .  my solution was to put a number on the end of each stamp and number the pieces of cardstock. Now its a breeze to find the right vellum sheet for my stamp.


Happy Stamping
--Katie

Monday, February 20, 2012

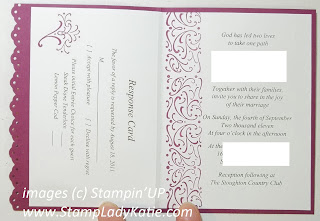
Wedding Sweet Invitation

Wedding Invitation made with Stampin'UP! Stamp set: Wedding Sweet. Made by Stamp Lady Katie
As promised yesterday, here is Dana's wedding invitation.  The image here is from a stamp set called Wedding Sweet. The elegant looking sentiment on the front of the card also part of the set.

When mass-producing I go for something not too complicated -  i.e. not too many steps.
  • We cut a standard size base from Rich Razzleberry and folded it in half
  • We used the Eyelet Border Punch on the front edge which shortened it enough to see the white inside along the lace edge
  • The white inside was printed on a computer and then cut to 8 1/4 by 5 1/4 (just smaller than the card base.
  • We folded the white insert in half and then used the cutter tool to perforate the Response Card portion
  • Then decorated the invitation half using the Sweet Swirls wheel.
  • The white insert was adhered on the right side but was loose on the left so people could tear off the Response card
Wedding Invitation made with Stampin'UP! Stamp set: Wedding Sweet. Made by Stamp Lady Katie
Regarding Envelopes: We included a stamped return addressed envelope for the response cards. We used our Stampin'UP! envelopes for the response cards and found a slightly larger "invitation envelope" for mailing out the whole ensemble.  

I did enjoy the project. They were fun to make and certainly cost me less than having them printed somewhere. Admittedly part of the goal was to be frugal, but it was also very satisfying to hear the compliments and wows. And, they were fun to make!
Stampin'UP! cutter tool for making a perforated edge Wedding Invitation made with Stampin'UP! Stamp set: Wedding Sweet. Made by Stamp Lady Katie
Contact me for more details on this project.

Happy Stamping
--Katie

Sunday, February 19, 2012

Wedding Card using Easy Events

Here is another easy wedding card.  ("another" means yesterday's post was also a wedding card) These love birds are from a stamp set called Easy Events. And if the card and the love birds look familiar its because just last month I posted another wedding card with these lovebirds. You can see it HERE.

The image was stamped in black Staz-On. Its important to use a quick-drying, non-water soluble ink like Staz-On when you plan to color with markers. The markers are water soluble and if we used a water based ink for the image it might bleed when it was colored.

Do you like the shiny gold medallion layer behind the lovebirds?  To make it I used the Brushed Gold Metallic paper. I only use this paper for special occasion cards like a wedding.  Start with a 3" square piece of the gold and center it in the Pinking Hearts Border Punch. Punch once on each side, centering it each time. The end result is a lovely medallion.

Isn't this a sweet wedding card? Actually (I'm going for the pun here . . .) the floral image in the left is from a stamp set called Wedding Sweet. We used the same image for my daughter, Dana's wedding invitations. That was back in September. I'll have to dig out a copy and post it tomorrow. Check back to see her card.

Are you planning a wedding?  Will you be making the invitations? Or any of the decorations?  Stampin'UP! has tons of supplies to help make your event a success. Contact me with any questions. Dana was married last September and we made all the Save the Date cards, the Invitations and the Place Cards for the dinner. We did all the rest of the decorations  too. Sara has announced she's getting married this fall. I am definitely in wedding mode right now.

Happy Stamping
--Katie


Saturday, February 18, 2012

Fresh Vintage Wedding Card

Card made with Stampin'UP!'s Fresh Vintage Sale-a-bration Stamp SetDo you have any weddings coming up? A friend asked me to do a private Stamp Camp for her and her friends to make wedding cards so I'll be posting pictures of them over the next few days. I often do private events for people. Contact me if you are local and would like to schedule something for you and your friends.

This card uses one of the Sale-a-bration stamp sets: Fresh Vintage. The floral image is just elegant enough for a wedding card, and I love the filigree strip that's part of the set. It really dresses up the bottom of the card. 

The sentiment is from a set called Teeny Tiny Wishes. There are 24 sentiments in this set and they use a variety of different fonts. The font used with this sentiment really adds to the elegant, formal look of this card.

The ribbon fits between the DimensionalsThis card was very simple to make. There are only 2 colors of paper and 1 color of ink, the red ribbon adds a strong contrast. I did use Dimensionals to pop-up the image on the ribbon. Without the Dimensionals the circle would be raised in the middle and would look funny. In this picture you can see how the ribbon would fit through the space between the Dimensionals.

Getting back to Sale-a-bration: the Fresh Vintage stamp set is one of the Sale-a-bration sets this year. Sale-a-bration is Stampin'UP!'s yearly promotion. With each $50 purchase during Sale-a-bration you earn a FREE item from the Sale-a-bration catalog. 

Sale-a-bration runs through the end of March. Its the best time of the year to host a Stampin'UP! party because your guests can all get a FREE stamp set with a $50 purchase.   
I'm working on my March calendar now. Contact me today to discuss having an event.

Happy Stamping
--Katie

Monday, February 13, 2012

Enjoying Nature on a New Level in New Orleans!

I'm sharing something a little more personal today. My husband and I are in New Orleans for a week. We have friends who live down here and we've had a standing invitation for years to come down for Mardi Gras. We could never accept the offer while we were working a 9-5 job. Now that we're both retired . . .  well we're here. 

We've had so many amazing experiences. One thing we did was take a walk through a marsh/swamp. The Live Oaks with the Spanish Moss hanging from them are so beautiful. Although it is a bit unnerving to read the warnings about alligators!  We felt somewhat safe in that it was a cold day so hopefully the gators were not active. We did see some crabs crawling around in the water. And lots of birds. Thankfully no gators. 


So on the animal theme . . .  the project I'm sharing today is a card made with the turtle from a stamp set called:  Nature's Nest. We did this card at the February Stamp-a-Stack.

We embossed the turtle image before coloring with markers. I thought the linen thread was the right embellishment for this card, it gives just the right "natural" look to a project with such a realistic animal image.

Can you tell that the scallops have little scallops? That edge was created with the new embosslit cutting die. I used it on this card because I thought it matched the scalloped lower edge of the turtle shell. I really like how all the parts of this card came together. 

Things to remember:
  • Sale-a-bration is going on now! Yes I'm "celebrating" Mardi Gras. But Stampin'UP! is "celebrating" Sale-a-bration. Read more about this once-a-year promotion here.
  • Get a 1 month FREE Trial of our Digital Scrapbook program. Download a free version. Join an online community of users and learn how to create beautiful projects for lasting memories of precious moments. Read more here.
  • Schedule YOUR Sale-a-bration party now. Hostesses earn even more during Sale-a-bration. Contact me now to schedule your event.
 Happy Stamping
--Katie


Saturday, February 11, 2012

Check out the new Edgelit Dies

Have you seen Stampin'UP!'s new Edgelit Dies?  These new dies are perfect for adding an elegant edge to a project. The edgelit die was used on this card to cut the curved edge on the bottom of the front flap. 

Isn't this little girl sweet? She reminds me of the old Betsy McCall paper dolls. My sister and I couldn't wait for the new addition of the magazine to arrive each month. The image of the girl is from a stamp set called: Greeting Card Kids.  Check out the catalog on-line for more great stamp sets.

All the cards on this post are Trade Cards I got from sister demonstrators. The card above was made by Lori Verdon. Below you'll see 2 more cards, both made by Terry Schultz. Terry and Lori are just 2 of the great women I've met through my involvement with Stampin'UP!

Terry was very creative with the edgelit die. On her first card she used the edgelit die to make an interesting border on a vertical element for the card.  Now check out the 2nd card. She used it on both sides of the vertical element and cut off the top half to make a vase. WOW!  This is what I love about being part of a group. You get so many amazing ideas.
 
Would you like to join our group?  We love new members.
*Join us to develop your stamping skills.
*Join us to learn how to grow your hobby into a business.
*Join us because we like the fresh new ideas we get from new members.
Are you worried because you are not local (Madison Wisconsin area) - don't worry. The internet provides many opportunities for sharing and the US mail allows you to participate in trades. I can keep you connected, informed and help you meet your goals.

I don't just sell you the Kit - I also support my recruits. I maintain an exclusive website for training my recruits. You'll have access to business files, technique files, digital templates and instructions for projects and hundreds of photos of projects. You can be confident that when you join with me you'll have the help you need to meet your goals. When you join with me you have access to me by phone or email whenever you need me and you have access to my exclusive demonstrator support site 24/7.

Now is the perfect time to join  because Stampin'UP! is running a recruiting promotion through the end of Sale-a-bration. The Starter Kit, which contains an assortment of over $300 worth of product , is specially designed to help a new recruit get her business off to a great start.
**The Starter Kit is normally $175, for a limited time the kit is available for only $125!
**Everyone who joins during this promotion gets a FREE designer package of paper each month for the rest of the year! AND you can choose either real paper or a digital package.

By the way, did I mention you also get a 20% discount on all purchases.Yes indeed, this is an opportunity to consider carefully.  Contact me wiith any questions, or click here to find out more about Stampin'UP's offerOur group is waiting - Join us now!

Happy Stamping
--Katie


Thursday, February 9, 2012

Lovely Letters Valentine

The Lovely Letters on this valentine really give it an elegant look. The letters are from an alphabet stamp set called Lovely Letters. The imagery in this set is so pretty. Its the perfect touch to really add some class to a project. I often use this set when I make a monogram card.

The letters were embossed in white to add an extra look of elegance.

The lay-out of this project is actually very simple: 4 squares arranged on a layer in the center of the card. In this case the 4 squares are different colors: Rose Red, Regal rose, Pretty in Pink and Pink Pirouette.

This card could have multiple uses. Of course its pink and this is February so we're probably all thinking Valentines Day. But don't you think this would make a great wedding/anniversary/engagement card?  It could even make a nice wedding invitation.

Thanks for visiting my blog . . . now are you inspired to go stamp something?  Let your creative juices flow. Think about this easy lay-out and the supplies YOU already have. 
  • What STAMPS do you have that would work well with this design?  Flowers? little animals or insects?  Snowflakes?   
  • What COLORS will you use? 
  • What will you use to BALANCE the focal piece?  Will you use ribbon? or a strip of accent paper? Or a sentiment?
Here's your chance to make the world a little prettier. 
Time to turn off the computer and go play.

Happy Stamping
--Katie

Wednesday, February 8, 2012

Super Easy Valentine

Easy Valentine made with the Stampin'UP! Heart to Heart Punch. Made by StampLadyKatie
Are you looking for a quick and easy Valentine? This one goes together really quickly. Just punch a bunch of hearts from coordinating colors and alternate them on the front of the card.  Add a sentiment on a coordinating color frame and a ribbon and voila!

The colors used on this card are Rich Razzleberry and Pretty in Pink for the hearts. The face of the card is Pink Pirouette on a White base.  The Razzleberry and Pirouette are 2 of my favorite colors. I love the deep intensity of the Razzleberry and the delicate light color of the Pirouette.

Other items used to make this card are the 1/4" White Grosgrain ribbon, the Word Window Punch and the Modern Label Punch.

One of the main advantages of Stampin'UP! products is how well everything coordinates:
1. The colors go well together - of course.
2. The Punches are designed to layer nicely
    (just see how the Word Window Punch is framed so perfectly by the Modern Label Punch)
3. The punches and Stamp sets are designed to work together.

The sentiment on this card is from a set called Short and Sweet. It has 6 different sentiments and they all fit in the Word Window punch.
*Try making this same card with 9 stamped and colored cupcakes punched out of circles and the birthday sentiment.
*Or stamp and punch 9 snowflakes on different colors of blue
*Or 9 flowers
Well, you get the idea. Create one lay-out and use our versatile products to make many many projects.

I hope you are inspired to go create.  You can get the supplies used on this project and fill all your stamping needs at my on-line Stampin'UP! Store.

Happy Stamping
--Katie

Tuesday, February 7, 2012

Multiple Uses from 1 Design - this one is a Valentine!

Card made with Stampin'UP!'s Ornament Punch used as a Vase. Made by StampLadyKatieDo you have a favorite card design that you use over and over? Isn't it great when you can get multiple uses out of one lay-out. Just change the color or the sentiment. Check out another ornament/vase card here.

I find this happening with the ornament punch and using it as a vase. Its so easy to turn the ornament into a vase by cutting off the pointy bottom.

I do like to jazz things up, so . . .
  • We embossed both the white strip and the vase with the Vintage Wallpaper embossing folder
  • We added a 1/8" Black Taffeta Ribbon bow
  • Used the Curly Label Punch as the layer for the sentiment.
  • I also put a self-stick Rhinestone in the vase as an  afterthought - I liked it.
Card made with Stampin'UP!'s Ornament Punch used as a Vase. Made by StampLadyKatie

We did this card at the January Stamp-a-Stack.  In January we made this as a "Thinking of You" card.

Then I thought about using it again as a Valentine and putting hearts in place of the flowers. It was fun, but the Calypso Coral seemed like the wrong color for Valentine's Day. 


So then I used Red Glimmer Paper - and WOW! Now the card really pops.
Valentine card made with Stampin'UP!'s Ornament Punch used as a Vase. Made by StampLadyKatie  Valentine card made with Stampin'UP!'s Ornament Punch used as a Vase. Made by StampLadyKatie

Do you send Valentine cards? Keep watching this blog, I'll be posting photos of the Valentines we made last week.

Things to Remember:
  • Sale-a-bration runs through March. Every $50 purchase earns you a FREE item from the Sale-a-bration catalog. And yes, clearance items are included in this offer. 
  • Join Stampin-UP! during Sale-a-bration and get a FREE designer paper each month through 2012. Your choice of either digital paper or real paper.
  • Interested in Digital Scrapping and Stamping? Now you can try our software - My Digital Studio - for a 30-day FREE TRIAL
Contact me with any questions about these offers or anything else stamping related.

Happy Stamping
--Katie

Monday, February 6, 2012

Digital Scrapbook Software Free Trial

Have you ever wondered what Digital Scrapbooking was all about? Stampin'UP! sells a Digital Scrapbook Program called My Digital Studio. And now you can download a FREE 30-day trial version. Click HERE to get your FREE trial version.

What exactly is Digital Scrapbooking? A digital scrapbook program allows you to do everything you can do with paper, stamps and ink . . . and more!
  • Use it to make Digital Products: share on-line or print them out
  • Use it to try different lay-outs before you make your actual paper album pages
  • Use it to make "HYBRID" pages, print the page with the pictures and background and then add real ribbon, glitter and other bling.
Check out this video:
The advantages to using any digital program are:
  1. You can try different LAY-OUTS to find the perfect fit for the occasion and the photos without wasting paper. Change it as many times as needed to make it perfect.
  2. You can RE-SIZE the images - both the photos and the stamp images
  3. You can try multiple different color mats and designer papers to find just the right fit for your photo.
  4. Its a great time saver: Make one photo album and print out multiple copies to give as gifts.
The added advantage to using Stampin'UP!'s software:
  1. You have access to our exclusive designer papers, stamps and punches. (yes - images of punches)
  2. You have access to matching images of ribbons, brads and other digital bling.
  3. You also have access to an active and growing on-line community of users who share ideas and expertise with the product. (www.mydigitalstudio.net)
This software is so versatile! "My Digital Studio" can make banners and calendars and cards and flyers and movies and . . . I haven't even explored everything it can do. One thing I love is using it to print out the designer papers. Each package of real paper comes with 2 sheets of each design. Sometimes I want more than just the 2 sheets and this software is my inexpensive way to get more of just one design. There is also an express version of the software. You can read more about it HERE.  

Bottom Line is - with a 30-day FREE trial you really have nothing to lose and everything to gain by exploring what this software has to offer. At the end of the 30-day trial if you decide not to buy then any projects you've made will still be there, the software will just stop working. If you do decide to buy you'll be given a pass code to re-activate the software. Simple as that.

Contact me with any questions.
 --Katie

Sunday, February 5, 2012

Framelits Heart Valentine with Red Glimmer Paper

Valentine made with the Big Shot Hearts Framelits dies and Sale-a-bration stamp set: Outlined Occasions. Made by StampLadyKatie
The New Framelits dies make it so easy to create extra special Valentines.  The three layers of different size hearts really draw your eye to that center heart. Don't you love things that sparkle! Its cut from Red Glimmer Paper.

The Glimmer Paper is wonderful. Its thick and sturdy and the glitter does not fall off. Even though its a little thicker than the regular colored cardstock, the framelits die had no problems at all in cutting through it.

I like to make sure my cards are balanced. I try to balance color, interest and weight. The word at the bottom needed a little something to balance the color and sparkle at the top of the card, so I added a little red Dazzling Details (our new glitter glue). It was the perfect solution for this card.

By the way, if you're wondering how to get the layers on the sentiment using just one punch then be sure to check out the photos from this snowman card. I have photos there explaining the trick.

Are you "dieing" to make some sparkly valentines like this?  Here are the supplies you'll need. 
$26.95 . . .#125599 . . . The Hearts Collection of Framelits Dies
$  2.50 . . . #125585 . . . Cherry Cobbler Dazzling Details
$  4.95 . . . #121790 . . . Red Glimmer Paper
$16.95 . . . #120907 . . . The Decorative Label Punch
The Outlined Occasions Stamp Set

 
The Stamp Set used on this card is a Sale-a-Bration item. The word "love" on this card is from my favorite Sale-a-bration set called: Outlined Occasions. You could get this set FREE with a $50 order. Assuming you already have red, black and white paper, if you bought the rest of the supplies to make this card the total comes to $51.35, which is enough to earn you this set, or any of the Free Sale-a-bration items.  

Click HERE to shop Stampin'UP! 24/7

Happy Stamping
--Katie

Friday, February 3, 2012

Framelits Cut Fabric Too!

Baby Onsie made with the Framelits Big Shot Hearts and Stampin'UP! Iron-on Fabric Adhesive. Made by StampLadyKatie
Stampin'UP!'s new Framelits cut through fabric as well as paper. This cute Valentine's Day Onsie was so quick and easy to make. The hearts were cut with the new Framelits dies and the Big Shot.

The word "framelit" is so appropriate. The cutting edge is just a frame so you can see the pattern you want to line up through the die. That was especially useful for the heart with the printed fabric.  I wanted to be sure the points of the print were aligned with the point of the die. The Framelits made it easy to get things aligned.

The hearts are attached to the Onsie using Stampin'UP!'s Iron-on Fabric Adhesive. Start to finish was less than 20 minutes. Its such a quick and easy project.

Now I just need someone with a baby . . . hmmm . . .
We have 3 daughters, 2 married and 1 engaged. You'd hope there'd be a little one coming along soon. I'll just pack this up and keep my fingers crossed.

Supplies:
Framelits Hearts Collection . . . . . item #125599 (Occasions Mini Catalog p6)  . . . .  See the Mini on-line HERE
Iron On Fabric Adhesive. . . . . . . item #122194 (catalog p196)  . . . . . . . . . . . . . . . . See the Main Catalog on-line HERE


Happy Stamping
--Katie