Tuesday, November 30, 2010

technique: Banded Spotlighting

Today's inspiration comes from our beautiful fall scenery.  I live in rural Stoughton but work in Madison so I have a beautiful scenic drive twice a day.  There is one corner where I round a hill and have a gorgeous view across a field with a big woods on the other side.  The leaves have all fallen now so I am now seeing just tree branches - like on this card.  But earlier this fall it was just a sea of oranges and reds and yellows, so I superimposed those colors across the bare branches on this card.

The technique is a variation on Spotlighting. In the spotlighting technique you basically have a black and white image and then color just one part. Most often the colored part is a circle shape - like the spotlight in a theatre production.  Here I made a band of color, hence me calling it "banded spotlighting". 

Supplies:
Black Brads (119736 $6.95 pagkage of 120, 20 each of 6 different colors - page 187)
Mat Pack (for perfect lining up of the holes for the brads) (#105826 - $9.95 - page 198)
1/8 Black Taffeta Ribbon (#119261 - $5.95 - page 191)
sponges (for applying the color) (item#101610 - $3.50 pkg 3 - page 195)
ColorsReal RedPumpkin PieBasic Black, Whisper White
Stamp SetLovely as a Tree (#115026 - $27.95 - page 114)


Thanks for choosing me as your source of stamping inspiration and education.  I'm here to help.  Your choice to purchase your stamping supplies through me helps to support this website.
--Katie

Monday, November 29, 2010

Big Shot Fall Card

Creating great projects is all about having the right tools. Several parts of this card were made using the Big Shot Die Cutting Machine (catalog p.204). The Big Shot is the most versatile die-cutting machine on the market today. The machine is used to cut shapes and to impress patterns.  On the card below you can see that I used it to cut the leaf shapes and to impress the pattern on the dark brown piece. I'll post more about this tool later, but for now I'll just mention that it is made by Sizzix and can be used with the dies and embossing plates of any other manufacturer. The trick to success is just to create the correct thickness to the "sandwich" as you roll the materials through the machine. Using the Big Shot's multi-purpose platform its easy to create the right conditions for the perfect cut or impression.

If you've considered buying the Big Shot machine but have not yet invested, you might want to give it some serious thought right now. First (wink, wink) its a nice Holiday Gift to yourself.  I bought it originally because as a demonstrator I need to be able to show it to customers.  But I can honestly say I have used it far more than I could have possibly imagined.  I use the embossing folders all the time to add interest layers to card.  I also have some favorite dies that I use alot. But here is the real reason I suggest buying now.  With the Big Sale that Stampin'UP! is having through the end of November you get FREE SHIPPING on all orders over $150. Buying the Big Shot (which is only $99.95) would help get you to that magic $150.  And, of course, any order over $150 also gets you Hostess Benefits. Call me if you have any questions about how much use you'd get from this machine.

Fall is beautiful here in southern Wisconsin - thus the reason that all my recent posts have leaves in them. To create this card I stamped the wood grain image onto Sahara Sand paper using a background stamp called Woodgrain (catalog p. 142). The dark brown strip is the new color: Early Expresso. It is darker than the Chocolate Chip and I'm finding that I really like it. I used an embossing folder called Square Lattice (catalog p. 214) on the Expresso strip. Stampin'UP! has their own line of unique designs, but remember that this machine can be used with ANY dies or embossing plates or folders sold by any manufacturer. 

This card has lots of "futzy" details: I used just a thin strip of Cajun Craze to add a little brightness to the card. I tore the edge of the Cajun Craze piece and then added a little expresso ink with a sponge. I used the Leaves #2 Die (item #113459 - catalog p213) to cut the leaves.  I cut 4 leaves, 2 from Sahara Sand and 2 from Vellum Cardstock. Then I sponged a little expresso on the back of the vellum and ran a stylus across the vellum to make a vein pattern on the leaf. The linen thread is the fiber on this card. The sentiment is from a stamp set called Teeny Tiny Wishes and was stamped on Sahara Sand, punched with the Word Window Punch and then used the Modern Label Punch for the Expresso frame for the sentiment.  Both the sentiment and the leaves are popped up with Dimensionals. Email me if you have any questions about the details of this card.

Thanks for choosing me as your source of stamping inspiration and education.  I'm here to help.  Your choice to purchase your stamping supplies through me helps to support this website.
--Katie

Sunday, November 28, 2010

My New Favorite Stamp Set: French Foliage

Stamp Set: French Foliage.  I just counted, this is the 4th card I've posted this month using this set. This is a super simple fall card using French Foliage (page 14 in the mini catalog). I really like how this card turned out, the color combination is very soft and natural. And the poly stitched ribbon is perfect on this card, its a more natural looking fiber and gives this card a casual beauty.

Saving Scraps: I stamped each leaf image onto scrap paper and used the square punches to make the layers. Are you like me, do you save every little scrap because you just "know" you'll be able to use it for something later? You gotta love any card that lets you use up that scrap paper!

A note about framing and layering:  Usually you cut each piece 1/4" smaller than the piece that frames it.  On this card the white card itself was cut that way, 1/4" less in width and 1/4" less in height. But the punches I used for the leaf squares were the 1 1/4" punch for the white and the 1 3/8" punch for the colored piece behind it which is only 1/8" larger. This is better for these small squares because these pieces would look like they were swimming in a larger mat. 

Supplies for this card:
Stamp Sets:  French Foliage [p. 14 of the Mini Catalog] and a retired sentiment
Colors: Pear Pizzazz, Always Artichoke, More Mustard
Accessories: 1 1/4" square punch, 1 3/8" square punch, 1/2" Stitched Poly Ribbon in Pear Pizzazz

Like I said in the beginning, French Foliage has quickly become one of my favorite sets. If you like it too then you should be sure to buy it before the mini Catalog buying period ends on Jan 3rd. Sometimes the mini stamp sets do carry over into the new main catalog - but not always - there is no guarantee. As a demonstrator I like when the new mini catalogs come out and we have a chance to play with fresh images. And I'm usually OK with the fact that most of the mini catalog sets will simply be retired. The concept is "get 'um while they're hot". I understand the need for the company to always have fresh items to sell.  But I will admit that I'll be really sad when French Foliage retires.  Contact me if you want to buy this stamp set or if you need any other stamping supplies. Actually NOW is the time to buy. Did you read the post about the BIG SALE Stampin'UP! is having right now? Selected items range from 20% off up to 50% off, including the software package called My Digital Studio which can be used for doing digital scrapbooking and for making Christmas Cards.And if your order is over $150 you get FREE SHIPPING as well as Hostess Benefits. Call me (608-220-3450) for more information or to place an order.

Thanks for choosing me as your source of stamping inspiration and education.  I'm here to help.  Your choice to purchase your stamping supplies through me helps to support this website.--Katie

Saturday, November 27, 2010

Autumn Days Wheat Card

I love fall.  I love the colors and the fresh air and the changing of the seasons and the anticipation of the holidays and . . . yeah, its a great season.  This week was Thanksgiving.  Here is a photo of our table before the chaos of the meal.  All three girls were home, Dana's fiance joined us as did Sara's new young man.  Kaia made the trip down from the Twin Cities but her husband had to work. We are so blessed with our family.  And I am blessed with and grateful for your presence in my life.  Thank-you for sharing my love of stamping.


The meal was  wonderful.  Add to the list that I love the fall food.  And the fall colors.  They are great inspiration for art work. What do you think of this color combination? Cajun Craze and Black with touches of gold. I love the colors on this card, to me they are so warm and earthy. The gold embossing, brads and gold cord add the perfect touch of elegance. The supplies I used on this card include:
Autumn Days Stamp Set
Sanded Background Stamp
Gold Brads
Gold Cord
Gold Embossing Powder (and Heat Gun)
Dimensionals (the focal piece is popped up)
Versamark Ink Pad
Stamp-a-Ma-Jig (to position the Wheat image)
Mat Pack (to position the holes for the brads)

Versamark Ink Pads have a variety of uses:
1) I used Versamark on the background stamp: Sanded, to make the background on this card.  As an ink Versamark is great!  What ever you stamp on, thats the color it makes.  On blue you'd see blue, on yellow you'd see yellow and here on Cajun Craze, you see Cajun Craze. 
2) I also used Versamark as the "glue" to hold the embossing powder to the black paper prior to embossing.  The process of embossing is simply melting the metallic powder into the paper.  You just need something sticky to hold the powder in place while its being heated. Versamark inks are a stickier ink and perfect for this purpose. Everyone should have a Versamark Ink Pad.

Thanks for choosing me as your source of stamping inspiration and education.  I'm here to help.  Your choice to purchase your stamping supplies through me helps to support this website.
--Katie

Friday, November 26, 2010

Only 5 days left to take advantage of the Spectacular OnLine Sale at Stampin'UP!

***Sale ends Nov 30th

This year Stampin'UP! is adding to the "Black Friday" fun - you can save big money with our Online Spectacular. Actually the sale goes until Nov 30, but the sale items will go fast and you don't want to risk a backorder. This amazing sale has over 50 selected items discounted 20%, 30% 40% and some even 50% off.

You can log on to my Online Store tocheck out the deals and take advantage of never-before-seen discounts. You won't want to miss this sale!!! I've been a demo for 5 years and I've never seen anything like this. Sale items include:
  • My Digital Studio - 50% off!
  • Designer Fabric - 50% off!
  • Some Stamp sets, Big Shot dies, decor elements, brads, ribbon and more
Remember that any order over $150 earns you Hostess benefits: 
a free stamp set and $15 of free merchandise
AND this sale is also giving FREE SHIPPING on orders of $150 or more
***And it doesn't have to be $150 of sale merchandise. Any order placed during the time of the sale will earn you the free shipping.
***If your order isn't big enough to take advantage of the free shipping then talk with your friends. Explain that the advantage of placing a group order is the free shipping.

My phone is on . . . 608-220-3450, please call if you have any questions about any of the products. Let me know if you need a catalog.

Thanks for choosing me as your source of stamping inspiration and education.  I'm here to help.  Your choice to purchase your stamping supplies through me helps to support this website.

--Katie

Saturday, November 20, 2010

Elegant Thanksgiving Cards

 
I really enjoy the stamping that I do with my co-workers at lunch. First its just fun to relax in  the middle of the day and have a little "girl talk". Of course I also revel in the comments people make about my cards. But I also appreciate that it really keeps me on my toes to create 2 new cards each week.  Here are 2 cards we've made recently. I'm trying to decide between them which to send as my Thanksgiving card this year.

Stampin'Up! has 2 lovely leaf sets to choose from.  The card on the top was made with a Stamp Set called French Foliage and the card on the bottom was made with a stamp set called Autumn Splendor.  I gold embossed the images and I really think it makes both of these cards look very elegant.  The card on the top used the Bravo Burgandy paper as the background and the one on the bottom has the leaves stamped on Very Vanilla.  For the card on the bottom I also went back and sponged just a little black onto the vanilla piece to "soften" the look,  it seemed too harsh with out the sponging.  The sentiment on the bottom card is from a stamp set called Heard from the Heart.  The sentiment on the top is actually from a retired set. 


Speaking of sets retiring and wishing you'd gotten them when they were available: Autumn Splendor (the set on the right) is in the regular catalog so it will be available at least through June (new catalogs come out in July).  But the set from the top card shown to the left here: French Foliage, is in the current "Mini" Catalog which means its availability is only guaranteed through the life of this little catalog. If you like French Foliage then get it now, because that catalog expires January 3rd.

So, back to Thanksgiving . . . I think I know which card I'd choose, but I'm willing to listen to your ideas.  Leave a comment below to tell me which card you like best.  Leave a comment even if its after thanksgiving - it helps me to know what my customers like.


As always. . .
I am here to help you.  Please call or email me if you have any questions about these cards or anything related to stamping.  Let me know if you want to order any of the supplies for these cards.  I want to be your demonstrator.  Your business is appreciated and helps to support this website.

--Katie

Tuesday, November 16, 2010

Limited Time Half-Price Offer on the Starter Kit!

Stampin'UP! has created a short lived (2 weeks only) offer of half-off on either starter kit.  The kit contains over $300 worth of materials and normally sells for $175.  That by itself is a good deal.  At half off you pay only $87.50 - for either kit:  the regular starter kit or the digital starter kit.

Why should you pay attention to this offer
  1. because you've been thinking about being a demonstrator and you'll probably never see a deal this good again
  2. because you buy a lot of supplies and you want the 20% discount on all your purchases
  3. because you've been looking for a home-based business opportunity and where else can you start a business for $87.50?
  4. because you've been thinking about buying the My Digital Studio Software (normally $79.95) and for an additional $7.05 you get 2 Stamp Sets!, 4 ink pads, paper, ribbon, adhesive and more.  That by itself is a great deal.
To see the contents of the starter kits click here and scroll to the bottom of the page. 
These kits are customizable!  You can choose the colors and stamp sets that you want.

So, you ask, whats the hitch? 
The answer is: nothing! 
**If you want to just buy the kit and have all these great supplies at an amazing price - do it!
**If you want to buy the kit and place occasional orders for supplies for yourself and your friends - thats fine.
**If you want to start a business, I can get you started and there will never be a better price.

You can sign up on my website.  To complete the process you will need a password and the password is myhobby.

Please contact me by phone or email if you have any questions at all about this offer. This really is a time-sensitive offer - its only good through the rest of the month.

As always, I'm here to be your demonstrator and help with any stamping questions you have.
If you take advantage of this offer I will be here in any additional role you want me play.
If you are looking to start a business I will be here to help you transition into creating the business you want.

--Katie

Saturday, November 13, 2010

Holiday Coupon for People on my Mailing List

You may have noticed a lack of posts this week. It was parent teacher conferences so I was busy at school for several nights. You can't see my red face but I really thought I'd posted this on Thursday. This is a short reminder that early next week I will be sending out a special Holiday Shopping Coupon to the people on my mailing list. But you must be signed up by Monday to get the coupon. Sign up here to recieve special coupons, how-to's, monthly newsletters and more.

I am here to help you.  Please call or email me if you have any questions about anything related to stamping. I want to be your demonstrator. Your business is appreciated and helps to support this website.

--Katie

Holiday Card Idea #9

Well I really had fun playing with this card and I'm so excited to share the results. I wanted to use the beautiful angel image from Angelic Joy and I wanted to put her on a dark background that suggested a night sky.  One way to do this would have been to stamp on white and cut out the image. But here's what I did instead. I embossed the image in silver and then bleached out the image - and that's all I did - no extra colors! I got all the lovely shading by using more bleach in some areas than others. Actually I let it dry and then went back and re-did some areas. I think I did her hands and face 3 or 4 times. Each time I added a little more bleach it got darker in that spot, but just because it was wet.  Then it got even lighter when it dried. Here is part of the trick, to apply the bleach I used my Aqua Painter. The bristles on it are specially shaped to do detail work like this. I don't think it would have come out as nice if I'd tried using a regular paint brush. I do keep one Aqua Painter dedicated just for use with bleach but I DO NOT store the bleach in the Aqua Painter. Partly to avoid damage to the seal on the Aqua Painter but also because the bleach goes bad if exposed to light. You need to start with FRESH bleach!

I was so happy with this and the way the colors turned out on the card above.  The paper I used was Night of Navy  and it bleached out to something that was such a good match for Perfect Plum  that I used Perfect Plum ink and Perfect Plum paper as a framing layer.

If you try the bleaching technique though you do have to test the papers. I made a trade card once for convention and did bleaching on Always Artichoke. The papers were from 2 different packages and some of it bleached to a whitish color and the other package bleached to a yellow color.  Both looked good, just saying you have to test to see what happens. I did try the angel on Not Quite Navy  and got a much more yellow image with that.  That looks good too. It seems like it might be a match for Soft Suede - I just haven't had time to play with that yet..

The angel looked so great on the card that I had to make the rest of it really special too so I sprayed Silver Foil Smooch Spritz on the Night of Navy and sprayed Vanilla Shimmer Smooch Spritz on the Perfect Plum.  I also used the little snow flakes from the Confetti Stamp Set as a background around the angel and I embossed them with Iridescent Ice

Supplies:
Silver Embossing Powder
Versamark Ink Pad
Heat Tool
Iridescent Ice Embossing Powder
Silver Cord
Dimensionals
AquaPainter
Silver Cord

Stamp Sets:
Angelic Joy (Holiday Mini)
Confetti (Big Idea Book and Catalog)

Colors:
Night of Navy
Perfect Plum


I am here to help you.  Please call or email me if you have any questions about this card or anything related to stamping.  Let me know if you want to order any of the supplies for this card.  I want to be your demonstrator.  Your business is appreciated and helps to support this website.

--Katie

Wednesday, November 10, 2010

Holiday Card Idea #8

Tuesday was a beautiful fall day in Wisconsin, warm and sunny and gorgeous fall colors. The colors really got my creative juices flowing. All  the lovely fall colors must have been my inspiration for this non-traditional Christmas card post.  These charming ornament stamps are from a cute little set called Tree Trimmings. The Make Merry Tag is from a stamp set called Grateful Greetings. Of course the little Self-Stick Rhinestone on the tag adds to the cheeriness of the card. The scalloped edge was punched with the Scallop Edge Punch

This color combination is interesting: Concord Crush, So Saffron and Pumpkin Pie, not the traditional red and green but it certainly looks festive.  I'd love to take credit for this idea, but this card is from one of my upline, Karla Anders. 
Are you making your own Christmas Cards this year?  I hope the last several days have given you some useful ideas (and a few more to come).  Let me know if there is any way I can help with your rubber stamping needs.  I love sharing my experiences and ideas with you and helping you to unleash your own creativity.

BTW:  are you signed up for my email list yet?  Coming next week is a special shopping coupon exclusively for the people on my email list.  So sign up today to recieve up to date information on company specials, crafting ideas, calendar updates for my events, coupons and more.  And if you are signed up by Monday you'll also get the special holiday shopping coupon.


I appreciate your comments and your business
Let me know how I can help

--Katie

Tuesday, November 9, 2010

Holiday Card Idea #7

Here are 2 cards made with the Serene Snowflake Stamp Set.

On the blue card I used the Scallop Edge Punch to trim the front edge of the card and then placed a piece of Designer Paper on the inside of the card as an accent.  The Sentiment on the blue card is from a set called Heard from the Heart. I added a little "bling" to the card by using glue to adhere Dazzling Diamonds glitter to the snowflake.

On the second card I used Sahara Sand ink to stamp the snowflakes on Shimmery White cardstock. The 5/8" Organza Ribbon and the Self Stick RhineStone add a little sparkle to this card.

Secret Tip:
The 3 little snowflakes in this stamp set are coordinated to work with the Boho Blossom Punch! One of the advantages of shopping with Stampin'Up! is that our designers do pay attention to things like that to give us that extra mile of versatility with  our products.
Supplies Card #1
Serene Snowflake Stamp Set. . . . . . . .page  42
Heard From the Heart Stamp Set . . . .page 156
Scallop Edge Punch . . . . . .  . . . . . . . page  201
Dazzling Diamonds Glitter . . . .  .. . . . page  196
2-Way Glue Pen . . . . .  . . . . .  . . . . . page  197

Supplies Card #2
Serene Snowflakes Stamp Set . . . . . . page  42
Sahara Sand Ink Pad . . . . . . . . .  . . . page 169
Shimmer White Paper . . . . . . . . . . . . page 170
5/8" Organza Ribbon . . . . . . . . .. . . . page 190
Basic RhineStones . . . . . . . . . . . . . . page 188

Email me if you want to order any of these supplies.
Let me know if you have questions about either of
these two cards or if there is any other way I can
help you with your stamping needs.

I appreciate your comments and your business
Let me know how I can help

--Katie

Serene Snowflakes Stamp Set

Boho Blossom Punch

Monday, November 8, 2010

Holiday Card Idea #6

This is a card we did at last year's December Stamp-a-Stack. This cardinal gives me such a warm feeling, he makes me remember my grandmother's kitchen. She had a bird feeder right outside the window by the kitchen table. It was in her kitchen that I learned how to identify birds. I am an empty nester now but no grand kids yet.  I hope when they do arrive that they'll have the same opportunity with me to learn and appreciate the beauty of birds.

This is a beautiful card if you are making a few for some special people.  It you are mass producing a lot of cards and want to make this one be sure to leave enough time for all the coloring.  He's so pretty, I can hear him singing while I type. 

The Stamp Set is called: A Cardinal Christmas and is found on page 39 of the catalog. This is last year's card so this ribbon has retired.  This year I'd make it with the 1/8" Taffeta Ribbon.  Isn't that sentiment beautiful?  Its from Many Merry Messages, which is  a great all-purpose Christmas sentiment set.

Let me know if there is any way
I can help you with planning
and making your own Holiday cards.

I'm here to help you with your stamping needs.
Please contact me with any suggestions or questions.
Your business and your feedback are both appreciated.
Be sure to check my class calendar for future events.

Happy Stamping --Katie

Saturday, November 6, 2010

Holiday Card Idea #5

Here is one more Christmas card I got at my last demonstrator meeting. This one was designed by Jen Sannes using a new stamp set called Rejoicing in Christmas. This card continues the theme of simple and easy to mass produce cards, the stamping is minimal and there are only 2 colors:  Vanilla and Burgandy. She did emboss the background - but remember my hint from the last 2 posts, you can do 2-3 papers at a time in the embossing folder. The White and Vanilla cardstocks are thinner than the colored card stock so you can easily emboss several layers at the same time - try it, you'll be pleased with the results.

Notice a couple of other things artistically about this card. Jen added a bit of sparkle to the card in 2 ways: she used the 5/8" Vanilla Satin Ribbon which is shiny.  She also used Dazzling Diamonds gitter on the centers of the flowers.  Its a very subtle touch, but really adds to the look of the card. One other special touch is the punching she did by the sentiment. That line of pierced holes wasn't necessary, the card would have looked fine without it.  But being there it adds balance to the card which may have looked somewhat askew with the sentiment off to the right and the bow off to the left.  The pierced line gives a finished look to the bottom edge of the card. If you are staring at that line that is so perfectly straight and evenly spaced and wondering about how she did that(!), the answer is, she used the Mat Pack. I use this tool whenever I have 3 or more holes to punch in a line and want them to be evenly spaced.  At $9.95 the Mat Pack goes on my list of essential tools.
Supplies
Mat Pack . . . . . . . . . . . . . . . . . . .#105826 . . $9.95 . . p198
Paper Piercer  . . . . . . . . . . . . . . . #116631 . . $3.95 . . p198
Petals-a-Plenty Embossing Folder  #116824 . . $7.95 . . p214
Dazzling Diamonds . . . . . . . . . . .  #102023 . . $4.50 . . p196
2-way Glue Pen . . . . . . . . . . . . . . #100425 . . $3.50 . . p197
5/8" Vanilla Satin Ribbon . . . . . . . .#117291 . . $8.95 . . p191

the Mat Pack
Colors
Bravo Burgandy
Very Vanilla
   papers and inks-pages 164-169
Stamps
Rejoicing in Christmas
   wood or clear mount
   Mini Catalog page 30

As a demonstrator I really appreciate the opportunity to be part of an active group of supportive business minded people. If you'd like more information about this business please contact me.  There are many things I can share with you and help you with as you start your business.  This is a great company, I am part of a great group of ladies and (of course) this is a great hobby.  Its so much fun to be able to call my hobby "my job".  And believe me, there is definitely the potential here to have this be your job.


Let me know if there is any way I can help you with your stamping.
Please contact me with any suggestions or questions. Your business and your feedback are both appreciated.
Be sure to check my class calendar for future events.

Happy Stamping --Katie

Friday, November 5, 2010

Holiday Card Idea #4

Here are two more ideas for hand-made Christmas Cards. These are 2 trade cards I got at my last Demo meeting.  Here in Wisconsin we've had several days now where I've had to scrape the frost off the car in the morning.  If you've been to an event at my house you know that we do not have a garage.  Once the snow arrives and the weather gets really bad then Dave will clear out the front part of the barn and I can park in there.  But right now its still got the lawn mower and tiller and other gardening stuff.  Anyway, those frosty mornings must have been on my mind when I chose these two card samples.  They were both made with the new Northern Flurry embossing folder found in the Holiday mini catalog-p26. 

The card on the right was embossed on white card stock and framed on a Real Red card base. This ornament stamp is from a new stamp set called Tags til Christmas (Holiday Mini-p24). Other Stamp Sets which also have ornament stamps are:  Delightful Decorations (main catalog-p35) and Contempo Christmas (main catalog-p45).  This ornament was stamped in Real Red and then punched out with the Ornament Punch. The Extra little Bling is a self-adhesive Rhinestone.  That rhinestone is a simple little touch, but the card would be so plain without it.  The sentiment is from a Stamp Set called Christmas Greetings (main catalog p44). The ribbon is the 1/8" white taffeta which is $5.95 a roll for 10 yards.  Like the other cards from previous days, this is a quick card and easy to mass produce.  And remember the hint from yesterday, you can do the white card stock in the embossing folders 2-3 sheets at a time.

The card on the left features a cute little punch art penguin made with the Owl Punch! You just cut off the ears from the owl and voila!, penguin.  I really like how the Owl Punch has ALL the parts for the bird. This card is just charming cute, but I'll warn you that its not a quick and easy card.  There are lots of little parts to glue and position for the bird.  The penguin is sitting on an iceberg which is a great artistic touch for the card but adds to the time it takes to make.  And you'll have to use the embossing folder one card at a time because the background is sponged with Bashful Blue prior to embossing.  Isn't it cool how the ink picks up selectively on the embossing folder so you get blue sky and white snow. This would be a darling card to send for a December birthday. And depending on how much time you have for making Christmas cards this would be a really cute WOW card as your holiday greeting card. The ribbon on this card is the 1/8" black taffeta. The scene is created on white cardstock, framed on a black layer and mounted on a white card base. The sentiment is from an all-purpose sentiment set called Teeny Tiny Wishes.


Supplies(Penguin Card)
Northern Flurry Embossing Folder, - #120902 ($7.95)
Owl Punch, #118074 - p200 - $16.95
Whisper White Card Stock
Black Card Stock
Bashful Blue Ink
Black 1/8" Taffeta Ribbon #119261 - p191 - $5.95
Teeny Tiny Wishes Stamp Set (Main Catalog-p157)
   (your choice of wood mound or clear mount)
Supplies (Ornament Card)
Northern Flurry Embossing Folder, #120902 ($7.95)
Ornament Punch, #119847 - p202 - $16.95
Whisper White Cardstock
Real Red Card stock
Real Red Ink
Tags til Christmas Stamp Set (Holiday Mini p24)
    (your choice of wood mound or clear mount)
Christmas Greetings Stamp Set (Main Catalog-p44)
    (your choice of wood mound or clear mount)
White 1/8" Taffeta Ribbon #119262 - p191 - $5.95
Basic Rhinestones #119246 -188 - $4.95
Call me if you are interested in making either of these 2 cards.  I can share more specifics about how to make them.  

Let me know if there is any way I can help you with your stamping.
Please contact me with any suggestions or questions. Your feedback is appreciated.
Be sure to check my class calendar for future events.

Happy Stamping --Katie

Thursday, November 4, 2010

Holiday Card Idea #3

Here's is a quick and easy card for this busy time of year.  This card is one I made for my last demo trade. Its super easy and goes together very quickly - trust me, when I'm making trade cards I'm looking for something that's easy to mass produce.  I cut the strips for the embossed piece and put 3 of them side-by-side in the embossing folder.  HELPFUL HINT:  Did you know that you can run 2 or 3 thicknesses of white paper through the folder at a time and it still looks great!  So I could actually emboss 9 strips at a time - 3 side-by-side stacks with 3 in each stack.  That sure helped.  

Both the snowflake and the sentiment are from the same stamp set: Snow Swirled (catalog p40).  I really like the crisp clean look of these colors together, the Whisper White and Pacific Point.  The tiny little Self-Stick Rhinestone (catalog p.188) in the center of the snowflake adds just the perfect little hint of bling to the card, like a falling snowflake that has caught the light just right.  And of course I LOVE it that the rhinestones are adhesive backed! That really made the project go a lot faster. They come in a package of 150, 50 each of 3 different sizes all for only $4.95. 

Supplies:
Basic Rhinestones #119246 ($4.95)
Embossing Folder: Finial Press, #115963 ($7.95)
will you need envelopes? #107301 (40 for $6.50)
Colors:
Whisper White #100730 (40 sheets for $8.50)
Pacific Point #111350 (24 sheets for $6.95)
Stamp Set
Snow Swirled #111690 (wood mount only, $24.95)

Let me know if there is any way I can help you with your stamping.
Please contact me with any suggestions or questions. Your feedback is appreciated.
Be sure to check my class calendar for future events.

Happy Stamping --Katie

Wednesday, November 3, 2010

Holiday Card Idea #2

On the Second Day of Christmas
Katie gave to Me
Two Ornament in a Holiday Tree
This is the 2nd in a series of posts with ideas for Christmas cards.

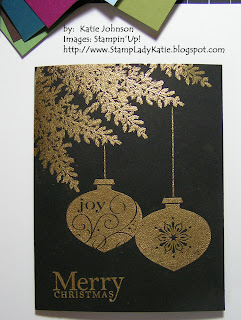
Here is a simple idea for a quick and easy Christmas Card. The gold embossing on black cardstock really gives a quiet elegant look to this card.  The ornaments are from the Delightful Decorations set.  The Sentiment is from a very versatile set called All Holidays.  And (surprise) the tree branches are actually the pine tree in Lovely as a Tree

If you send handmade cads and are looking for ideas this would be pretty easy card to mass produce.  Look through your stamp drawer - you probably already have an evergreen tree stamp and a holiday sentiment.  I really like this ornament set from SU and in the next few days I'll be showing more cards made with it.
Contact me if you need any supplies.


Let me know if there is any way I can help you with your stamping.
Please contact me with any suggestions or questions. Your feedback is appreciated.
Be sure to check my class calendar for future events.
--Katie

Tuesday, November 2, 2010

Holiday Card Idea #1

Do you like to send hand made Christmas card but always feel rushed trying to come up with ideas for something thats elegant and yet easy to mass produce?  For the next 12 days I will be posting ideas for easy Christmas cards.  Some of them will require a particular stamp set, but you'll find that many of them can be adapted to stamps that you already own.  Enjoy, and as always, shoot me an email if you have any questions or need more ideas. 

On the First Day of Christmas
Katie gave to me
An idea for a card as easy as 1-2-3
(sorry, I know its a bit cheesy...)

This card, with its deep colors is really goregous.  I used Rich Razzleberry, Garden Green and Brushed Gold papers. The charming ornament stamp is from a cute little set called Tree Trimings (page 44 in the catalog).  It is an older set and only available in wood mount so if you decide to make this card you will need a Stamp-a-ma-Jig to line up the "string" with the top of the ornament.  The sentiment is from a very versatile set called All Holidays and the lovely swirls on the bottom are from Baroque Motifs. And FYI: Baroque Motifs is a great, all purpose set to have.  I use those swirls on a lot of different cards. 

Paper:
Garden Green
Rich Razzleberry
Brushed Gold
Stamp Sets:
Tree Trimmings
All Holidays
Baroque Motifs
Supplies:
Gold Embossing Powder
Versamark(for the swirls too)

Contact me if you need any supplies.

Let me know if there is any way I can help you with your stamping.
Please contact me with any suggestions or questions. Your feedback is appreciated.
Be sure to check my class calendar for future events.

Happy Stamping --Katie

Monday, November 1, 2010

Two Different Cards - - - Same Lay-out (take 2)

Well this is gratifying - I got 2 emails from people commenting that they liked the reminder about using a layout for more than one card design.  So here are more examples. The blue card to the right is one I got as a trade from one of the very talented ladies in my demonstrator group, Rachel Durtschi.  I am so lucky to be part of this group of women. Originally I bought my Starter Kit because I wanted the discount on the product. But this group of business women have been so wonderful that I stuck with it. They are a warm and sharing group and I've learned so much from them, both about stamping and about running a business. They really showed me that I can do this as a business, not just for fun.

If you are thinking at all about a home based business I'd certainly recommend what I do.  Call me or email for more information.  Its fun and extra money in my pocket. 

So, I got this beautiful blue card as a trade from Rachel.  Don't you just love that little adhesive Rhinestone.  That is one new SU product I'm really loving! Here is my card.  Same Stamp Set:  French Foliage, and same basic card design - just different colors.  You'll notice that I stamped a lot more leaves on my card. The words on the left of the card base are part of the Stamp Set - I'm a sucker for lovely leaf sets anyway but I really love this set.  Also, if you look closely, you'll see that Rachel use a wet paintbrush on the leaves on the blue card.  It blurs the edges and gives them a hint of movement, like they are falling.


Stamp Sets:  French Foliage and Three Little Words
Colors
Crumb Cake (which is the old Craft Paper)
So Saffron, Pumpkin Pie, Soft Suede
Supplies:
Scallop Border Punch

Let me know if there is any way I can help you with your stamping.
Please contact me with any suggestions or questions. Your feedback is appreciated.
Be sure to check my class calendar for future events.