Sunday, October 31, 2010

Build-a-Bear Halloween Card

Happy Halloween everyone. This card is very similar to the card I posted on Sept. 11th. I substituted a punch art bear for the bats. See, one design makes many cards. The hat and the sentiment are both from the cute Season of Hugs stamp set that is part of the Build-a-Bear collection. Check out the picture of the stamp set below. It has some really cute accessories to go with the rest of the Build-a-Bear Stamps.

Stamp Set: Season of Hugs
Colors: Always artichoke, Basic Black and I used Confetti White Paper for the card base and vanilla for the bear's face.
Accessories: Large oval punch, Scallop circle punch, 3/4" circle punch, 1/2" circle punch, 1" square punch, decorative label punch, word window punch and googely eyes.  I made the smile on the pumpkin with the oval punch

Let me know if there is any way I can help you with your stamping.
Please contact me with any suggestions or questions. Your feedback is appreciated.
Be sure to check my class calendar for future events.
Happy Stamping  - - Katie

Saturday, October 30, 2010

Halloween Ghosties using Pick-a-Petal

Here is a ghost card made with one of the most versatile sets I've ever owned: Pick-a-Petal.  When I first saw this set I was less than impressed.  I love flowers but somehow I didn't see myself making flowers with this set. But the more I played with it the more possibilities I saw.  Can you see how I made this card?  Each ghost is 3 of the solid petals.  I Stamped the petal 3 times using Whisper White Craft Ink and then embossed with white embossing powder.  I cut the letters for the Boo using the Big Shot and the Go Go Boots Alphabet Die Set.

Supplies
Big Shot
Go Go Boots Alphabet Die Set
Bat Punch
1/8" Black Taffeta Ribbon
Googly Eyes
Stamp Set
Pick-a-Petal

Let me know if there is any way I can help you with your stamping.
Please contact me with any suggestions or questions. Your feedback is appreciated.
Be sure to check my class calendar for future events.

Friday, October 29, 2010

Two Different Cards . . . Same Lay-Out

First, a thank-you to everyone who sent prayers and thoughts for Dave's mother. The main health crisis is now stable. I apologize for the lack of posts and intend to get back into the swing of things.

People often ask me where I get my design ideas.  One secret is to come up with a good design and just keep re-using it.  Stampin'Up! makes it so easy to do this because so often the stamps in a set are the same size and therefore interchangeable in a design - like the 2 cards below.
  
These are cards we made at the October Stamp-a-Stack. I used a cute little set called a Flower for All Seasons. Its one that the participants in my spring Technique Class recieved. BTW: if you are on my email list then watch for a notice in November for the next Technique Class which will be starting in January. You can sign up for the email list here.

Originally I intended the Stamp-a-Stack card to be the sunflower card. But I wanted people to see how easy it is to use the same lay-out for multiple different cards so I made a Christmas card too. I made both cards with the same colors and gave the attendees the choice of which card to make.

Stamp Sets
A Flower for All Seasons
Heard From the Heart
Colors:
Wild Wasabi
Riding Hood Red
Naturals White Paper
Supplies:
Gold Cord
Linen Thread
Eyelet Border Punch
Ticket Corner Punch
Stamp-a-Ma-Jig (to align the sentiment)


Let me know if there is any way I can help you with your stamping.
Please contact me with any suggestions or questions. Your feedback is appreciated.
Be sure to check my class calendar for future events.

Saturday, October 16, 2010

Grated Paper Fluff


Here is a new technique for embellishing your projects!  The really grate [bad pun intended] thing about this is is that it doesn't require you to purchase anything, it uses things you already have in your house AND it uses up some of those little pieces of scrap paper that we all save.  The final look is similar to a commercial product called Flower Soft - but you don't have to buy anything and you can get a perfect match to the other colors on your project. When people are shopping for stamping supplies I always remind them of the advantage to getting ALL your colored product from one company.  Its so frustrating to try to make a project when the colors are not coordinated and Stampin'Up! has such a great color pallette, its one of the reasons I chose Stampin'Up!

OK - so here's how I made those fluffy colored images.  I rolled up some scrap paper into a tight roll (like a carrot) and I grated them.  Yep! Thats it.  Its so simple but it really adds a WOW factor to the cards.  Plus its fun to touch :).  To adhere the fluff to the paper I used liquid Tombo glue and spread it around with a toothpick or Q-tip.  I was a little afraid that the glue would smear the image so I embossed it rather than just stamping it. 
The middle card is the little lamb from Pun Fun.  The white paper was easier to grate than the colored papers.  Both of the tree images come from a set called Lovely as a Tree.  Here in Wisconsin the trees are all turning such lovely fall colors so my spreading oak tree is very seasonal.  With the holidays coming up I've toyed with turning the evergreen into a Christmas card.

In addition to the supplies listed below I embossed the image on each card in black.  And, of course, you'll need your kitchen grater.

Supplies for the Oak Tree Card:
Stamp Set:  Lovely as a Tree
Colors:  Always Artichoke, Soft Suede and Early Expresso
also, various fall colored scrap papers
Accessories: 1/8" Early Expresso Taffeta Ribbon, Dimensionals

Supplies for the Sheep Card:
Stamp Set:  Pun Fun
Colors:  Basic Black, Whisper White and Real Red
Accessories: none

Supplies for the Evergreen Card:
Stamp Set:  Lovely as a Tree
Colors: Naturals White paper and Always Artichoke
Accessories: none 

Let me know if there is any way I can help you with your stamping.
Please contact me with any suggestions or questions. Your feedback is appreciated.
Be sure to check my class calendar for future events.

Thursday, October 14, 2010

Technique: Thumping

I just love how this card turned out.  The feather image is from  a Stamp Set called Nature's Nest.  I got all these beautiful colors by using a marker technique called "thumping".  First I stamped the image in the light color, in this case it was Pear Pizzazz.  The two colors I added were Tempting Turquoise and Elegant Eggplant.  I added them by holding the marker sideways to the stamp and tapping it (thumping it) in random places on the stamp.  Its super easy and boy does this look great.  We did this as one of our lunch cards this week so that tells you it was a quick card.  After I got home I wondered what it would look like if I added a little sparkle so I embossed it with Iridescent Ice embossing powder.  This is the result!   

Stamp Set:  Nature's Nest
Accessories:  Iridescent Ice embossing powder
Colors:  Pear Pizzazz, Elegant Eggplant, Tempting Turquiose

Let me know if there is any way I can help you with your stamping.
Please contact me with any suggestions or questions. Your feedback is appreciated.
Be sure to check my class calendar for future events.

Happy Stamping --Katie

Wednesday, October 13, 2010

Flower Fancy Emboss Resist

Technique Tip:  Emboss Resist
I got the idea for this card and played around with several color combinations. This is my favorite!  Pear Pizzazz and Not Quite Navy. To create the focal point I stamped the flower images several times using White Craft Ink and embossed with White Embossing Powder.  Then I used Sponge Daubers to add the color to the flower petals and center of the flower. This big outline image from the Flower Fancy Stamp Set is perfect for this technique.

Stamps
Flower Fancy, and Phrases for a Friend(retired)
Colors
Not Quite Navy, Pear Pizzazz and Whisper White
Accessories:
White Craft Ink and White Embossing Powder and a Heat Gun

Let me know if there is any way I can help you with your stamping.
Please contact me with any suggestions or questions. Your feedback is appreciated.
Be sure to check my class calendar for future events.

Happy Stamping --Katie

Tuesday, October 12, 2010

Emboss Resist

I love silhouette cards and this one is so simple.  This card is one I designed for the ladies who stamp with me at lunch.  We need cards that are quick and easy because we have only a half-hour lunch and we do 2 cards.  This one had only a few simple steps:
  • emboss the flower
  • sponge a little ink around it
  • tie on the ribbon
  • stamp the sentiment
  • glue together
One of the big advantages to buying all your supplies from the same company is that you can exactly match the ribbon, paper and ink, and I think that is one of the things that makes this card so effective. This card was done in Marina Mist, but it would look pretty in any color.

Stamps: Water Color Trio (Dormant List)
Colors: Marina Mist and Whisper White
Accessories:  White Craft Ink, White Embossing Powder and Heat Gun, 1/4" Marina Mist Taffetta Ribbon.

The lunch thing is really fun.  We stamp 2 cards once a week.  Its a nice way to build up a supply of cards and to get to know your co-workers.  I did this at both my old school and the school where I'm at now.  You might want to start something similar at your work place.  I wouldn't worry about not having enough people.  Once you start stamping you'd be amazed at how many people either share your hobby (and you just didn't know) or who are eager to learn.  Ask me for ideas, I can help you get a group started and I can also help you with simple card designs like this one.

Let me know if there is any way I can help you with your stamping.
Please contact me with any suggestions or questions. Your feedback is appreciated.
Be sure to check my class calendar for future events.

Happy Stamping --Katie

Monday, October 11, 2010

Owl Punch Ghost Card

Today my students were talking about their Halloween Costumes so I naturally I started thinking about "creepy crawlies".  I've seen such creative things done with the new Owl Punch including making this cute little ghost so I just had to try it.  The punch creates many pieces including the black circles used for the ghost's eyes. I got the other little "googly" eyes from Wal-Mart. 

This card was pretty simple and quick.  I stamped the grasses (from Inspired by Nature) using White Craft Ink. Its not embossed, that would have been too shiny, this looks more "ghostly". I adhered the ghost's eyes with a Mini-Glue Dot. The biggest suggestion I have for you if you try to re-create this is to glue the googly eyes on last.  I didn't and it was hard to use the SNAIL on the back of the lumps!  BTW:  the googly eyes were too small to use a glue dot on or the snail so I held them with a tweezers and dragged them across thetop of the 2-Way Glue Stick.  It worked perfectly!

This will be one of the cards we will do at the Halloween Card Class October 24th.  Please pre-register so I have enough materials cut.
Stamps: Inspired by Nature
Colors: Peach Parfait, Always Artichoke, Black an Whisper White
Accessories: White Craft Ink, "Googly Eyes", 1/2" Peach Parfait Stitched Poly Ribbon, Mini Glut Dots, 2-Way Glue Stick, Tweezers


Let me know if there is any way I can help you with your stamping.
Please contact me with any suggestions or questions. Your feedback is appreciated.
Be sure to check my class calendar for future events.

Happy Stamping --Katie

Friday, October 8, 2010

Manhatten Flower Embossing Folder

I bought my Big Shot because I wanted to use the dies.  But I've been pleasantly surprised with how much I really like the look you get with the texture plates and the embossing folders.  The Manhatten Flower Embossing Folder is one of my favorites.  The first card I posted that used this folder was showing off the Deboss Resist Technique.  It is a beautiful card, but there was a little work involved with adding the color.  This card is super quick and simple: emboss the flowers, cut them out, paste on the background and emboss the sentiment. I used the Shimmery White Paper for the flowers and the 1/8" Taffeta Ribbon with white trimmed edges.  The sentiment is embossed in white.   

As you can see below, I played around with different colors.  The Rich Razzleberry and the Not Quite Navy look nice but this black card is really elegant. 


Let me know if there is any way I can help you with your stamping.
Please contact me with any suggestions or questions. Your feedback is appreciated.
Be sure to check my class calendar for future events.

Happy Stamping --Katie

Thursday, October 7, 2010

Elegant Thank-You

Here is a super quick and super easy card. The color scheme is simple, black, white and one other color.  You can use up a scrap of any printed paper you had on hand.  Darker colors and geometrics makes it suitable as a masculine card.  I used a strip of black ribbon along the top edge of the Designer Paper but a strip of black paper would work as well - or just leave the edge showing.  I used a black circle (1 3/4" punch) behind the square scallop punched sentiment,  partly to highlight the sentiment and partly because the white paper is thinner and the black makes it look more sturdy. This card is so fast and so easy.  If you embossed the sentiment in gold or silver that really would make it elegant!


This card lay-out would work with any small image.  What little stamps do you have that would look nice in this lay-out? The stamp I used is called Elegant Thank-You and its one of those little "a la CARTE" stamps.  About 2 catalogs ago Stampin'Up! began offering single stamps at a price of under $10.  When they started they had just 1 page.  This catalog has 2 and a half pages of these cute little stamps - you can find them on pages 18-20 of the 2010 catalog.  I love this stamp and I use it all the time.  Here are a couple of other ideas for this stamp.

Technique Tip: Using Markers on the Stamp Itself! For both of these samples I used markers directly on the stamp.  On the left I colored each letter a different color. You could use this technique if you just wanted the words and not the swirly decoration on top and bottom.

On the right I used markers directly on the stamp again, but this time I just colored the swirly part.  I stamped it twice to get this cool little square image. I'd love to tell you my hand/eye coordination was good enough to get it lined up so perfectly, but I'm not that good.  I used the Stamp-a-ma-Jig, which is an alignment tool.  This, by the way, is on my list of essential tools, I couldn't stamp without it. 

Let me know if there is any way I can help you with your stamping.
Please contact me with any suggestions or questions. Your feedback is appreciated.
Be sure to check my class calendar for future events.

Happy Stamping --Katie

Saturday, October 2, 2010

Birthday Candles with the Bird Punch

Yes, I know - 2 posts in 1 day.  I'm trying to catch up and post all the cards we've done recently at the Stamp-a-Stacks.  This one is so super easy and a great way to use up scraps.  The candles were put through the Big Shot with a texture plate and on the background I used the Perfect Polka Dots Embossing Folder.  The sentiment was punched out with the Square Scallop Punch.My favorite part of this card is the flame - can you tell that its the wing from the 2-Step Bird Punch?  The whole card came together really quick and easy. 

Let me know if there is any way I can help you with your stamping.
Please contact me with any suggestions or questions. Your feedback is appreciated.
Be sure to check my class calendar for future events.

Happy Stamping --Katie

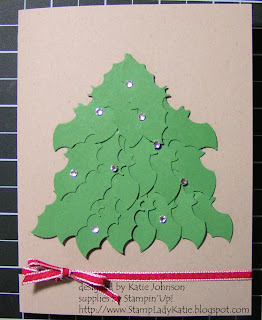
Bat Punch Christmas Tree


I've been playing around with Halloween Cards in preparation for the Halloween Stamp Camp.  I can't wait to show pictures of the cards, pumpkins and ghosts and spiderwebs . . .  Anyway as I'm playing with the Bat Punch my mind suddenly turned to Christmas - and - well, the result is a Christmas Tree made with punched bats! 

This card was my first try at it. Its not an elegant card by any means but I just wanted to see what it would look like.  The edges of the punched bat definitely give the look of the shaggy Christmas Tree with the needly branches.  This definitely has potential. 


I added a few of Stampin'Up!'s new Self-Adhesive Rhinestones for a little extra sparkle.


Let me know if there is any way I can help you with your stamping.
Please contact me with any suggestions or questions. Your feedback is appreciated.
Be sure to check my class calendar for future events.

Happy Stamping --Katie

Friday, October 1, 2010

Man's Shirt Template

A few weeks ago I was looking through the catalog for ideas for Halloween cards. There is a good reason its called "the Ideas Book and Catalog"! On page 154 I found this cute little candy container made by wrapping the 3/8" Twill Tape around a small can or empty toilet tissue roll. You can fill the can with a little bag of candy. Isn't he cute?  But then my eye was caught by the card next to him.  I'd always wanted to try making a "shirt" card and this looked pretty easy.  Plus I needed an easy card for a trade I was doing.  It turned out to be so easy that I actually used this card for my September Stamp-a-Stack. 

I made my trade card with the Concord Crush, which I quickly used up.  The folks at my Stamp-a-Stack made the same card in Soft Suede with an orange tie.  Then I used it again with a group who stamp with me at work and we made the card in Old Olive.  I can't decide which one I like better.  What do you think?

I stamped the card with the Sanded Background stamp to give the shirt a subtle pattern. The Hand cut a tie from designer paper.  The pocket is the Small Tag Punch which I raised up with Dimensionals. I also sponged around the pocket to give it some extra definition. The ribbon is just a small scrap of Satin folded in half and adhered to the back of the pocket with the Mini Glue Dots.  To make the collar I just cut in about 1 1/8 inch from each edge and about 1/2 inch from the top folded edge of the card.  Then I folded those 2 tabs forward to meet in a V.  Used the Mat Pack to punch the holes for the brads.  I did have to fold the back of the card up and out of the way so the brads would not get in the way of opening the card.


Let me know if there is any way I can help you with your stamping.
Please contact me with any suggestions or questions. Your feedback is appreciated.
Be sure to check my class calendar for future events.

Happy Stamping --Katie