Showing posts with label acetate sheets. Show all posts

Monday, December 10, 2018

Three Ways to Add Shine to the Cake Icing

#INKcredibleTechniques - to Create Shine
#INKcredibleSneakPreview - of 2019 Occasions Catalog Product

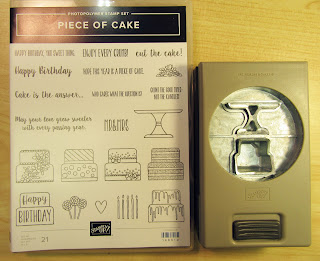
I am loving the new Piece of Cake stamp set and matching Cake Builder Punch.  These products will be available to purchase in January from the 2019 Occasions catalog. I'm happy to send you a copy .

Check out these projects and see 3 ways to make the icing on the cake shiny.


card made with Stampin'UP!'s "Piece of Cake" stamp set and "Cake Builder" Punch by StampLadyKatie

Closeup of the heat embossed cake, card made with Stampin'UP!'s "Piece of Cake" stamp set and "Cake Builder" Punch by StampLadyKatie


The icing on this first cake shines because the image is heat embossed.

  1. Ink the stamp in Versamark
    and then Ink in the color ink
  2. Stamp the image on colored paper
  3. Sprinkle with Clear Embossing Powder
  4. Heat set
  5. Punch out (or cut)


For the 2nd card just look how the whole cake shines!
 
card made with Stampin'UP!'s "Piece of Cake" stamp set and "Cake Builder" Punch by StampLadyKatie

Stampin'UP!'s "Piece of Cake" stamp set, ake image covered with glue from the Fine Tip Glue Pen by StampLadyKatie
To achieve this look the cake was stamped and colored with markers and cut or punched out.  

Then I covered the whole thing with the glue from the Fine Tip Glue Pen. The glue functions like a crystal lacquer. 

Of course you have to let it dry thoroughly before finishing the card . . . several hours at least. 


The shine on the last card comes from a combination of stamping the image on acetate and then layering over glimmer paper.

card made with Stampin'UP!'s "Piece of Cake" stamp set and "Cake Builder" Punch by StampLadyKatie

Close up of the cake image from Stampin'UP!'s "Piece of Cake" stamp set, stamped on acetate and layered over glimmer paper by StampLadykatie

The background on this card has its own shine: it was stamped with the Marble Background Stamp and heat embossed with Clear Embossing powder. For the cake 
  • The image was stamped on Acetate (Window Sheet) in StazOn ink
  • The flowers were colored with Stampin'Blends (an alcohol marker)
  • The image was layered on top of white Glimmer Paper.
Stampin'UP!'s "Piece of Cake" stamp set and Cake Builder Punch
One thing I appreciate about being a Stampin'UP! demonstrator is the opportunity to play with new product before it hits the market.  I love it that my job is to play with ink and stamps.

Recently I've been having lots of fun making samples with the new Piece of Cake Stamp Set and coordinating Cake Builder Punch.

You are going to love this set - it works for so many different occasions: weddings and anniversaries, birthdays, retirement, showers - anything you want to celebrate.


Are you familiar with Stampin'UP!'s Buying Cycle? 
here are a few important dates:

December is the Close-out month for items from the Holiday Catalog. some items will carry over through spring but most are now available only while supplies last.   And many of them are on-sale. Check out the deals here.

January - March is Sale-a-bration.  Each $50 of merchandise you order earns you a free Sale-a-bration reward.

January - May we have new offerings from the Occasions Catalog.  Contact me if you'd like a catalog sent to you.

If you haven't browsed the Stampin'UP! store I encourage you to spend a little time there. This is a great company with wonderful product. I do receive commission on sales and I appreciate your business - thank-you. My commission is paid by the company, you pay nothing extra when purchasing product through me.

I hope I've inspired you. I'm happy to answer questions about this or any other project. My email is in the header at the top of the page.


Versamark Pad
[102283]- $9.00
and ANY color Stampin' Classic Ink
Heat Tool
[129053] - $30.00


Window Sheets
[142314] - $5.00
and any color Stampin' Blends Marker
these are alcohol markers


Saturday, February 27, 2016

Glimmer Paper Challenge Project

This card was part of a challenge project for my demo group.  We needed to create samples using Blushing Bride Glimmer Paper.  Now, glimmer paper is beautifully sparkly all by itself, but I added a little extra shine to mine by covering it with a piece of Window Sheet (acetate). Then of course, that presents the challenge of how to adhere it since the window sheet is clear. So here's my final project.
Star Card made with Stampin'UP!'s Blushing Bride Glimmer Paper and acetate Window Sheets

Here's another view to showoff the extra shine, the acetate contributes so much to this card.  
I really like how it turned out . . .  the smooth feel with the sparkle underneath. 

Star Card made with Stampin'UP!'s Blushing Bride Glimmer Paper and acetate Window Sheets

Its a challenge to glue anything to the sparkly side of glimmer paper.  The uneven surface with all the little dips between bits of glitter does not make for a strong surface to surface bond.  So here's a quick summary of my experience with adhesives and glimmer paper.
  • I love my SNAIL adhesive and I use it almost exclusively on my cards. Its quick and easy and makes a very satisfactory paper to paper bond . . . . but, in my experience double sided tape does NOT work on the sparkly side of glimmer paper.
  • The liquid tombo glue is a wonderfully strong adhesive for most paper projects, I use it a lot . . . . but even this does not hold well for me on glimmer paper. I think because the surface of the glitter is smooth so there's no fibers for the glue to sink into.
  • By far my best results come with using Glue Dots

Any adhesive presents a challenge when working with a transparent material like the Window Sheets. My solution was to add the stars to the front so I could hide the glue dots behind them. 

Star Card made with Stampin'UP!'s Blushing Bride Glimmer Paper and acetate Window Sheets

And the bonus is I really loved the color combination.  Black with Blushing Bride on white looks really elegant, especially with the sparkle from the glimmer paper.


I hope you like the card and I hope you found the review of adhesives helpful.  Let me know if there's anything else you'd like to see on this blog.  The chart below shows the other product used on this card.

114323s
Window Sheets
 Base Material
[114323]  - $5.00
140550s
Blushing Bride 
Glimmer Paper
[140550]  - $5.00
122497s
clear mount  [122497]  - $21.00
wood mount  [128706]  - $29.00 
133787s
Itty Bitty Accents 
Punch Pack  
[133787]  - $17.00
138293s
[138293]  - $16.00
103683s
[103683]  - $5.25
119856s
[119856]  - $18.00
119855s
[119855]  - $16.00


Thanks for Stopping by: Take a minute and browse previous posts. If you see anything you like I'm happy to help you get the product or just to consult and explain further how the project was made . . . its all about having fun with our hobby. There are also ordering links under my signature.

Class Calendar: StampLadyKatie 

Are you local to the Madison/Dane county area?
The March class:  Designing with DSP (Designer Paper)


click here to see Stampin'UP!'s Deal of the Week
new each Tuesday - Weekly Deals

Click here to see whats on Stampin'UP!'s Clearance Rack
Up to 80% Savings Clearance Rack
Stampin'UP!'s Annual Catalog
2015-2016
Annual Catalog
Stampin'UP!'s Spring 2016 Occasions Catalog and Sale-a-bration Brochure
2016 Catalog       Sale-a-bration Brochure

* * * Buy it Here * * *
Order Stampin'UP! products here I'll be happy to help you place your order 
Order Stampin'UP! products here If you're ordering on-line then use this Hostess Code 
 to be registered for my Customer Rewards Program 

S7HNWFAD (good thru - Feb 29th)

Subscribe:  Fun Monthly Kits
  Sign-up HERE
(only $19.95/month)  www.MyPaperPumpkin.com
Sign-up for Stampin'UP!'s Monthly Craft Kit, the kits are called Paper Pumpkins (but they don't make pumpkins)
  • Your card is charged on the 10th of the month
  • Your kit ships around the 15th.
  • You can suspend the subscription in a busy month
  • No minimum commitment, you can quit anytime.
  • See what others have done (on Pinterest)
  • See what others have done (Facebook Group)