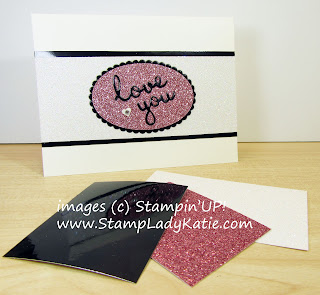
This card features a die cut technique called Inlay. If you were to run your finger over the words they would not be raised up - they have been 'laid into' the base paper. Its one of those "wow" cards where people will ask you how you did it. And we love to hear people say that about our projects, right?
The concept of an inlay is very simple (product list is at the end of the post)
- die cut the words from black foil paper, and throw away all the little pieces from inside the words
- die cut the words again from the pink glimmer paper so you'll have a hole to place the black foil into. AND SAVE ALL THE LITTLE PINK PIECES so you can put them back into the spaces in the black words.
The bonus is that now you have pink glimmer words to use on another project - yay!
The concept was simple, the actual construction was a bit of a challenge because those little centers from the loops on the words are very tiny. For me the best way to accomplish this was to use a pick tool to dab a bit of liquid glue on the back and then use that same pick to maneuver the piece into its hole. Yes, I know. its very fussy. But so worth it with the final look.
Having the right tools helps: I love the liquid multipurpose glue, its a good strong glue that dries fast. A paper piercer is so useful, if you've been crafting for any length of time you have one of these laying around. You can put your puddle of glue on any non-porous surface, I used my Silicone Craft Sheet. This sheet has a ton of uses, I'll save those comments for another post. These three items are basic supplies for every paper crafter and I'll put links to these basic supplies in the product list below.
Its all about the papers! Did you notice there is no stamping on this card? This card is all about the papers and how they sparkle and contrast. Stampin'UP! papers are the best! This card uses both the pink and white glimmer paper which pairs well with the gorgeous shiny black foil. The words on this card are from the Well Written die set, but you could accomplish this look with any set of dies you have.
Has this post stimulated some creative thought for you? Time to head to your craft supplies and try out this inlay technique. By the way: I usually keep a few sheets of all the glimmer and foil papers in my craft stash so I'm ready whenever inspiration strikes. Its a great time saver to have them on-hand when I'm inspired to try a new project.
I hope I have inspired you to try this technique. I'd love to hear your comments below. I'm happy to answer questions about this or any other project. I can also answer questions about the advantages of joining Stampin'UP!

If you haven't browsed the Stampin'UP! store I encourage you to spend a little time there. This is a great company with wonderful product. I do receive commission on sales and I appreciate your business - thank-you. My commission is paid by the company, you pay nothing extra when purchasing product through me.
Because I do appreciate your business, you can earn extra rewards when you shop with me
Just be sure to use the Rewards Code for the month (found in the left pane of the blog) when you place your on-line order.
Because I do appreciate your business, you can earn extra rewards when you shop with me
Just be sure to use the Rewards Code for the month (found in the left pane of the blog) when you place your on-line order.
Links by TheseAreMyStamps.com


2 comments:
Love this technique! Heading to the craft room now to try it out. Also love the colors that you chose.
Diann Benafield
Thanks Diann
I love the contrast of black with soft pastels.
Post a Comment