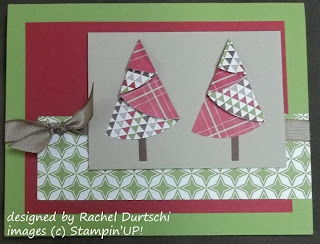
 Isn't this a cute card? We learned how to make this folded Christmas Tree
at our last demonstrator meeting. I've seen cards like this before but
I'd always thought it looked complicated and I was afraid to try folding the
Christmas Tree. I was so wrong - its amazingly easy.
 Our group meets once a month and I always get such great ideas. This was the card we all made as one of our group projects. By the way - I can bring a guest to these meetings. Are you local? You learn so much and you get free cards. Contact me if you'd like to attend.
Here's how I switched it up for an event I just did. I switched it for several reasons. First, my card has only 1 tree instead of 2 and that was just a time factor.
Speaking of time - the glitter glue snow drifts add time. But only because of the time to dry. Its super easy to lay down a line of the glitter glue and cards are so much better when you can add some sparkle. Stampin'UP!'s glitter glue is called Dazzling Details.
 The second reason for making my card different is because I wanted a chance to play with my new embossing folder. Its called Pretty Print. You can't really read it but I like the nice texture for this background.
The tree is made from a half-circle of Designer Paper. Here is a link to step-by-step photo instructions of how to make the tree. This is an easy idea for using up some scraps of Designer Print Papers
and it works with ANY SIZE circle.
This would make a quick and easy Holiday card. And Stampin'UP! makes is easy to mass produce any card using Designer papers. The papers used on both these cards now come in 4-1/2 x 6-1/2 pads rather than the large 12x12 sheets. The blue papers are from the Winter Frost Paper pack and the red/green/brown paper is from the Season of Style paper pack. You can see all the new Christmas product HERE.
 You can order all your Stampin'UP! product from my on-line store.
Its delivered right to your own home.
Happy Stamping
--Katie
and it works with ANY SIZE circle.
This would make a quick and easy Holiday card. And Stampin'UP! makes is easy to mass produce any card using Designer papers. The papers used on both these cards now come in 4-1/2 x 6-1/2 pads rather than the large 12x12 sheets. The blue papers are from the Winter Frost Paper pack and the red/green/brown paper is from the Season of Style paper pack. You can see all the new Christmas product HERE.
 You can order all your Stampin'UP! product from my on-line store.
Its delivered right to your own home.
Happy Stamping
--Katie


1 comment:
Thank you for this. It is the simplest instruction I have seen! md
Post a Comment