Wednesday, April 29, 2015

Playing with Lay-outs - This Versatile Lay-out Makes 2 Totally Different Cards

Here are 2 cards, both with the same lay-out, yet they look totally different. 

Card made with Stampin'UP!'s Open Sea Stamp Set Card made with Stampin'UP!'s Stippled Blossom Stamp Set
stamp set:  Open Sea                                                      stamp set:  Stippled Blossoms

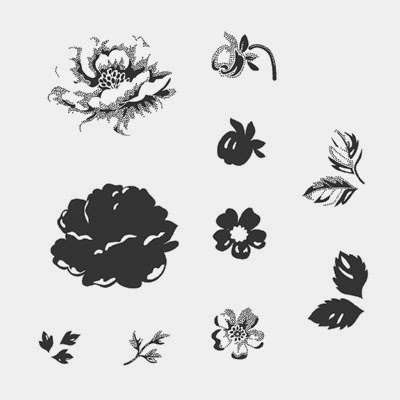
Stampin'UP!'s Open Sea Stamp Set                       Stampin'UP!'s Stippled Blossom Stamp Set

Both cards use the Chevron Embossing folder on the bottom half of the card front. I love texture embossing, its a great way to add some depth and dimension to a project. You can also add texture with ribbon or twine, like the Linen Thread on these 2 cards.

The sentiments on the 2 cards are both from a set called Teeny Tiny Wishes.  What a great set! 24 different sentiments to choose from and they all fit in the Word Window punch (the white piece on these cards). Then to make it look pretty I layered the sentiment on a colored piece that was created with the Modern Label punchFYI: The Modern Label punch is on the retirement list - boy am I going to miss that one. I use that punch a lot!

Speaking of retiring, the flower stamp set is on the retirement list too. Its a 2-step stamp set called Stippled Blossoms. If you look close you can see the 2 images stamped to make the flower: The solid lighter body of the flower and the darker detail on the petals.  

For Stampin'UP! fans the catalog transition time is always exciting. We know there's going to be some amazing, wonderful new stuff coming - but we also want to make sure we have everything from the retiring catalog before its gone for good.


Stamps are guaranteed to be available through May 26th.

Everything else is available only while supplies last

In my experience I suggest checking the list sooner rather than later
and if there's something there you want, I'd get it now before its gone
and the good news is - more than half the stuff is also on sale
anywhere from 15% up to 50%


Find something you like? I'll be happy to help you place your order 
Or if you're ordering on-line then use this Hostess Code 
 to be registered for my Customer Rewards Program
2AXK3K9Q  (good thru - April 30)
Thanks for stopping by.


* * * Find a deal  * * *
**Up to 80% Savings
on Clearance Rack Items


**Don't miss the Weekly Deals 
new product each Tuesday


Monday, April 27, 2015

Table Favor with the Curvy Box Thinlet Die

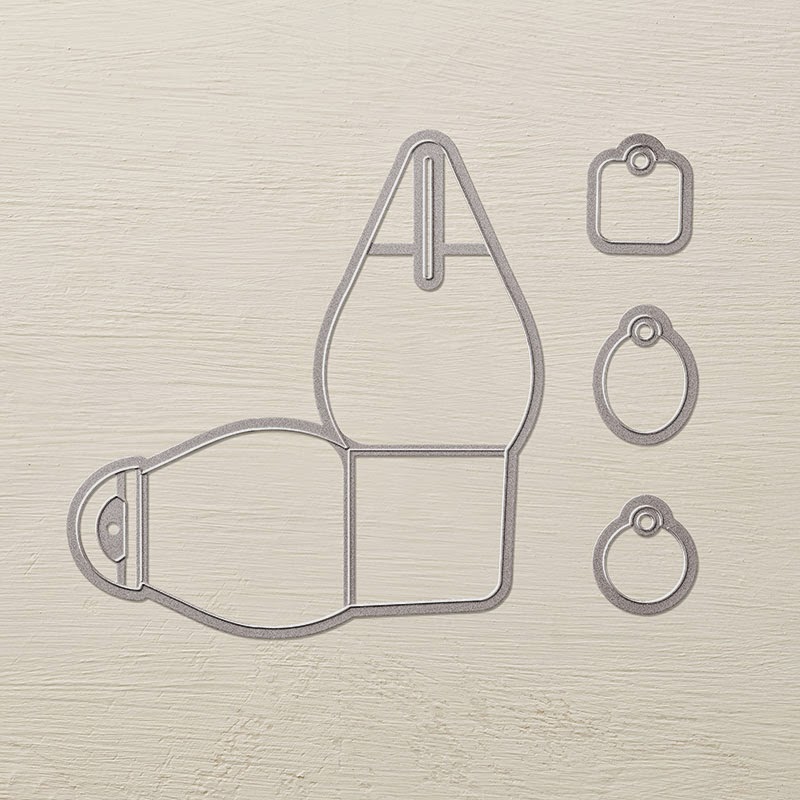
This pretty little box was die cut using the Curvy Box Thinlet Die.


The small round label used on this project is one of three labels that comes with the Curvy Box Thinlet.  The label is embellished with a ribbon rose and tied to the box with some Silver Thread Baker's Twine.
Stampin'UP!'s Curvy Box Thinlet Die


Table Favor for a wedding shower or baby shower made from Stampin'UP!'s Curvy Box Thinlet Die 
The silver threads in the Baker's twine are a pretty good match for the Smoky Slate ink used to stamp the lace on the box.  

For this project I used the Something Lacy background stamp on 2 sides of the box. I stamped the lace on alternate sides - there wasn't any special reason not to stamp all 4 sides.  You'd just get a different look to the project.

Wouldn't this cute little box make perfect a table favor for wedding guests or for a bridal shower.  I also think it would be  really sweet for a baby shower.


The Curvy Box Thinlet has been a really popular product and its probably retiring. This die was originally in the Holiday catalog last fall and carried over into the spring. We don't know whether it will be in the new catalog or not, so for now we have to assume its retiring.  If this item has been on your Wish List, you might want to get it before its gone. 

Here's a few more projects made with the Curvy Box Thinlet die. These were from a meeting last fall, and FYI: the moustache die is retiring for sure, in fact its on sale, priced for clearance.

Find something you like? I'd be happy to help you place your order, or you can order on-line and have it shipped directly to your house.  Use this Hostess Code (good through April)
I'll be happy to help you place your order 
If you're ordering on-line then use this Hostess Code 
 to be registered for my Customer Rewards Program
2AXK3K9Q  (good thru - April 30)
 
 
Thanks for stopping by.


Friday, April 24, 2015

Shaker Card Congratulations

Retirement? - Graduation? - Promotion? - Wedding?
How about giving a Shaker Card?
It doesn't really matter the occasion or the age 
- everyone loves a card that does something.

Congratulations Shaker Card made with sequins

The concept of a shaker card is simple
you need to create a closed container for little pieces.
The little pieces here are some star and heart sequins. (soon to be retiring).

The lid of the container is the front of the card
For this card I first stamped my sentiment . . . from the Bravo Stamp Set
Then I punched a 1-3/4" circle.
And on the BACK side adhered a 2-1/4" square of Acetate Window Sheet.

How to make a Shaker Card

Now for the container itself. You'll need a thin strip of dimensional foam.
Stampin'UP! currently carries the perfect product, 
a set of concentric foam rings made for Shaker Cards.

How to make a Shaker Card

I used the largest of the Shaker Frames
which I stuck on a 2-1/4" piece of white paper
Filled with some sequins
and carefully positioned the hole over the foam
i.e. I put the lid on the container.

The final steps are to finish the front of the card.
I cut banners by hand from thin strips of card stock in colors to match the sequins
I created the scallop frame by first punching the 1-3/4" hole 
and then centering the hole in the Scallop Circle Punch.

How to make a Shaker Card

Voila! This is a super fun card to give and an easy card to make.

Shaker Card made with sequins
So I mentioned that the sequins are retiring
so are the Shaker Frames.

Stamps are guaranteed to be available through May 26th.
Everything else is available only while supplies last

In my experience I suggest checking the list sooner rather than later
and if there's something there you want, I'd get it now before its gone
and the good news is - more than half the stuff is also on sale
anywhere from 15% up to 50%


Find something you like? I'd be happy to help you place your order, or you can order on-line and have it shipped directly to your house.  Use this Hostess Code (good through April)
I'll be happy to help you place your order 
If you're ordering on-line then use this Hostess Code 
 to be registered for my Customer Rewards Program
2AXK3K9Q  (good thru - April 30)
 
 
Thanks for stopping by. Time to go "Shake" things up.

Thursday, April 23, 2015

Koala Bear Punch Art with Retiring Top Note Die

The Retirement Lists have been posted.  If you're new to Stampin'UP! you may be wondering what the fuss is all about. Well, our annual catalog expires the end of May. In order to make room in the warehouse and in the new catalog for some wonderful amazing new product, it means we have to let go of some old favorites.  See the Retirement List here.

Today's project is this adorable Koala Bear card. Oh my gosh! He is so cute.  I just got him recently in a demonstrator trade, he's made by Tina Petko

Punch Art Koala Bear card made with the Top Note Die

Tina went all out on her project.
This card is actually a gift card holder.  How cool is that?
Punch Art Koala Bear Gift card holder made with the Top Note Die

In our demo group when we do a punch art trade we always include the "recipe", 
so I'm posting that for you here too.
Recipe for the Punch Art Koala Bear card made with the Top Note Die

Don't you love how easy it is to read this punch art recipe? This project showcases 2 retiring products: The Top Note Die and the Blossom Punch.  I'm really gonna miss them.  They're both really versatile. You can do so much with them. Oh and I just noticed, his nose is the Small Oval punch which is also retiring.

As a demonstrator I stop using product after it retires.  Only because I can't sell it anymore.  But YOU can use it and love it forever!  And speaking of loving something - most of the retiring tools are on sale.  The Blossom Punch for example was $16.95 and its on sale for only $8.48.  Wow!  If you like saving money it might be worth it to spend some time browsing the retirement pages.

FYI - re availability: Stamps are guaranteed available through May 26th. After that its "while supplies last".  And paper, ink, tools and embellishments are all only available until they're gone.  In fact some stuff is already gone so don't delay - check the list now.

Find something you like? When you find that great deal I'd be happy to help you place your order, or you can order on-line and have it shipped directly to your house.  Use this Hostess Code (good through April)
I'll be happy to help you place your order 
If you're ordering on-line then use this Hostess Code 
 to be registered for my Customer Rewards Program
2AXK3K9Q  (good thru - April 30)
Thanks for stopping by
Tina's cute Koala Bear Punch Art card is cute enough to inspire anyone to head to the craft room and play.


Wednesday, April 22, 2015

Easy Bow for the Decorative Window Gift Box

Here's a classy looking little gift box. The box itself is Stampin'UP!'s Decorative Window Gift box. It comes flat in the package and you just fold to assemble. The acetate window and the white printed trim are nice. But with a little Vanilla Satin Ribbon and some Crochet and Gold Sequin trims you can really dress it up.

A decorated Gift Box

Check out this cool way to make the bow.

How to Tie a Bow
Fold the ribbon in half and bring the loop under the box
with the loop pulled up level with the top of the box
as shown.

Thread one of the loose ends through the loop
and tie them together.

How to Tie a Bow
Tag for the Decorative Window Gift Box

Assemble your Tag. This one was made with the Note Tag Punch on Vanilla Cardstock and embellished with a Petite Petals flower punched from Crumb Cake Paper. Add a little Pearl popped up with a Dimensional and Voila! 
  • Punch a 1/4" hole in the tag and thread some Linen thread through the hole.
  • Fold a 3" piece of Crochet trim in half and lay it over the Thread. Do the same with a 3" section of Gold Sequin Trim.
  • Tie a knot to hold the trim to the tag and then thread one of the loose ends of the thread through the bow on the box to secure it to the box.

Tag for the Decorative Window Gift Box

FYI: The Gift Boxes are on the Retirement List. This is the last 6 weeks for the current catalog and we just got the list of what's retiring. 
**The Good News is that because they're retiring, they're on sale.
**The Bad News is that because they're retiring, they're only available while supplies last.

Click Here to see the full Retirement List.
  • Stamps are guaranteed available through May 26th.
  • Everything else is "while supplies last"
  • The list will be updated daily and somethings are already unavailable. 

Thanks for stopping by and I hope you've been inspired to play today
And if you like what you see you can purchase all the product used on this project from my Stampin'UP! store.  Links provided below.


* * * Find a deal  * * *
**Up to 80% Savings
on Clearance Rack Items


**Don't miss the Weekly Deals 
new product each Tuesday


* * * Make a Purchase * * *
I'll be happy to help you place your order 
If you're ordering on-line then use this Hostess Code 
 to be registered for my Customer Rewards Program
2AXK3K9Q  (good thru - April 30)

* * * Browse the Catalogs * * *
2014-2015 Annual Catalog
**Annual Catalog
 (PDF)
2015 Spring Occasions Catalog
**Occasions Catalog 
(PDF)

**See what's still available from
the Fall Holiday Catalog
 

Friday, April 17, 2015

Gold Star Shaker Card

A shaker card is perfect for celebrating anything. People just love a card that does something. And it doesn't matter your age.  Kids love 'em and so do grandpas. 

Shaker Card made with Stampin'UP!'s Confetti Stars Border Punch

The card is even more fun when the shaker window is a special shape. For this card the shape is a balloon - although with the Baker's Twine bow its hard to tell the shape isn't just a plain circle. I made the shape with Stampin'UP!'s Balloon Framelits die

Shaker Card made with Stampin'UP!'s Confetti Stars Border Punch

I love all the gold on this card. Gold Baker's twine, gold embossing on the sentiment (from a set called Sassy Salutations). And Gold Foil backing paper.

The stars in the shaker window were punched from a scrap sheet of gold foil paper using the Confetti Stars Border Punch. I used the Confetti Stars punch on the bottom of the white piece too so that the gold foil paper would be visible through the holes.
Star border punched with Stampin'UP!'s Confetti Stars Border Punch

How to make a Shaker Card:
1. Punch or die cut the hole
2. Adhere a sheet of Acetate over the back of the hole (to keep in your little pieces)
3. On the back of the acetate, use foam Dimensionals, to create a wall around the hole.
    The Dimensionals have enough depth to allow the little pieces to move around. 
4. Add your little pieces and cover with a backing material. 
    You should now have sealed shaker compartment
5. Adhere to your project.

Thanks for stopping by and I hope you've been inspired to play today
And if you like what you see you can purchase all the product used on this project from my Stampin'UP! store.  Links provided below.


* * * Find a deal  * * *
**Up to 80% Savings
on Clearance Rack Items


**Don't miss the Weekly Deals 
new product each Tuesday


* * * Make a Purchase * * *
I'll be happy to help you place your order 
If you're ordering on-line then use this Hostess Code 
 to be registered for my Customer Rewards Program
2AXK3K9Q  (good thru - April 30)

* * * Browse the Catalogs * * *
2014-2015 Annual Catalog
**Annual Catalog
 (PDF)
2015 Spring Occasions Catalog
**Occasions Catalog 
(PDF)

**See what's still available from
the Fall Holiday Catalog