Wednesday, August 28, 2013

Besty's Blossom with a Banner

Card made with Stampin'UP!' stamp set: Betsy's BlossomsThis is a really simple design: one large flower for a focal point accented by a banner on the side for the sentiment.  The flower I used is from a set called Betsy's Blossoms, although any large flower you have would work for this design. 

What color combination would you use?  This late in August I'm seeing lots of sunflowers in my garden, so the yellow and black just seemed like a good combination. 

This flower was so large I just felt it needed the rhinestone in the center to break up the large expanse of color. The sponging around the banner helps it stand out from the black background and also to balance the color.

The banner to the right could be sized to fit any medium to small sentiment. The sentiment I used is from the My Paper Pumpkin Welcome Kit. Actually the banner is from the July My Paper Pumpkin Kit (The one with the Cake Topper). 
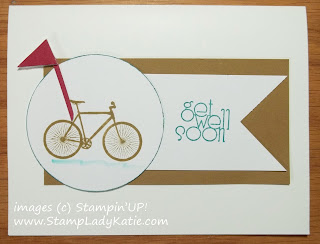
card made with stamps from Stampin'UP! set: Delightful Dozen and the August Paper Pumpkin KitThis design would work for so many different stamps.  It doesn't just have to be flowers.  For the second card I used the bicycle from the My Paper Pumpkin August Kit and a sentiment from a set called Delightful Dozen.

Are you starting to think about stamps you own and what would work for this design?  You could turn it around too and put the banner on the left side.  Time to hit the craft area and play.

Thanks for stopping by

Tuesday, August 27, 2013

Punch Art Bee with a Honeycomb Background Stamp

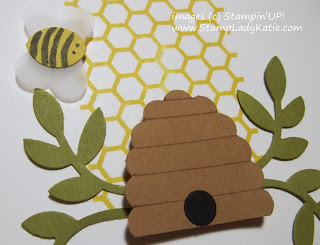
Punch Art Bee card made with the Honeycomb Stamp from Stampin'UP!'s July My Paper Pumpkin Craft KitThis punch art bee and beehive was inspired by the honeycomb background stamp. This "sweet" background stamp (pun intended) came in Stampin'UP!'s July "My Paper Pumpkin" kit. 

People have asked me what type of stamps come in these monthly kits.  So far they have been mostly sentiments  and background stamps. And the sentiments have been fairly generic (thinking of you, hello, thanks etc). However, the sentiment I used on this card was not one of the My Paper Pumpkin kit stamps, it came from a set called Friendly Phrases

The stamp collection I'm building up through the "My Paper Pumpkin" monthly kits is a very versatile set of background and sentiment stamps and I'm having a lot of fun playing with them.  The kits also come with little 1" ink pads so when you subscribe you also build up a set of ink pads.

Punch Art Bee card made with the Honeycomb Stamp from Stampin'UP!'s July My Paper Pumpkin Craft Kit
Here's how to make the punch art bee & hive 
The beehive is a scallop oval punch that I cut off the bottom half and drew lines on. 

The leaves are from the Bird Builder Punch.

The bee's body started as a 1/2" circle. Then I attached a post-it to use as a handle and re-punched with the circle punch (as shown below). 

The bee's wings are hearts punched from vellum cardstock.

How to use a circle punch to make a Punch Art Bee body
I made this card to share with my subscribers. I send a monthly email to everyone who subscribes to the kits through me - to give ideas for additional uses for the stamps and inks and other supplies that come in the kits.

Subscribe today 
and get the first 2 months at half price!

Stampin'UP!'s half-price special on the Monthly Craft Kits ends Aug 31st. If you like the idea of the monthly kits then subscribe today and you'll get the first 2 months at half-price.  Normally the kits sell for $19.95 a month (+tax). But when you subscribe during August you'll get the first 2 months at half-price.
  • NO CONTRACT - you can quit any time
  • VERSATILE - You can put the service on hold to suspend it for a month or more
  • QUICK EASY PROJECTS -designed to be finished in 30-45 minutes
  • EVERYTHING INCLUDED - pre-cut paper, inks, stamps, embellishments.
    You just need your adhesive and you're ready to play.
  • DELIGHTFUL SURPRISES - we never know what we get until the box arrives. Cards? mini-album? something else?  what fun!  (and if your papercrafting is limited to cards, no problem, just use the supplies for cards - in truth thats what I do and I send you photos of my projects.)
 Its a very sweet "honey" of a deal. 


Stampin'UP!'s My Paper Pumpkin monthly Craft Kit Sign-UP buttonSign-up HERE or click the pumpkin to the right.

To get the half-price deal enter the promocode:  PUMPKINDEAL
To get my monthly emails with additional ideas be sure to list me as your demonstrator, Katie Johnson, Stoughton Wisconsin. Then send me an email asking to be on the list.


Monday, August 26, 2013

Honeycomb Background Stamp

Card made with stamps from Stampin'UP!'s My Paper Pumpkin monthly craft kits.This honeycomb background stamp came from the July "Paper Pumpkin Kit". My Paper Pumpkin is the name of Stampin'UP!'s monthly craft kits.

The monthly craft kit comes with everything you need to make a simple craft project.  Ink, Stamps, pre-cut papers, ribbon other bling. Everything is there, you just need your own adhesive.

Past kits have included cards, a mini-album and a cake topper. You never know what comes in the kits, they're always a surprise. And even if you don't like what the kit is intended to be, you can always use the parts for cards.

If you follow this blog you can tell that in fact, most of my projects are cards. I confess, I didn't make the cake topper from the kit, instead I used the parts for cards. 

Inks and stamps from Stampin'UP!'s July My Paper Pumpkin Craft Kit
These were the inks and stamps we got with the Cake Topper kit.  I LOVE the background stamps and used the honeycomb one on this card. These three background stamps are a very useful addition to my collection.


The sentiment on the card is from the My Paper Pumpkin Welcome Kit. When you subscribe this is what you'll get with your first kit. After that you'll be cycled into what ever the current kit of the month is. Check HERE to see more cards I made with the stamps from the Welcome Kit.

Do you like the idea of a Monthly Craft Kit?  
  • The kits are normally $19.95 a month plus tax (shipping is already included).
    if you subscribe before the end of August you can get your first 2 months at HALF-PRICE. Get the first 2 months for only $10 a month, after that the price reverts to the normal $19.95 a month.  
  • You can quit any time. There is no minimum subscription period
  • Best of all, you can suspend the service for how ever long you want and then pick it up again when ever you want.
Go to www.MyPaperPumpkin.com to subscribe

I support you in this creative adventure! If you choose me as your demonstrator: Katie Johnson of Stoughton, WI - I'll send you a monthly email with images of alternate projects I've made with the kit contents and ideas for how to use the extra stuff you get in the kits.

Send me an email when you subscribe. As soon as I see your name on the list I'll send you my photofile of ideas for the Welcome Kit.

I've enjoyed getting these monthly kits and I think you will too.


Friday, August 23, 2013

Retired Product Rummage Sale


No time for a proper post today. Busy with the retired product rummage sale.

Are you local to Dane county.  
Stop today or Saturday for some great deals.

Over 200 stamp sets
plus inks, paper, punches and more

Thursday, August 22, 2013

Flower Shop and Pansy Punch

Card made with Stampin'UP!'s Flower Shop Stamp set and Pansy PunchIts mid-August, the season when our gardens are giving us their best. Our yard has lots of flowers in addition to the vegetables - almost enough to start our own Flower Shop.  And speaking of flower shops, that's the name of the stamp set used on this card.

The Flower Shop stamp set has 6 flowers in a wide range of styles. I liked the playful look of this flower image for this card. Actually it was kind of hard to choose because they're all nice.


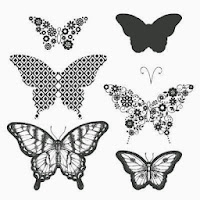
And of course where there's flowers you'll find butterflies.  This butterfly image is from a set called Papillon Potpourri.


There's lots of little extras on this card.  The scalloped edge on the white card face, the ribbon, and the dimension on the butterfly wings and the flowers.  I used a bone folder to curl the flower petals and folded the butterfly's wings up before adhering them to the card. Oh yeah, and I added some of Stampin'UP!'s glitter glue, Dazzling Details, to the center of the flowers and to the butterfly wings.

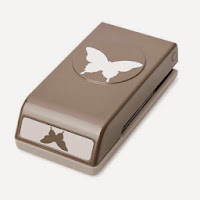
But the best thing about this card - at least in my opinion - is the matching punches.  I'm not one much for "fussy cutting" so I am really glad that Stampin'UP! makes punches to match the stamps.  For the butterfly its the Bitty Butterfly Punch and for the flowers its the Pansy punch.

What do you think? I couldn't decide which I liked better: vertical or horizontal.  Leave a comment below if you'd care to share an opinion.

And here's another great thing, Stampin'UP! is now "bundling" some product.  If you like the butterfly, you'll have to buy the stamp set and the punch separately. But if you like the matching Pansy Punch and Flower Shop stamp set you can get them as a bundle and save 15%
 
Contact me if you need a catalog.
And if you put "flower shop" into the search box, including the quote marks, it will show you the bundles.

Thanks for stopping by

And if you're local to Dane county be sure to stop by on Friday or Saturday for my big Retired Product Rummage Sale.


Wednesday, August 21, 2013

Wetlands

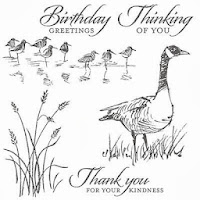
Card made with Stampin'UP!'s Wetlands Stamp SetThis group of shorebirds is from one of the new stamp sets. The set is called Wetlands and I love the realistic images in the set.

The advantage to buying stamps as sets is that you get images that match in style and size, they coordinate well to create a scene. I've been playing with this set a lot recently - its definitely one of my new favorites.

Stampin'UP!'s Wetlands Stamp Set


What do you think about the sentiments in the Wetlands set? I really like the font. Its such a beautiful script with a somewhat formal look that would look good on either a masculine or feminine card. And the sentiments themselves, "Thank-you", "Birthday" and "Thinking of you" cover a wide range of needs.

Close-up of the card made with Stampin'UP!'s Wetlands Stamp Set

Do you like the colors on this card? Its Old Olive and Soft Suede on a Naturals Ivory card base.
The plant stamp was colored with markers directly on the stamp.
The birds were stamped in StazON and then I used markers to color the water blue and the shadows the light brown.


You can get the Wetlands Stamp set and all your Stampin'UP! product HERE
On-line orders over $25 qualify for my Customer Rewards Points.


Thanks for stopping by
--Katie

By the Way:  If you're local to the Madison/Stoughton/Dane Co area then stop by Friday or Saturday for my Retired Product Rummage Sale.  I live in rural Stoughton, contact me for directions.

Saturday, August 17, 2013

Christmas Card Buffet

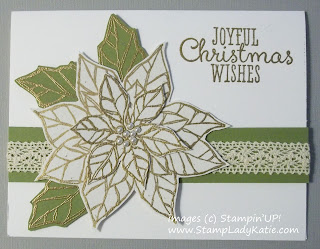
White Poinsettia Christmas Card made with Stampin'UP!'s set: Joyful ChristmasDo you send home made Christmas Cards? Want an early start on making your Christmas Cards? Sign up now for my Christmas Card Buffet.

As you'd expect with any buffet, there will be choices:
  • You'll pay for a minimum of 10 cards, but can choose to make more.
  • There will be multiple designs to choose from and you can choose WHICH designs you want to make and HOW MANY of each.
Poinsettia Stamps in Stampin'UP!'s new Joyful Christmas Stamp Set 
This card will be one of the choices. It was made with one of the new Christmas sets called Joyful Christmas. The poinsettia on this card was stamped on white paper, gold embossed and cut out to layer the petals. At the Christmas Card Buffet you'll have the choice of making this card as a White Poinsettia or a Red Poinsettia. And of course there will be lots of other card designs to choose from too.


Sign up today. Its an open house format all day Saturday Sept 21st.  come anytime between 9am and 4pm. and be sure to leave yourself  a couple of hours of stamping time


Hope to see you at a stamping event soon
Happy Stamping
--Katie

Wednesday, August 14, 2013

Washi Tape Accents

Card made with Stampin'UP! Washi Tape and Serene Silhouettes Stamp SetAre you familiar with a product called Washi Tape? Essentially its decorated masking tape. On this project the Washi Tape is used to add a splash of color behind the main focal point. I could have used Designer paper or ribbon or plain colored strips of paper. The advantage of using Washi Tape is that 
  • its already sticky, 
  • its already decorated 
  • and it tears off the roll easily.
Quick and easy is a wonderful concept.

And - you can use Washi Tape to decorate all sorts of things. Its like having a sticker made with Designer Papers.
  • The colors are vibrant. 
  • There is an amazing selection of patterns. 
  • And because its a low mask adhesive you can use it on lots of things besides paper without worries about the adhesive damaging the surface.  
Just imagine what else you can decorate with Washi Tape: school notebooks, lockers, lamp shades, flower pots, wall outlets, your water bottle or lunch box,  picture frames, pencils, luggage tags, glasses case, camera, iPad . . .

Stampin'UP! carries 4 assortment packs for a total of 12 different designs.
Stampin'UP! Washi Tape
Epic Day Washi Tape
Stampin'UP! Washi Tape
Gingham Garden Washi Tape
Stampin'UP! Washi Tape
Season of Style Washi Tape
Stampin'UP! Washi Tape
Witches Brew Washi Tape


By the way, the stamped image on this card is from a set called Serene Silhouettes.  I just punched some small circles to add color where the flowers go.

So, what do you think of Washi Tape?  Pretty cool, huh?  Leave a comment below with your experience using Washi Tape. It sure does make it quick and easy to add a splash of color to a project. 
 
Shop my on-line store for Washi Tape 
and all your Stampin'UP! needs.


Tuesday, August 13, 2013

July Card Class Samples

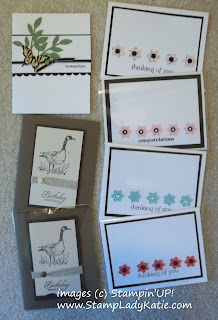
Cards made at the July Senior Center Classes
My goodness I'm behind.  Today I am getting ready for the August Events in Oregon, Monona and Verona and I realized I'd never posted the cards from July.  So here they are: the 3 cards we made at the July Senior Center Class.

The Technique of the Month was using Designer Papers to color an image.  The card in the upper left was our sample card.  You can see an explanation of coloring with DSP HERE.

The card on the right was intended to show a quick simple way to use DSP scraps. If you're like me you probably have lots of little pieces of Designer Papers that are just too pretty to throw away. A small flower punch and a few rhinestones and voila.

Its so fun doing these classes.  I love teaching the techniques and tricks. And of course, I love the opportunity to play with lots of different stamp sets. And I especially love being a part of each of the groups.  The people who attend these classes are a super friendly, talented group. They welcome new stampers and share ideas with each other.

You are welcome to join us at any of our events.  The same event repeats at each of the centers so if you miss one date/location you can always catch up by attending at a different location.  

Check the events calendar HERE.
And you can RSVP here too. We stamp:
**the 2nd Wednesday of the month in Oregon, starting at 9am
**The 3rd Thursday of the month in Monona starting at 1pm
**And the Verona group is just starting, we don't yet have a permanent calendar slot, but our events are posted
.

If you're local I'd love to meet you - and you'd meet some great people too.

Thursday, August 8, 2013

Paper Pumpkin Stamps

Card made with Stampin'UP! Washi Tape and stamps from The Paper Pumpkin Welcome KitThis card was made with stamps from the Paper Pumpkin Welcome Kit. I'm a bit behind in posting cards from convention - this was my contribution to our ShoeBox Trade.

There's lots to say about this card, but for now I'll be short and just say that the stamps on this card are from the Paper Pumpkin Welcome Kit.  

What is the Paper Pumpkin Kit???  This is Stampin'UP!'s cute name for a monthly craft kit subscription service by mail.
  • You get a new kit each month, always a surprise
  • Projects vary - they could be cards, mini-albums or something else paper crafty
  • Projects are quick and easy and EVERYTHING is included, you just need adhesive
Normally the kits are $19.95 a month, but when you sign-up during August using the special promo code you'll get your first 2 months for only $10 a month. Promo code:  PUMPKINDEAL

  • Would you like a quick easy project each month? Easy to assemble and all the planning is done for you.
  • Looking for a way to build up a supply of ink pad colors at a manageable price and pace?  Each kit comes with a little 1" ink spot. Use them like a regular ink pad and they can be re-inked too!
  • Want to build up a supply of basic stamps?  So far the stamps that have come in the kits have been sentiments and background stamps.  I use the stamps from my Welcome Kit all the time.
  • Worried about getting into something you can't get out of?  You can quit this one any time, there are no minimums!
If any of this sounds good to you then consider subscribing - for the promotional price of only $10 a month for August and Sept you just can't go wrong. And you can quit any time.

By the way: I do send out an email once a month with ideas for how to use the extras from the kits.  Ideas for other ways to use the stamps and inks.  So if you do decide to sign-up and if you want my monthly ideas by email then be sure to choose me as your demonstrator for this subscription:  Katie Johnson, Stoughton WI.

These are the stamps from the Welcome Kit.  Don't you love the "splotches"?  What a great background.

And I love the font on the words "hey there". And remember, by inking with a marker you can use just the word "hey" or just the word "friend" or the phrase "hey there".

And here's a few more ideas for how to use them.
Remember: to get the the promotional price for $10 for the first 2 months you have to use the promocode.


Happy Stamping
--Katie

Tuesday, August 6, 2013

July Stamping Technique: Coloring with DSP


Card made with Stampin'UP!'s Papillon Potpourri stamp set and colored with DSPThe August Stamping Technique was "Coloring with DSP" - if you're not up on all the acronyms DSP means Designer Series Papers.  For this card we used the DSP to color the butterfly.

This is such a simple technique. You just stamp on the Designer paper and either punch or cut out the image to apply to your project. There are so many paper designs available, just pick a color and pattern that fits your stamp image.

This image was heat embossed, to make the butterfly image really "pop" off the Designer Paper.

Speaking of the butterfly, I LOVE that Stampin'UP! offers matching stamps and punches.  I could have used a scissors and "fussy cut" the butterfly - but my Elegant Butterfly punch makes this quick and easy. The butterfly is from a stamp set called Papillon Potpourri which was made to go with our butterfly punches.


Stampin'UP! Papillon Potpourri Stamp Set
Papillon Potpourri Stamp Set
available in wood or clear

Stampin'UP! Elegant Butterfly Punch
Elegant Butterfly Punch

Stampin'UP! Bitty Butterfly Punch
Bitty Butterfly Punch

Butterfly image stamped on Designer Paper and punched with Stampin'UP! Elegant Butterfly PunchDo you ever get those annoying black speckles everywhere when you heat emboss in black?  Here's how I solved that problem - I never use black embossing powder anymore.  Now I just stamp in black ink and use clear embossing powder.  I used to use Black Craft Ink, but Stampin'UP!'s new foam ink pads are actually gooey enough to emboss with. So, cool bonus: now you can emboss in ANY color.  I always keep a few extra jars of clear embossing powder on my supply shelf.

Hope you found something useful here.
Happy Stamping
--Katie

Friday, August 2, 2013

The August "Best of . . . " set is Halloween

Have you been collecting Stampin'UP!'s monthly "Best of" stamp sets?  
The newest release is Best of Halloween.  

Why would you collect them? 
  1. because they're darn cute and you want the images - and this months set of Halloween images are great
  2. and once you've collected 6 sets
    you get a FREE $14.95 stamp set
  3. because you like to collect things...
I confess my husband I and have had many conversations on the concept of collecting things for the sake of the collection itself. But I can totally go with the first 2 reasons. Turns out that the house and the tree were 2 of my favorite Halloween stamps and I'm so glad they've returned for this fall season.

Here's an old Halloween card I made with the tree image that's being re-released as part of this "Best of" Set.  

To get that moon behind the tree I punched a circle from a post-a-note and sponged the rest of the white piece with grays and purples.  Then I removed the post-it and stamped the tree.

I am definitely getting this "Best of" set and I can't wait to start playing with these wonderful spooky images.


So lets talk about the FREE set for just a minute.

First: Stampin'UP! is releasing a new "Best of. . ." set each month. But they're all available until March 31 of 2014

Second: each set is only $14.95 and comes in clear mount only.

Third: They also come with a Proof of Purchase sticker. Once you've collected 6 of them you can redeem the stickers for a FREE stamp set up to $14.95 value.


Do you send Halloween greetings?  If so, for only $14.95 you can make some really cute cards with this stamp set.

Thanks for stopping by
Happy Stamping
--Katie