Saturday, June 29, 2013

Stampin'UP!'s Monthly Craft Kit - My Paper Pumpkin

Are you a subscriber to Stampin'UP!'s Monthly Craft Kits?  Each month you get a box with all the supplies (except adhesive) to make a cute set of cards or other paper project. You'll get ink, little stamps, paper, ribbons, stickers . . .  whatever the project needs. Its a neat way to slowly build up a supply of inks and stamps.

Here is a video made by the home office showing the contents of the June kit.


Here's how the subscription works
  • The kit is only $19.95 plus tax (shipping is already figured into the price). So here in Wisconsin its only $21.05 a month.  
  • There is no contract. You can stop the subscription at anytime.
    You can put the service on hold.
    You can change the number of kits you get for any given month. 
  • Subscribe by the 10th of the month to get the kit that month.
  • Its always a surprise!  You never know what you'll get, the only thing you know ahead of time is that it will be cute, fun and easy.
Click HERE to subscribe and be sure to choose Katie Johnson of Stoughton Wisconsin as your demonstrator.  I send additional ideas to my subscribers for ways you can use the left over stuff in your kit.

Happy Stamping
--Katie

A few additional reminders:

Friday, June 28, 2013

Patriotic Brayered Embossing for the 4th of July

4th of July US Flag card made with Brayered Embossing TechniqueThe Technique of the Month for my local stampers is Brayered Embossing. Here is one more card with the brayered emboss technique.  

The square piece for the stars on this flag is a white piece of cardstock that was embossed with the Square Lattice Embossing Folder. Then the blue ink was applied to the raised parts with a brayer.

Actually this card has 2 techniques, the other one is an Embedded Embossing on the stripes. The base of the flag is a red piece of cardstock with 6 white stripes - 1/2" wide each - glued onto the red base. Then the whole thing was run through the Big Shot using the same Square Lattice Embossing Folder.  And finally the star field was glued onto the flag.

The vertical dimensions of the flag were 3.5" (that allows for 13 stripes). Because I made the flag proportionally longer than it was high there was an empty white area at the bottom. So a little red and white Bakers Twine adds the finishing touch.

What do you think?  Its a bit futzy, what with gluing on all the white stripes.  But really, thats the only part where you'd ask yourself why you wanted to make the card.  The brayer part is really fun, its just like painting a wall with a paint roller.  Please leave a comment below.  I'd love to hear your experience with brayering on embossing.  Or what you do for 4th of July cards.

Anyway, thanks for stopping by.  You can get the supplies to make this project and all your Stampin'UP! supplies from my on-line store.  And be sure you check out my Customer Rewards Program.

Happy Stamping
--Katie

Thursday, June 27, 2013

Emboss Resist on the Oh Hello Flower

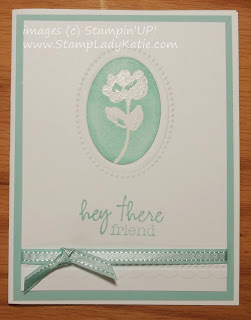
Card Made with Stampin'UP! Oh Hello Set,and Emboss Resist TechniqueI love the look of the Emboss Resist on this flower. This is one of the cards we did at the community center classes this month - the technique is called Emboss Resist.  We had actually learned this technique a year ago, but hey, its good to review, right? 

I just love how how feminine this card looks, the blue is called Pool Party and its a really feminine color of blue.  And the texture embossing on this card also adds to the feminine look.

This is one of those projects where things work better when done in a particular order. 

Card made with Stampin'UP! Needlepoint Borders Embossing folder Card made with Stampin'UP! Designer Frames Embossing Folder

The Emboss Resist Technique really makes the flower pop. You can see more samples of Emboss Resist on my blog by clicking HERE and scrolling down past this post. 
  • This little flower is from a set called Oh Hello.  We stamped it on scrap paper in White Craft Ink and Heat embossed with White Embossing Powder.  
  • Next we sponged on Pool Party ink
  • Then punched it out with the Extra-large Oval Punch, which was designed to fit perfectly inside the Embossed Oval Designer Frame
Truly, this was my favorite card this month. Which one was yours?  If you are one of my local stampers then leave me a comment below and tell me which of the cards we did this month was your favorite.  I'll have a special treat at our next class for everyone who leaves a comment. Ummm - yummy!  OOps - I did not mean to exclude anyone.  Everyone can leave a comment, but you'll have to come to class to pick up your treat.

If you'd like to attend local stamping events then check my events calendar for a date and location  that works for you. The stampers who come to my events are all really friendly and helpful and you'd have a lot of fun.

And by the way, I do private classes too!  Contact me for more details and to set up a date for you and your friends. 608-220-3450

Happy Stamping
--Katie

Wednesday, June 26, 2013

Grab Your Greeting for this Focus on the Sentiment

Card made with Stampin'UP! Stamp set: Sassy Salutations and embossed with the Square Lattice Embossing Folder.
Want to make a card that focuses on the sentiment? First Grab your Greeting, then choose the colors and then decide how to add some interest that allows the greeting to remain the focal point.

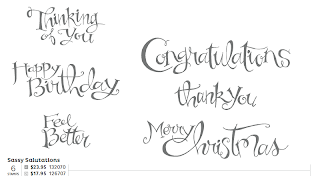
The greeting on this card is from a set called Sassy Salutations.  This Stamp set is part of Stampin'UP!'s "Grab Your Greeting" Promotion.  Wow - 25% off on 3 popular greeting sets.  Its all part of the way we're celebrating the company's 25th anniversary. 

Petite Pairs - Sassy Salutations - Sweet Essentials
Your choice:  wood mount or clear mount

The neutral colors on this card  makes it work for either a man or a woman: Vanilla and  Crumb Cake, and accented with the Linen Thread.

Stampin'UP! BrayerThe decorative piece at the bottom is an example of Brayered Embossing. This was our Technique of the Month for June. Its very easy to do as long as you have a way to texture emboss your paper.  

For this card we texture embossed the bottom half of the Vanilla card using the Square Lattice Embossing folder. Then we applied the Crumb Cake ink to the raised areas of the embossing using a Brayer.  

You use the brayer just like you use a paint roller on a wall.  Its kind of fun actually.  You can move the brayer in any direction and go back to smooth out lines and fill in gaps. Its pretty awesome.


Be sure to check out the 3 Greeting sets on sale. You can see images of the sets in this post. This sale ends soon, so if you'd like any of these sets at the sale price you have to act this month.

You can get any of these sets from my Stampin'UP! Online Store. Also be sure to check out my Customer Rewards Program.  I appreciate your business and this is my way of giving back.

Happy Stamping
--Katie

Monday, June 24, 2013

Fun Foam Can Koozie

Fun foam Can Koozie made with Die Cut flowers
Can Koozie - what a weird word.  I even did a Google search to see if I was spelling it correctly. Anyway, this was my 3D Trade for our Demo event yesterday - a Can Koozie made from Fun Foam.

The flowers  were cut with the Big Shot Fun Flowers Die. I was really pleased with how well the Big Shot handled the Fun Foam. I could easily cut 3 pieces at a time. 

The flowers are held on by an Antique brad. The legs of the brad are long enough to go through all three flower layers and the band that wraps around the can.


Fun foam Can Koozie made with Die Cut flowers
 The construction was pretty easy

1. I cut a rectangle long enough to go
    around the cans.

2. Die cut the flowers
    and adhere them to the rectangle with
    the brad

Fun foam Can Koozie made with Die Cut flowers3.  Die cut a black circle and adhere with
     a small black brad

4.  Apply Sticky Velcro Dots to the outside of
     the can wrap and the inside of the black
     circle.


This is a quick easy project that would be tons of fun for kids to make. And it goes quickly so children will be able to complete it in a single sitting.

Thanks for stopping by

--Katie

Saturday, June 22, 2013

Distressed for Dimension

Want an easy way to add a little dimension to your projects? Try distressing the paper. The wrinkles add depth.

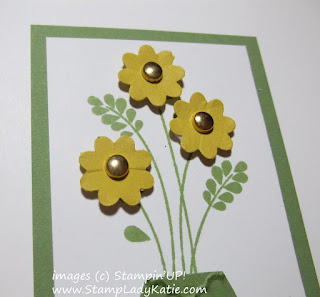
These wrinkles are not random! Notice that the  "wrinkles" all radiate outward from the center giving these flowers a more realistic look than you'd get with random wrinkles. To do this I just laid each flat flower on a spongy surface and pressed hard with the end of my stylus in the center of the flower.

How to distress paper flowers
Distressed paper flowers
Want more even more "dimension"?  Use Dimensionals. To give even greater depth to the flowers they are mounted on little sticky foam pads called Dimensionals

Of course other things can add dimension too.  Below you can compare the card made with these distressed flowers and a 2nd card that uses Designer Buttons in place of the flowers.  These are Stampin'UP!'s Dahlia Buttons.


Leave a comment below and tell me which card you like better.

Thanks for stopping by
--Katie

Friday, June 21, 2013

Oh, Hello - Brayered Embossing

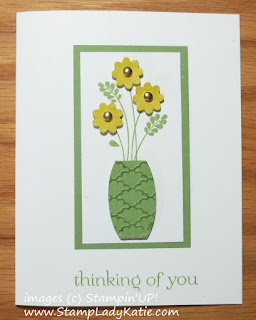
Punch Art Vase Card made with Brayered Embossing TechniqueAre you looking for an easy way to jazz up a project?  Try Brayered Embossing. You can see what brayered embossing looks like on this card.  The technique was used on the vase.

Brayered embossing is a simple concept: you texture emboss a piece of cardstock and then add color to the raised parts.  There are lots of ways to add color to paper, but with this technique you apply the color with a brayer - hence "Brayered Embossing".

This card was embossed with the Fancy Fan embossing folder. The ink that was brayered over the raised parts is the same color as the cardstock and it really helps add "visual depth" to the project. 

Check back tomorrow to see how I added depth to the flowers on this card.

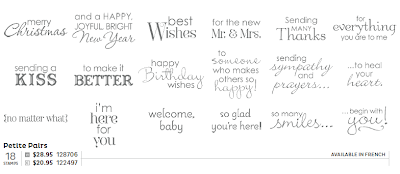
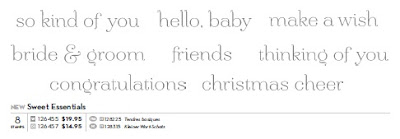
Do you like the Greeting?  Its from a set called Sweet Essentials. And by the way, this sentiment set is part of the June Grab Your Greeting promotion25% off on 3 sentiment sets:
1.  Petite Pairs
2.  Sassy Salutations
3.  Sweet Essentials

Stampin'UP!'s Petite Pairs stamp set.


Stampin'UP!'s Sassy Salutations Stamp Set
Stampin'UP!'s Sweet Essentials Stamp Set

Everyone needs a few good sentiment sets 

and when better to invest than during a sale!

sale ends June 30th - Order Your Greetings Here
Are you a Loyalty Rewards Customer? Each $25 purchase through my on-line website earns you a Reward PointCheck the details here.

Happy Stamping
--Katie


Monday, June 17, 2013

Grab Your Greating and Feature it

Monochromatic card made with Stampin'UP! stamp set: Sassy Salutations
Grab your Greeting and go!  This card was designed to feature the greeting. Doesn't it kind of look like that linen thread is underlining the words?  

The greeting is also "underlined" with the fancy cut edge and score line.  The cut was made with the Adorning Accents Edgelit die and the score line was made with the Adorning Accents embossing folder. If you are really good you could probably use a stylus and do the score line free-hand, but not me.  I'm glad Stampin'UP! has these matching products.

I also used variations of the same color so the colors wouldn't be a distraction. This is another way Stampin'UP! offers "matching products" - the fact that the colors of the papers match the colors of the inks. 

The words on this card are part of the Grab Your Greeting promotion this month.  Stampin'UP! is offering 25% off of 3 selected greetings in your choice of wood mount or clear mount.  Read more about this promotion here and Grab YOUR greeting before the sale ends.

Thanks for stopping by
--Katie


Sunday, June 16, 2013

Acrylic Block Spotted Background

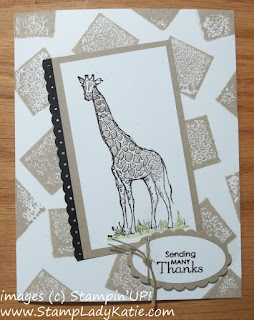
Acrylic block background stamping on a card with the giraffe from Stampin'UP!'s Zoo Review stamp set.
Isn't this the perfect background "animal print"? I love how it matches the spots on the giraffe.  It was super easy to do, I just randomly stamped a bunch of small brown squares. 

I don't own a square stamp, so I used my small acrylic block.  YES! you read right - acrylic blocks will pick-up and transfer ink. Click here to see more acrylic block stamping. Scroll past this post to see 6 more samples of Background Stamping with Acrylic Blocks.


Other details on this card:
The sentiment is from a set called Petite Pairs.  This set, by the way, is on sale right now, 25% off. Its part of the Great Greetings Promotion.  You can read more about the Greeting sale here

You can buy those greeting sets and all your Stampin'UP! supplies from my on-line store.

Thanks for stopping by
Happy Stamping
--Katie


Saturday, June 15, 2013

Papillon Potpourri Meets Paper Pumpkin Stamps

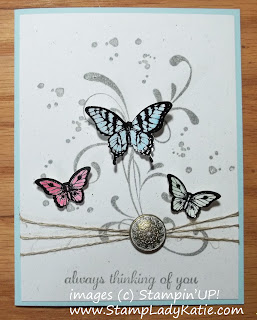
Card made with Stampin'UP! sets: Everything Eleanor, Papillon Potpourri and the splotches from the Paper Pumpkin Welcome KitDo you subscribe to My Paper Pumpkin?  Are you looking for a few additional ideas for using the stamps you get each month?  Here's a card I made using the "splotches" stamps from the Welcome Kit. I send out a monthly newsletter to my subscribers showing ideas for using the extra things in the kits.

Stampin'UP!'s Paper Pumpkin is a monthly subscription service.  Each month you get all the supplies for a half-hour of creative fun.  The kits don't really make pumpkins, what you get is everything needed to make cards, little photo journals or other  paper craft projects. You will need your own adhesive.

Everything is included: paper, ribbon, ink, stamps, stickers and other embellishments - along with an easy to follow photo of the project. You can make the project exactly as suggested in the photos or you can be creative and change it up any way you want.

These kits are a great way to slowly build up a set of stamps and little ink pads.  Each month you get a little 1" ink pad in one of Stampin'UP!'s great colors.  These 1" ink pads take hardly any room to store which is especially great if you you travel with your stamping. And of course DON'T throw them away when the ink is all used up because you can re-ink them just like you can re-ink the larger ink pads.

You also get a couple of little stamps each month so you can gradually build up a collection.  And you'll have other left-overs too, like extra ribbon or stickers.  So you can have even more creative fun using them with supplies you already have.   This card uses the swirls from a set called Everything Eleanor and the butterfly stamps from Papillon Potpourri  and a Stampin'UP! Antique Brad.

This card is made with the "splotches" stamps that come in the Welcome Kit. Each kit after your first month is a surprise. The projects could be cards or mini-albums or some other paper craft fun. But what you can be sure of is that it will be fun and easy and will be something you'll be proud to share with others. 

You can read more about the Paper Pumpkin monthly kits here or you can subscribe here. And to help the people who subscribe through me (Katie Johnson, Stoughton, WI) I send out monthly emails to my subscribers showing other ways to use the Paper Pumpkin extras. Like the card posted today.  

Thanks for stopping by
Happy Stamping
--Katie

Wednesday, June 12, 2013

Rounded Corners Add Pizzazz

Are you looking for a way to add a little pizzazz to your projects? One simple thing you can do is to round the corners of your design pieces.  Here's the difference it can make.

Compare square corners with rounded corners. Compare square corners with rounded corners.

Use a Circle Punch to round the corners.Its such a simple thing and it makes a very subtle difference. Hardly noticeable, just enough to catch the eye and make people look a little longer.

You don't need a special punch to do this, you can round your corners using a Circle Punch.  The diameter of the circle will change the size of the rounded corner.   I showed how to do this in a post a few days ago.

The Sentiment is on Sale! The sentiment on this card is from a set called Petite Pairs.  This stamp set is part of Stampin'UP!'s "Grab Your Greeting" Promotion.  25% off of 3 of the most popular Greeting Sets:
*Petite Pairs
*Sassy Salutations
*Sweet Essentials 

Thanks for stopping by
Happy Stamping
--Katie

Monday, June 10, 2013

The Best Things in Life - Feel Goods Sentiment

Wedding card made with Stampin'UP! Stamp set: Feel GoodsThe sentiment on this card is from a set called Feel Goods. My plan for this card was to use it as a thank-you to a dear friend but it ended up being a wedding card.

It worked as a wedding card for several reasons.
  1. the simple black and white gives a touch of elegance
  2. it sparkles! the butterflies were embossed with Iridescent Ice embossing powder
  3. The sentiment works! A good marriage is one of the best things in life!
So what is one of the best things in your life?  I used the same sentiment on a scrapbook page of my baby granddaughter.

Here is the project supply list for the card
Bitty Butterfly Punch
•Stamp Set: Papillion Potpourri
•Stamp Set: Feel Goods
Iridescent Ice Embossing Powder
And of course, white paper, black paper, a heat gun for the embossing and Versamark to stamp the butterflies for embossing.

You can get these supplies and all your Stampin'UP! products from my online store.

Thanks for stopping by

Happy Stamping
-- Katie


Thursday, June 6, 2013

Tip for Rounding Corners - Get the Most from Your Punches

I have a tip for you on how to get a little extra use from your circle punches. But first . . .

Have you been paying attention to Stampin'UP!'s Color Refresh for 2013?
Ten colors were retired and replaced with some of the more popular In Colors from past years.

The colors you see on this project are
Island Indigo  - -  Marina Mist  - - and Soft Sky

If you are wondering what you have that is current, or just want to see the gorgeous new color palettes you can

Stampin'UP! sells papers in both the 8-1/2x11 size and 12x12 for scrapbooking.

The standard card making size of 8-1/2 x 11comes as a package of 24 sheets for $6.95.  Or you can get an assortment package for each color collection.


Today's card is really simple to make.
Each color starts as a 1" square. Our 1" square punch makes this so easy!

To get the corners rounded you just stick opposite corners into a circle punch as shown here.

The black brads add balance for the sentiment.

Do you have your new catalog yet?  Contact me for your paper copy or you can download the PDF version here.

Happy Stamping
--Katie

Tuesday, June 4, 2013

Water Color: Inks and Paper

Today's post is about inks and paper.  The colors on this flower were added with an AquaPainter - which means the image was watercolored.  You can certainly use a regular paintbrush, but I like the control I get with the tips of the aquapainter. And the clean up with them is super easy.


Of course when you apply color with water you don't want the image to smear.  So the image must either be stamped in a non-water soluble ink such as Staz-On  or heat embossed.  On this card I heat embossed. I stamped the image in Black Ink and used Clear embossing powder. The added advantage of heat embossing is that it really makes the image "pop".

Use watercolor paper!  Watercolor paper is more porous and accepts the extra liquid better.  If you try to watercolor on standard white cardstock the water tends to bead up.

Other project details:
On a different note I'm happy to announce the winner of the Mystery Hostess Drawing we did last month.  The winner is Carole M. from Dousman.  Congratulations Carole. Watch for details soon about another Mystery Hostess event.

Happy Stamping
--Katie


Saturday, June 1, 2013

New In Colors for 2013-2014

Have you seen the new In Colors for 2013-2014?  Stampin'UP! is known for its color collections and how easy it is to match paper colors with ink colors and ribbons and buttons and brads and other bling.

Stampin'UP! colors are on trend We have 4 standard color collections: Neutrals, Brights, Subtles and Regals.  And each year Stampin'UP! introduces a new In Color collection of colors that match the latest fashion trends.

I am really liking this new In Color group. All 5 new In Colors are on this card along with the new Mosaic Punch and the little flower from the Bitty Punch Pack. Top down on this card:
  • Pistachio Pudding
  • Baked Brown Sugar
  • Crisp Canteloupe
  • Coastal Cabana
  • Strawberry Slush
There are lots of possibilities with these colors.  Beautiful spring pastels and baby cards. Gorgeous for summer flowers. Nice tones for fall foliage. And pretty combos for winter scenes. I can't wait to start playing.

I gave this card a bit of a 3D look by pulling up on the edges of the top flower. This flower is so tiny that I used Glue Dots to adhere them to the Mosaic Piece. I wanted to get a good strong adherence - one that would take the stress of my pulling for that 3D look. They're finished off with a self-stick rhinestone.

Do you have your new catalog yet?  Contact me to arrange delivery or view it on-line.

Happy Stamping
--Katie